Totenbeinli (Hazelnut Fingers)

image

I kept wanting cookies, but at the store I’d either forget or promise myself to make some at home, so at least I would have control over the ingredients. And finally I just had to make the time! I love hazelnuts, in an y form I can get them, and these cookies rely heavily on just that. It’s not juts the flavor, I guess it has as much to do with the memories. Of outdoor adventures and hikes with my family.

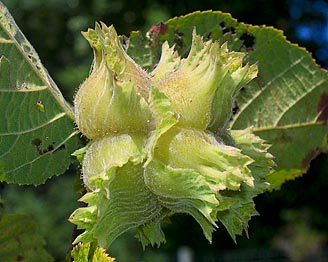
Memories of my Dad making flutes out of fresh sprouted hazel twigs in early spring, when the sap just started rushing back up from the roots to make the buds sprout and give life to the plant, then in the summer the nuts would still be green, not quite ripe yet, and we’d sometimes cut small branches  (they are perfectly straight) for grilling sausage over an open camp fire for lunch out on a hike, then in early fall, the nuts would start to turn brown inside their green frilly frock and you knew they would be ready soon!

The great thing about these cookies, just like biscotti, they keep for quite some time. That is, i you can keep from eating them. Since they are crunchy all the way through they don’t go hard and stale like chewy cookies often do, (then again maybe I just don’t eat those other ones quick enough?)

image

These can range from crunchy to totally hard, but they keep, like forever (or until someone with less self control finds out where they are kept). Sort of similar to a biscotti. As per my research (thank you fragtdenkoch.ch) apparently the strange name (Toten= Dead,  Bein=Bones) comes from a custom that was mentioned first around 1500, where these would be served after a funeral. People did not have much and would save luxury items such as sugar, hazelnuts and such things for special occasions, later lemon zest, cinnamon and cloves were added and the cookie is now often made during Christmas time.  Although I remember our local grocery store carrying these in big (maybe not for American standards 😉 ) 500 gr bags all year long. I have pretty drastically reduced the sugar from my original recipe, but I think next time I will try and use even less, they are still plenty sweet!

Oh and just today, I got the local bulk store to turn some hazelnuts into hazelnut butter for me, so watch out world, I can see more Hazelnut recipes in my near future 😉

image

Ingredients

  • 1/3 cup butter, unsalted, softened
  • 1 1/2 c sugar
  • 3 eggs, separated
  • 1/2 lemon, grated peel only
  • 1 tsp cinnamon
  • 1 dash ground cloves
  • 1 pinch salt
  • 3/4 cups unblanched hazelnut flour/meal/ground hazelnuts
  • 1 1/2 cups whole hazelnuts
  • 2 cups flour

image

Directions

  1. Toast hazelnuts for a few minutes, then place on a kitchen towel and rub until some of the skins come off, set aside
  2. Stir sugar into softened butter until well mixed
  3. Add 2 eggs and lemon zest, spices, salt and ground hazelnuts, then add flour.
  4. Once everything is well blended, add the whole hazelnuts and stir.
  5. Let rest in the fridge for 30 minutes
  6. Preheat oven to 380ºF
  7. On a flour dusted surface, roll out to a little under 1/2″ thickness and cut into 1/2″ by about 3″ pieces using a bread knife to get easily through the whole hazelnuts.
  8. Place cookies on a lined baking sheet and brush with the lightly beaten remaining egg, bake for 15-18 minutes or until golden brown and crisp all the way through.

imageMakes lots of cookies, but they’re eaten so quickly

image

Copyright © 2012 Simple Healthy Homemade. All rights reserved

Best way to cut up a pineapple

Stop buying those crazy gadgets, people!  There is, in no kitchen in the world, the need for a pineapple corer. Not only do you waste money on the tool, but you waste a whole bunch of yummy pineapple every time you cut one up. No No, nononono!
Here is a much better the best way to go about it, and all you need is a big cutting board, a bread knife (trust me, works the best) and, of course a ripe pineapple.
First you cut the ends off, like such…

image

Then proceed to slicing off just the outer layer, or most of the outer prickly layer…

image

Make sure you leave the prickly  ‘dimples’ in place, they provide a visual clue for the next step…

image

Notice how there is a patter to those ‘eyes’? Yes, they run in a spiral around your fruit. So cut out a few at a time, by holding the knife and cutting diagonally from one, then the other side of the dimples, so as to cut out a wedge containing the prickly bits.

image

And there is your pineapple! Imagine the waste if you had to cut down to the inner level and chuck all the rest?

image

The only thing left to do now is half, then quarter the pineapple, and cut the hard part off of the center as shown in the picture. Feel free to gnaw and chew on it, its yummy! You just can’t eat all of it, too hard.

And there you go. No more unnecessary waste!

Another thing I like to do, after the outer hard shell is cut off and discarded(since I don’t know where this little fruit’s been hanging around) get a pitcher and put all the diagonal/wedge cut pieces plus the center in it, fill with water and let rest a room temperature for at least 4 hours, then refrigerate. Makes yummy pineapple flavored water. Keeps in the fridge for 4 to 5 days.

Would be really yummy on some fresh cheese or yogurt…but we’ll have to make do with plain Kefir, since that’s all my fridge will give me at the moment…

Copyright © 2012 Simple Healthy Homemade. All rights reserved

Lighter Spinach Artichoke Dip

image

This proves that Spinach Artichoke Dip does not have to be a totally unhealthy indulgence. Well, it’s not quite diet food either, but besides being much lower in sodium than any restaurant version out there, this also has a lighter hand on piling on the fat calories and you get a good bit of veggies.

imagePlus you get waaaaaaaaaaayyy more Artichokes when you make it yourself 😉

imageMake extra, it makes a terrific layering ingredient to so many things     (like Fish Wellington, and Spaghetti Squash Bake)

Ingredients

  • 1 pack frozen chopped spinach (10 oz), thawed
  • 1 pack frozen artichoke hearts (9 oz), thawed or canned (if using canned, drain and rinse)
  • 1 clove garlic
  • 1/2 cup cottage cheese
  • 1/2 cup thick fromage blanc (or sour cream)
  • 1 cup Italian cheese blend, shredded (mine had 5 cheeses in it) + some for topping …sometimes when I am really hungry, I use 2 cups 😉

image

Directions

  1. Squeeze the defrosted spinach until mostly drained. set aside.
  2. Chop the artichoke hearts into small pieces (chunks are fine, just remember you have to be able to ‘dip’ it up)
  3. In  a pan, heat a tablespoon oil, then add the minced garlic and stir, cooking carefully until golden, but not brown.
  4. Add the Spinach, Artichokes and the Fromage Blanc, stir then add the cottage cheese and heat until it gets stringy.
  5. Add the Italian cheese mix, and heat until melted, pour into a serving dish or oven proof form and sprinkle with some more cheese, cover and allow the cheese topping to melt. Serve with veggies or corn chips for dipping.
  6. Can be made in advance, cover and refrigerate, then reheat in the oven at 350 until hot and melted, or microwave until hot.

image

Copyright © 2012 Simple Healthy Homemade. All rights reserved

Fromage Blanc

image

It took me years to figure out what the elusive desert ‘cheese’ was we had back home, it was called ‘Blanc Battu’ short for fromage blanc battu and it is delicious with some fresh berries! Helpful but uninformed people over the years suggested farmers cheese and friendship cheese, but nehh, not the same AT ALL. Turns out you can make it at home here in the US quite easily with ingredients that are not too hard to come by. * Happy  dance* ( In am doing that a lot lately, hmm)

Fromage Blanc culture is available from New England Cheese Making and the process couldn’t be simpler.

You need:

Milk, culture (see above) stainless steel cauldron (just kidding, you only need a pot) Thermometer, a colander and butter muslin. For a fresh and soft desert cheese (ok you can also drain it more and mix it with herbs or drop spoons full into your Spinach Salad, but if you leave it a little more moist it makes the best desert, and healthy too!) Again, for a fresh and soft cheese like this, the fresher the milk the better the cheese is going to taste. If you have access to a farm, where you can get yourself some raw milk that would taste the best. If you’d like to make it fat free or at least with less than the whole fat content, let your raw cow milk sit for 12 hours in the fridge, then skim off the layer of cream that forms on top (and make butter with it for example)

    • 1 gallon milk
    • 1 pack fromage blanc culture

image

Directions

    • In a large pot heat the pasteurized milk to 86 degrees.The best and easiest way to do this is by placing the pot in your sink and filling the sink with warm (not hot) water. (86°F isn’t all that hot…)

image

    • Once at temperature, sprinkle the direct set fromage blanc culture over top, let sit 2 minutes then stir and mix in well.
    • Cover and let the milk sit undisturbed at 72°F for 16 hours (you can do as little as 12 hours, but I have found I like the taste best after about 16), in the colder month you want to add some warm water to the sink every so often.
    • After the required time, you will have something like this, kinda like a thick yogurt consistency

image

    • Ladle into butter muslin lined sterilized colander and drain for 3-4 hours (if you are going for more of a cream cheese texture, you can let the whey drain out for up to 12 hours), scraping the sides of the butter muslin every so often if the cloth becomes clogged. (One trick to draining this properly is to hang the knotted cheesecloth from your kitchen faucet)
    • For true Blanc Battu, place the drained curd in a bowl and using your handheld mixer/egg beaters, beat until smooth.

image

I know I have mainly berry pictures, but it is super yummy on a nice piece of crusty bread with some chives sprinkled over

image

    • Use fromage blanc instead of sour cream in your favorite recipe or dressing.
    • Whey makes a terrific fertilizer for your plants: Unless you are going to use it for something else, don’t juts dump it, give it to your (indoor or outdoor) plants. The year I started making cheese, my fig tree had the most figs ever!

Copyright © 2012 Simple Healthy Homemade. All rights reserved

Sticky Rice with Mango (Khao Neeow Mamuang)

image

Sticky rice, also called glutinous rice (even though there is absolutely no gluten in rice) is eaten sweet as a snack or desert a lot of places in Thailand, in the northeast of the country it is also served along your meal, unsweetened of course. That rice finds its way into meals from breakfast to desert isn’t surprising for a country where rice is a main staple in the diet, after all the verb ‘to eat’ in Thai is tantamount to ‘to eat rice’

image

For me, nothing says Thailand more than getting a serving of sticky rice with mango from a small place off a street corner somewhere. Vendor’s specialize in this dish and often you will find a line of people when mangoes are in season. That’s what I look for 😉 where the locals eat, it’s always the best. It’s served with sweetened coconut milk and is just delicious! Back home I would order it at Thai restaurants any chance I’d get, but alas it was often unavailable due to seasonal availability and because, unfortunately the restaurant often thought that ‘common’ food was not what should be served to guests in their establishment. 🙁 Imagine my joy when a few years back, I finally figured out that this exotic desert was actually pretty simple and easy enough to make at home. Cheaper and available whenever the lovely grocery store carries yummy mangoes. Win & win! Now I just have to figure out how to make the taro desert I can only get in Thailand…

image

You need to start this several hours before you want to indulge, since the rice is first soaked, then steamed.

Ingredients

  • 1 cup sticky rice*
  • 2-3 ripe mangoes, cut into bite sized pieces
  • 1 can coconut milk (not the light kind)
  • 2-3 tbsp palm sugar

Directions

  • Soak the rice in cool water overnight or at a minimum 4 hours
  • Line a bamboo steamer with cheesecloth and over the sink pour the rice into it to drain. Fold the cheesecloth over the edges so it doesn’t hang down and catch fire (tried that, and no, it doesn’t improve the flavor). Cover with the steamer lid.image
  • Set your bamboo steamer over a pot or wok of boiling water, and steam until the rice is cooked and yields softly to the bite. It will have a tacky consistency, will be slightly shiny and the rice grains will stick together. Takes about 15 minutes.

image

  • In the meantime, gently heat 3/4 of the can of coconut milk in a sauce pan, add the coconut sugar and stir to dissolve.
  • When the rice is done, transfer to a bowl and add the rest of the can of coconut milk, stir to mix. Let stand a couple of minutes until evenly moistened, then serve with mango and sweetened coconut milk.

If I get a good deal on mangoes, like I did this week, (hence the mango cheesecake, and this) I will make a good batch of this and keep the rest in the fridge, to reheat as needed for a quick exotic snack or desert anytime 🙂

*You can get this type of rice at most Asian stores, look for glutinous rice, sticky rice or sweet rice. Regular rice won’t work. It comes in white as well as purple!

If you find you end up making this a lot, you can get yourself an authentic sticky rice steaming contraption at Importfood.com as seen in the picture to the right here. I so far have used my regular (Chinese) bamboo steamer with results that make me happy 🙂

Nomnomnom nom nom…image

Copyright © 2012 Simple Healthy Homemade. All rights reserved

Banana Chocolate Raw Pudding

image

There are days when chocolate is the only thing that will do. And today I had one of those days. To make up for it, there is nothing like treating yourself with something yummy, delicious even decadent! Yay, treat time! Decision made, but good things don’t have to be bad for you. And yes, you can have this even if you don’t eat sugar. The only sweetness comes from the bananas! Let them get nice and ripe  over-ripe brown, and you’re in business! Easy to make and guilt free too 🙂

image

Ingredients

  • 2 over ripe bananas, mashed with a fork
  • about 1/2 cup milk (dairy or almond)
  • 2 tbsp cocoa powder
  • 2 tbsp ground flax seeds
  • 2 tbsp chia seeds

Directions

  1. Mash the banana with a fork
  2. Add the milk, stir until well blended
  3. Add the cocoa powder, flax seed and chia seed and stir it all together until mixed
  4. Refrigerate overnight

image
Copyright © 2012 Simple Healthy Homemade. All rights reserved

Naturally Dyed Easter Eggs

image

With Spring arriving so early this year, my egg dyeing project will be so much easier! *dancing around in my kitchen* I remember a few years back, looking for anything that grew already outside, and short of some blades of grass I couldn’t find a thing. 🙁 But this year, even though it’s gotten cold again, I will be able to beautifully decorate my eggs, and naturally too, using items you could eat, well mostly (onion peels, anyone?), but nothing chemical or artificial. The colors we can make are just as beautiful, although not quite as bright or unnatural looking.

For this adventure, you will need some small leaves or flowers from outside. Clover, and fern leaves work well, as do wild violets. What you are looking for is anything small that will lie (mostly) flat, so a round, puffy flower like the pink one in ‘Horton hears a who‘ would not work well. If you are wondering, just what the heck is going on, it will all become clear soon, promise. You will also need some cheap stockings or pantyhose/tights, (or use the ones you were going to throw out, the ones with the toe hole, you know, some string and the ingredients for whatever color you choose to try!

This is how my Mom used to dye eggs with us, when we were little, and gathering the decorations outside is half the fun! And isn’t it awesome that you don’t have to worry about artificial colors getting into your eggs or tummy of your family members? What Easter traditions from when you were little do you remember and cherish?

image

For the onion skin version you need to first decorate your eggs with the leaves you gathered (Making them a little wet helps the leaves stick better), holding the leaf in place, stretch the tights/pantyhose over the egg, pinning the leaf in place, twist on the opposing side or bottom of the egg (The part where the nylon crimps will not get colored evenly) and tie with some string. If you are using the red beets or the turmeric, hard boil the eggs before then decorate once cooled down.

imageAll the eggs with stockings on and ready for their bath 😉

The easiest and my favorite first:

Onion Skins = Sienna/Reddish Brown (12 o’clock):

image

You need about 3 cups of dry onion skins. Surprisingly the red onion skins make pretty much the same color, so it doesn’t seem to matter which ones you use. Next year I will know not to eat red onions for a month to get red onion peels

    • To make the dye with onion skins: In a stainless saucepan, place a good 2 cups onions skins and 2 tablespoons of white vinegar in a quart of water and bring to a boil. Lower heat and simmer, covered, for 30 minutes.
    • Strain to remove onion skins and discard, and let dye cool to room temperature. (Don’t be fooled by the orange color.)
    • In a stainless saucepan, add the cooled strained dye and eggs at room temperature (up to 1 dozen). The eggs should be in one layer and covered by the dye.
    • Bring to a boil over medium heat. When boiling, reduce heat, and keep at a simmer for 10 minutes, turn off the heat and let eggs sit in the dye for an additional 2-3 minutes.
    • Dyeing time will be affected by the color of the eggs. Start checking for color at 12-15 minutes.
    • Remove eggs with a slotted spoon and cool on racks. The remove the stocking and leaves, rinse quickly and dry.
    • When they can be handled, you can coat them lightly with olive (or other edible) oil.
    • Refrigerate until ready to hide, or eat.

Turmeric = Yellow

image

Yellow you can get from Turmeric, use 2 tbsp per quart of water, bring to a boil and stir until the turmeric is all dissolved, then add the already hard boiled eggs. Mine did not get as yellow as I have seen this get. But I had tried to make them blue before, using red cabbage (it’s supposed to work) the color however was rather disappointing, more of a very faint barely visible pale sky blue, even after a looooong time in the brew, no real color and no more patience, and off into the yellow they went. Since they were already hard boiled and I did not want them to become, I don’t know, dusty and dry, I made the whole thing less hot and that combined with the faint blue made them a nice juicy yellow with a hint of green. very spring-like 🙂

image

Red Beets = Dusty Rose/Pinkish Color (on the left)

image

This one was a tad unsatisfying. You know how beets stain everything staring with your hands, the cutting board and the kitchen back splash if you drop them? Well, I expected a bit more from this one… Instead of boiling the chopped beets in water, I decided that beet juice would be a fantastic substitute, but after 5 hours in the fridge, the eggs still only had a dusty rose color.

image

The great thing about any of these natural colors is, that even if the egg cracks or the white takes on the color you dyed the egg, it’s perfectly fine to eat, since all the dyes are food material. Egg shells are porous and I am always concerned about the bright chemical colored eggs, and just how much of that might have gotten into the egg?

Overall I’d say onion skins give the most vibrant color and the best contrast. The turmeric would have been brighter yellow, had I either boiled the eggs in it ( I might try that next year) or at least had the ‘soup’ real hot to start. I might try the red cabbage again  too,  even if it is mainly because I don’t like being defeated, by cabbage. Maybe if I let the stuff sit overnight…

image

Copyright © 2012 Simple Healthy Homemade. All rights reserved

Mango Cheesecake

image

All Mangoes are not created equal.

What I am trying to get at here is, this is a very seasonal dish, not all mangoes will be up for the task at hand, and the kind you need for this cheesecake are not always readily available. First, the common grocery store variety, you know the big green and red ones are NOT going to work. I know. I speak from experience, I had to find out the hard way, as I happily agreed to bring a cheesecake to a good friend’s birthday party. Even blending cannot get rid of the stringy fibers inside that fruit and unless you’re a cat and you don’t mind getting hair between your teeth or you like getting hairballs…(And juuust on the off chance that you are, I bet your dinner guests might not )

The Mighty Mango, an infographic← Just to give you an idea, the Mango varieties out there are in the hundreds, if not thousands. Over 500 varieties are known in India, the largest producer of mango in the world.

Okay, so now that we know what not to do, let’s get to what you do need 😉 There’s a variety called Champagne or Ataulfo Mango, it’s smaller, flatter and oblong in shape and yellow. Indian grocers might be a good source, they also carry a shortcut item I’ll cover a bit later here. If you live in other parts of the world, you might be lucky and get your fingers on any number of varieties of tasty mangoes that would work, but in the US there seems to be not that much choice. So after you got yourself the perfect mango to make the cake, you will need to start the day before you want to eat this, since it requires to get chilled and set in the fridge overnight.

image

Ingredients

Crust:

  • 1 1/2 cups graham cracker crumbs
  • 2 tbsp sugar
  • 3/4 stick unsalted butter, melted

Filling:

  • 3 packets of cream cheese (8oz each), softened and brought to room temperature
  • 1/2 cup sugar*
  • 4 large eggs
  • 1 tsp vanilla extract
  • 2 cups pureed mango (from 4-5 Champagne Mangoes)*

*lazy version/or when the proper mango cannot be found: Get Kesar Mango pulp from an Indian Grocer, omit the sugar in the filling, since the canned Mango pulp is sweetened already. Works great and is less messy. Get 1 mango to decorate the top of the cake

Directions

  • Preheat oven to 325°F.
  • Butter a 9″ Ø Spring form pan.
  • To make the crust,  stir together crumbs and the 2 tbsp sugar. Add the melted butter and mix until evenly moistened. Then press crumb mixture into bottom of prepared pan (only bottom, not up the sides)

imageMake sure you pack the crumb crust down firmly. Push progressively more as the crust starts to hold together

  • Bake until set, 12 minutes, then cool completely
  • For filling, peel and chop mango, then blend until smooth
  • (If you turned off the oven and did this in two steps, preheat the oven to 325°F again.)
  • Mix softened cream cheese, sugar and vanilla in a large bowl until completely creamy and no little chunks remain.
  • Add eggs one at a time, beat well after each addition.
  • Add the mango puree, beat until well blended, then pour filling over crust into springform. Wrap bottom of springform pan in a layer of aluminum foil. Then bake until the edges are golden and puffed and the cake is set (it should only move very slightly when the pan is shaken gently, if the whole thing jiggles, it’s not set yet) about 1 hour and 25 minutes
  • Cool cake one hour. Refrigerate uncovered overnight.
  • Before serving, run a sharp thin knife around the edges of the pan to loosen cake. Remove ring. Transfer cake to serving dish and garnish with additional sliced magoes

Copyright © 2012 Simple Healthy Homemade. All rights reserved

Raspberry White Chocolate Oatmeal Quick ‘Cake’

image

This chewy little treat can be eaten as much as a quick breakfast, on those gray and cold days, where the snooze button is your BFF and your feet are deadly afraid of the cold floor outside the cozy covers. You could even try to tell yourself it is all healthy by serving it topped with some greek yogurt. Or you can just face the facts that everyone needs a treat sometime, morning or night, and enjoy it as a quick desert or snack bake anytime you need a ‘cheer me up’.  Very similar to the Snack Bakes shown here, it uses a ripe banana for sweetness, but I am splurging and adding white chocolate chips and some frozen raspberries that miraculously turned up in my freezer today 🙂 Isn’t is great when you find things you didn’t know you had? Like the $20 bill in the pocket of your winter coat when you take it out of ‘summernation’ (yes, I just made that up) in October

imageBecause heart-shaped things make me happy 🙂

Makes 2

Ingredients

  • 1/2 really ripe banana
  • 1/2 cup rolled oats*
  • 2 tbsp white chocolate chips,
  • 2 tbsp frozen raspberries * you can also use rolled quinoa or other rolled grains
  1. Grease 2 ramekins or other heat proof little bowls/forms
  2. In a larger bowl, mash the ripe banana with a fork, until it doesn’t look dry anymore.
  3.  Mix in the rolled oats, then add the chocolate chips and the frozen raspberries.
  4.  Divide among prepared ramekins, and microwave for 3-4 minutes, depending on the power of your device, until the top looks no longer moist and the sides pull away from the ramekin.  Like in the picture below. (Mine usually take 3 minutes)
  5. Let cool down before quickly eating all enjoying, whoever you are trying to hide these from will smell them anyway 😉

image

You can flip it over on a plate to serve or just eat with a spoon right out of the bowl after you have given it enough time to cool down a bit.

My ‘sweet seduction’ speed cooking contribution is ready in under 10 minutes! That should be an incentive to enjoy life and have desert, even after a long day or week!

Blog-Event LXXV - Speed-Cooking (Einsendeschluss 15. März 2012)

This is my contribution to a blog event over in the German speaking world of food blogs. Every submission has to be prepared in under 30 minutes, or the time it takes the average pizza delivery to get to you. Here is the whole list of all the goodies that can be made super quick! This sweet treat is ultra quick, and I am hoping it will sweeten up many a tired after work meal!

Nachwort auf Deutsch: Leider hatte ich keine Zeit den ganzen Beitrag auf Deutsch zu = Übersetzen, hier nur kurz: Oatmeal/Rolled Oats= Haferflocken, eine ‘1/2 cup/ ist etwa ein Deciliter, white chocolate chips= weisse Schokolade, in kleine Stücke oder Würfelchen geschnitten. Ich hoffe das diese kleine süsse Verführung hier manchen langen Tag erträglicher macht, wenigstens im Rückblick oder aber da man schlauerweise geplant hat, von wegen transportfähig und so 🙂 Einfach einpacken und mitnehmen!

Copyright © 2012 Simple Healthy Homemade. All rights reserved

Seed and Nut Cracker (grain free)

image

Seed or nut based crackers are yummy I daresay even addictive. But the price for a girl on a tight budget, is rather prohibitive… 🙁 So after tinkering in my kitchen (batch one and two shown here) batch 3 was the winner, hands down.

imagebatch one & two

You can make them square or round, depending on your preference. Square is a bit less work, but takes a little longer to get to that perfect crunchy state. For either one, flatten or roll out on the prepared cookie sheet (preferably lined with a silicon baking mat, that’s how I made them, if you don’t have one of those, at least use baking parchment) by covering with wax paper and rolling out, then peeling the paper layer gingerly from the top.

imagethe only downside? You could always eat more than there are left…

Ingredients

  • 1/4 cup cashews
  • 3 tbsp sun flower seeds, divided
  • 1/2 cup ground flax seeds (flax meal)
  • 1/4 cup ground almonds, natural not blanched
  • 1/4 cup quinoa flakes
  • 3/4 cup water
  • 3/4 tsp sea salt
  • 1 1/2 tbsp sesame seeds
  •  1 tbsp flax seeds, whole (golden or brown)
  • 1 tbsp butter or coconut oil, melted

Directions

  1. Preheat oven to 300°F
  2. Prepare baking sheet (if you are making these round, it will make two cookie sheets) by lining it with a silicone baking mat
  3. In a blender or a mini food processor, combine the cashew and 1 tbsp sun flower seeds, blend until it forms a coarse meal
  4. Add ground almonds, flax meal, and quinoa flakes and pulse until combined
  5. Add the water and salt, blend until well mixed
  6. If you have enough space in your mini processor, add the remaining ingredients and pulse 2-3 times, until mixed but not chopped.
  7. Round: drop onto prepared cookie sheet, 1 level teaspoon at a time, distancing about 1 12/” to 2″ apart, cover with waxpaper and roll out until less than 1/8″ thick, basically as thin as you can get it.
  8. Square: Scrape or drop dough onto cookie sheet, spread out, then cover with wax paper, and roll out super thin, (less than 1/8″ thick)
  9. Bake 30 minutes in the middle of the preheated oven, or until no longer soft and pliable. then finish baking another 5 minutes on the bottom rack
  10. Let cool before crunching away!

image

Copyright © 2012 Simple Healthy Homemade. All rights reserved