Pumpkin & Flax Seed Granola with Almonds

image

There are many, many versions of granola, and I have made countless of them in the past, but no matter how much I would tinker and change the recipe, I found that they would never get quite like the ones you buy in a box. Lately I was re-inspired to give it another try by seeing such yummilicious recipes as LightlyCrunchy’s chocolate granola (doesn’t that sound super delish?) and I am just intrigued by Leanne’s idea of using sprouted lentils for her granola recipe, on my list to try…
image

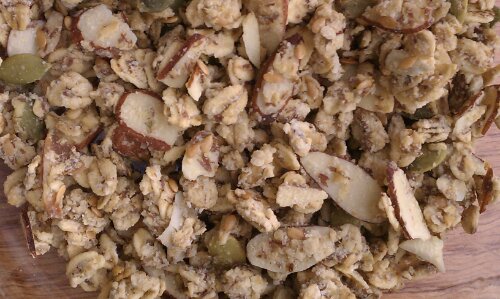
So back to my granola story. In the past they either got REALLY crunchy (and I know there are some at the store you better add to the milk or yogurt a good while before you plan on eating it, tried them too) or they are just flavored roasted rolled oats, yummy, oh yes, but what I am looking for are those clumps or clusters that are crunchy, yet you don’t lose a tooth biting into them if you decide to just grab a handful at random. So crunchy clusters that crunch apart when you bite them, if that makes sense. But I have never been able to replicate that, no matter how much I doctored the recipes, that is, at least not until now! (Maestro, drum roll please!) 

imageSee? Got the clusters I wanted!

Yes, I could just go on and buy some every once in a while (which is what I have been doing), when the urge overcomes me, but you see, besides being quite expensive, in my opinion, there are several problems with most granola. They either contain soy (I am staying away from soy, almost all of it in the US is gmo and besides, unfermented soy contains phytoestrogens, which I try to avoid. Phytoestrogens are plant based estrogen like compounds, and a lot of cancers are hormone fueled…) or soybean oil (or vegetable oil, same difference in the end), gluten, (which normally I have no issue with, but for allergy season, I mostly cut it out of my diet, and what do you know? My accupuncturist was right! Shhhht, but I have been with hardly any seasonal allergy symptoms this year!!!! Yes, I am going and knocking on some wood right now… ) So even though I generally am perfectly capable of eating gluten and have no (visible) symptoms or reactions to it, I know a lot of my readers have to watch it.

And lastly the sugar content upsets my apple-cart, (in the spirit of full disclosure, I admittedly have only a vague idea of what an apple-cart looks like… I am gonna have to google that one) I often wonder, why so awfully sweet? But the answer probably lies in the general over use of sugar and the resulting ‘taste immunity’ to the sweetness of it, so they keep having to add more to all the processed food so people buy theirs over the competition. Once you start moving towards eating cleaner, for starters, less stuff in boxes, less sugar (or better no sugar), you will start to notice the natural sweetness in say carrots or red bell peppers again.

Oh boy am I exited about this one! And the possibilities… can’t wait to play some more with it, I already got some trials running and some definite winners on flavor combinations coming up shortly!

And gosh, it smells so good, you’ll totally want to eat some while it is in the oven, but try and wait, totally worth it 🙂

image

Ingredients

  • 2 cups old fashioned rolled oats
  • 1/2 cup sliced almonds
  • 1/2 cup mixed pumpkin, flax and sunflower seeds
  • 1/2 cup brown rice flour
  • 1/4 cup quinoa flakes
  • 2 tbsp coconut oil
  • 1/4 cup rice syrup
  • 2 tbsp honey or agave syrup (you can start with 1/3 cup and transition down to 2 tbsp, if you still like things conventionally sweet)
  • 3 tbsp ground flax seed/flax meal
  • 6 tbsp water
  • 1 tsp vanilla extract

Directions

  1. Preheat oven to 275º F
  2. Mix oats through quinoa flakes in a large bowl.
  3. In a separate bowl, gently heat brown rice syrup, honey and coconut oil until liquid.
  4. Meanwhile stir water into flax meal, let sit 5 minutes.
  5. Add vanilla and flax mixture to rice syrup, stir then add to the big bowl with the oat mixture. Stir until evenly moistened.
  6. Spread on a lined cookie sheet and bake at 275º F for 15 minutes, stir, bake another 10 minutes then stir again, and bake another 10 minutes. Cool on the baking sheet
  7. Let cool completely before storing so it has a chance to crisp up.

The only downside to this is it makes me want to eat some every time I look at it…

imageCopyright © 2012 Simple Healthy Homemade. All rights reserved
Finnish Rhubarb Bake

image

This is adapted from an old recipe handed to me by a friend in school who was from Finland. I have made changes to it over the years and adapted the dairy products to something more readily available here in the States.

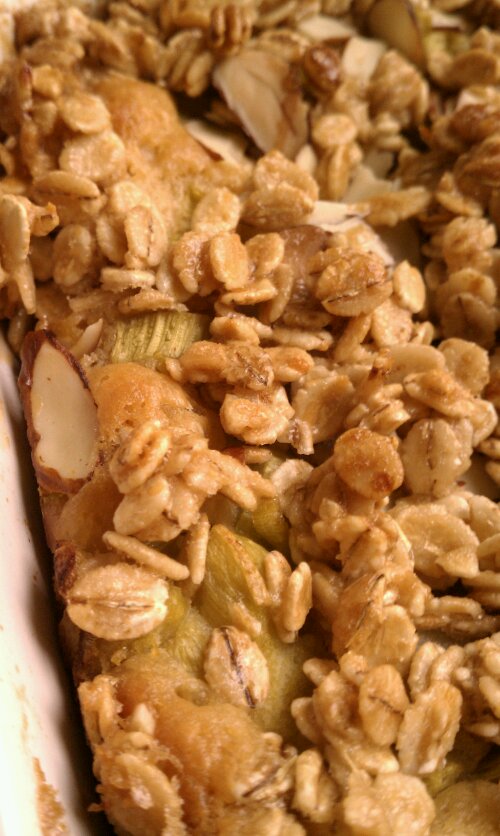
You bake it in a Lasagne type glass dish (9×13″) or using several smaller ones works as well. The resulting cake is moist, tart and sweet at the same time, and the topping makes for an awesome textural contrast. Soft rhubarb and crunchy almonds. Yum.

image‘Budget Version’ made with Oats

This year my garden has not yet produced a ton of rhubarb, it might still be too young, the stalks are nowhere near the size of what my parents have in their garden, but I had enough to make pie, for the first time this year! So I am extra exited, I love tart things and when I was a kid, when we’d cut up and clean the extra amount to prep it for the freezer, I would sneak a piece or two here and there. Yep, raw, no sugar just like that. I am weird, I know 😉 Depending on the amount of rhubarb your garden (or your neighbor’s garden or farmers market ) gives you, you can add more or less (adjust the sugar down if you use less rhubarb, or up of you like it sweet and you use extra stalks). Just make sure you don’t too drastically reduce the sugar, rhubarb is quuuuuuite tart. I have tried it, and it was not so fun. :S

I also tried greek yogurt instead of sour cream, don’t bother. Unfortunately the savings on the side of fat calories do not justify the flavor you lose by doing so. It’s a treat, so treat it as such. There just aren’t any shortcuts for some things, *sigh*

image

Ingredients

  • 4 eggs
  • 2/3 cup sugar
  • 2 sticks butter, melted, separated
  • 1 1/4 cups sour cream
  • 2 1/2 cups flour
  • 2 tsp baking powder
  • 5 stalks of rhubarb, washed peeled and chopped
  • 2 cups sliced almonds or rolled oats
  • 1/4 cup + 2 tbls light brown sugar

Directions

  1. Preheat oven to 400ºF
  2. Butter a 9″x13″ glass dish (adjust baking temp and time if using metal or ceramic)
  3. Mix eggs and sugar, then add the sour cream and stir until well blended
  4. Stir in 1 stick of melted butter, then add the flour and baking powder
  5. Pour dough into prepared form, top with the chopped rhubarb
  6. Mix remaining molten butter and brown sugar, then stir in the almonds or oats, whatever you are using (Oats will be cheaper)
  7. Spread over the rhubarb in the baking dish
  8. Bake for 30 to 35 minutes or until tester inserted in the center of pan comes out clean.

imageCopyright © 2012 Simple Healthy Homemade. All rights reserved

Chocolate Coconut Rounds

image

There they were, sitting timid in the middle of my fruit basket trying to pretend they were not there. Overripe bananas, like the poor step child in an old fairy tale. Since I only like to eat them when they are still a little green, these brown things in my fruit basket are definitely not my thing. But over time I have come up with various ways to use them up, using them for smoothies, pancakes or baking, after all they do provide a great source of natural sweetness without adding sugar. And yes, I have to admit before I did that, sometimes they would get thrown out. So that’s why they are scared. But fret not bananas, I have something yummy to turn you into 🙂

What do you do with your past prime bananas? Any favorites?

This recipe is grain and sugar free, the only sweetness comes from the banana, so it isn’t your traditional cookie, if you like things sweet, you might want to add 1/4 cup of sugar or some stevia. These are more like a piece of 70% cocoa chocolate, flavorful but just subtly sweet.

image
And without further ado here is how to make them:

Ingredients

  • 1/2 cup egg whites (about 4)
  • 2 ripe bananas, mashed with a fork
  • 2 cups unsweetened, shredded coconut
  • 1 cup ground almonds, natural not blanched
  • 6 tbsp cocoa powder
  • 1/4 cup almond butter (cashew butter or other nut butter would work as well)
  • 1 tbsp coconut oil
  • 1 tbsp coconut flour
  • 1 dash of salt

Directions

  1. Combine shredded coconut, ground almonds, coconut flour and cocoa powder in a bowl
  2. Add the mashed bananas
  3. Melt the coconut oil together with the almond butter and stir until smooth, add to bowl
  4. Add the egg whites
  5. Mix until everything is fully incorporated
  6. Divide dough into two portions and between wax paper, work each one into a roll of about 1 1/2” to 2″ diameter.
  7. Place in the freezer for about 1 hour or until nice and solid.
  8. Preheat the oven to 350°F
  9. Remove one roll from the freezer, and slice into rounds 1/2″ to 3/4″ thick, place ona  lined cookie sheet and bake for 15 to 20 minutes.
  10. In  the meantime, repeat the same with the other roll.
  11. Let the rounds cool down on the cookie sheet for 5 minutes before removing to a cooling rack.

image

Copyright © 2012 Simple Healthy Homemade. All rights reserved

Basler Brunsli

image
Basler Brunsli – ‘Basler Brownies’ – Swiss Christmas Cookies

Holidays are getting closer and no matter what your faith, we all like to celebrate and in line with that, prepare special foods and treats (Oh yeah!)  We share meals and we share time with family and friends.

So does it come as a surprise that coming from Switzerland, I would have treats involving chocolate? Probably not. But maybe it will stun you to known that these contain absolutely no butter, (and no, I did not replace it with margarine or some other fake stuff), are gluten and even grain free, and that the only fat in them comes from the ground almonds (and cocoa)? How is that for a healthy treat? (Now that said, it still IS a treat, almonds though containing healthy fats, still are fatty)

A “Fähri” (small passenger ferry) setting across the Rhine opposite the Münster Cathedral in Basel

Basel, on the cross roads of Europe, has long been a center of trade from exotic spices and tea to more mundane items, and having a traditional cookie involving chocolate and other luxury goods, isn’t surprising. So here adapted for the american kitchen: Basler Brunsli

Did you know?

  •  “Dark chocolate”, also called “plain chocolate” or “black chocolate”, is produced by adding fat and sugar to cocoa. It is chocolate with zero or much less milk than milk chocolate. The U.S. has no official definition for dark chocolate but European rules specify a minimum of 35% cocoa solids.[2] Dark chocolate can be eaten as is, or used in cooking, for which thicker, more expensive baking bars with higher cocoa percentages ranging from 70% to 99% are sold. Dark is synonymous with semisweet, and extra dark with bittersweet, although the ratio of cocoa butter to solids may vary
  • “Hershey process” milk chocolate is popular in North America. It was invented by Milton S. Hershey, founder of The Hershey Company, and can be produced more cheaply than other processes since it is less sensitive to the freshness of the milk. The process is a trade secret, but experts speculate that the milk is partially lipolyzed, producing butyric acid, which stabilizes the milk from further fermentation. This compound gives the product a particular sour, “tangy” taste, to which the American public has become accustomed, to the point that other manufacturers now simply add butyric acid to their milk chocolates.

Ingredients

  • 1 1/4 cup sugar
  • 2 1/2 c ground almonds/almond flour, unblanched
  • 1/2 tsp cinnamon
  • 2 tbsp tapioca starch (or cornstarch)
  • 2 egg whites
  • 3 1/2 oz extra dark or cooking chocolate, melted (use Lindt chocolate if available)
  • 2 tbsp cocoa powder
  • 1 tbsp Kirsch (optional; a clear Cherry Brandy)

Directions

  1. In  a big bowl, mix the first four ingredients.
  2. Beat egg whites until stiff peaks form (being careful not to overwork, you can only do this once)
  3. Add to the bowl with the almond mixture. Carefully fold in the beaten egg whites.
  4. In the meantime, melt the chocolate: Break into smallish pieces and either melt in a double boiler with a tablespoon water or (and this is the easier way) place in a bowl, cover with warm water and microwave at 30 second increments until the chocolate is soft and molten, then carefully pour off the water and stir smooth. Let cool slightly (so as not to cook the egg whites) then mix into the ingredients in the bowl.
  5. Refrigerate overnight or at least for several hours to firm and chill the dough
  6. Roll out on sugar (or sugar mixed with ground almonds) to about 1/2″ to 1/4″ thick.
  7. Cut out shapes using your favorite cookie cutter, place on lined baking  sheet and bake at 480°F  for 4-6 minutes (mine were perfect at 5) (if you bake them too long, they will get rock solid when cold)

image

Check out the post on more Swiss Christmas Cookies to try other varieties

Copyright © 2011 Simple Healthy Homemade. All rights reserved
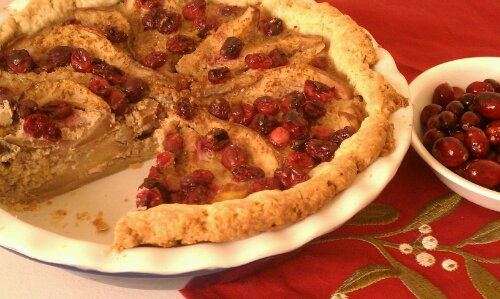
Pear Cranberry Almond Tart

image

Looking through my collection of recipes, I realize I bake a lot. Well, I do love my oven, so there’s that. It’s nothing fancy or anything but its GAS. And it bakes the best bread, and pies, and tarts, and muffins and lasagna. 🙂 I love baking, did I mention?  And since cooking with gas, I will never, ever want to live in any place I cannot cook with gas (alright, if the choice is living in a house with an electric stove or living under a bridge…, but short of that)

And on to another fall/winter treat…

image
Can you tell I got a good deal on pears recently? After shopping the local farmers market at the end of the day on Saturday, I suddenly found myself with bags of produce that now needs to be eaten. As for pears, it’s a race against time, as they are only at that ‘perfect ripe but not mushy’ state for so long, or should I say, so short. Sometimes it really seems like that window is measured in minutes not hours. So what’s a girl in possession of 12 pears to do? Well I made this, twice. And this deep dish pie uses another 6, so doing pretty good overall.

image
I also have been on a quest for the perfect pie crust recipe and am trying out different ones to see what to add or subtract from my two standard go to recipes in order to make a perfect and foolproof everyday crust. But more on that after the study has been completed.  😉 Here I used an amazing flaky, slightly sweet, all  butter crust.

image

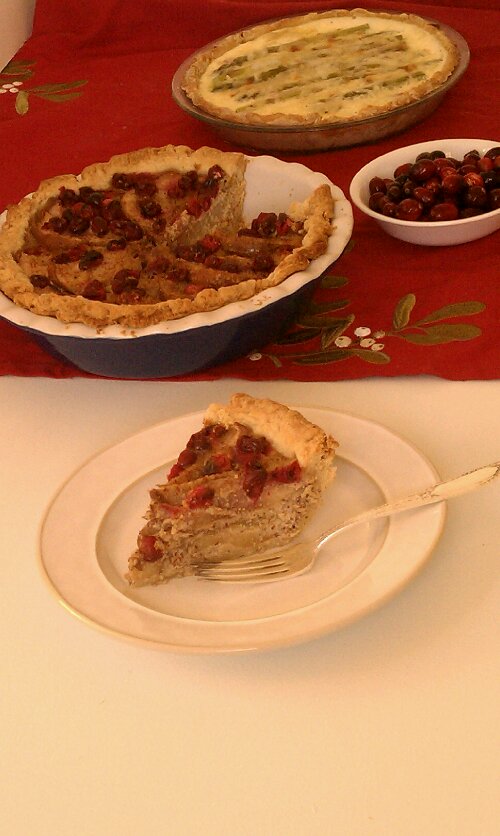
So for this seasonal recipe besides using the abundance of pears in my kitchen, I used some cranberries. I think that the tartness of the cranberries very nicely offsets the sweetness of the ripe pears, but you could just as well leave the cranberries out. Almond and pear are a natural match and a lot of fancy French pastry draws on that flavor combo, you can do the same here, just easier.

imageFresh in the oven

You will need a Deep dish pie plate

Ingredients

  • Single pie crust (home made or store bought, your choice)
  • 6 medium pears * see note
  • 1 cup cranberries
  • 3/4 ground almond
  • 2 eggs
  • 1 cup almond milk (or dairy, if you prefer)
  • 1/3 cup sugar (i used coconut/palm sugar)
  • 1 tbsp coconut flour (you could use cornstarch instead)
  • 1 tsp almond extract (you could also use vanilla)

* note: I used pear the size of your fist, like the ones that come in 3lb bags at the grocery store; if you use bigger ones, you might need less

Directions

  1. Roll out pie crust about 1-2″ bigger than the pie dish. Fold crust in half and in half again to easily transfer it to the baking dish. Refrigerate
  2. Preheat oven to 400°F
  3. In a bowl or 4 cup measuring cup, mix the eggs, sugar, ground almond and almond milk. Then  add the coconut flour and the almond extract. Beat with a fork until well mixed.
  4. Wash pears and cut in half, core and cut each half into 4 slices (you should have 8 slices per pear)
  5. Remove crust from refrigerator, arrange pears in circles into the crust, layering the cranberries in between (or if you almost forget like me, just put them over top the pear before it goes in the oven). You should end up with two layers of sliced pear.
  6. Pour the filling over the pears into the pie pan, doing circles as you pour to distribute evenly
  7. Bake for about 35-40 minutes or until the filling is set and not liquid any longer.
  8. Serve warm or at room temperature!

imageand that’s light Asparagus Quiche in the background

Copyright © 2011 Simple Healthy Homemade. All rights reserved