Lazy ‘South of the Border’ Soup

image

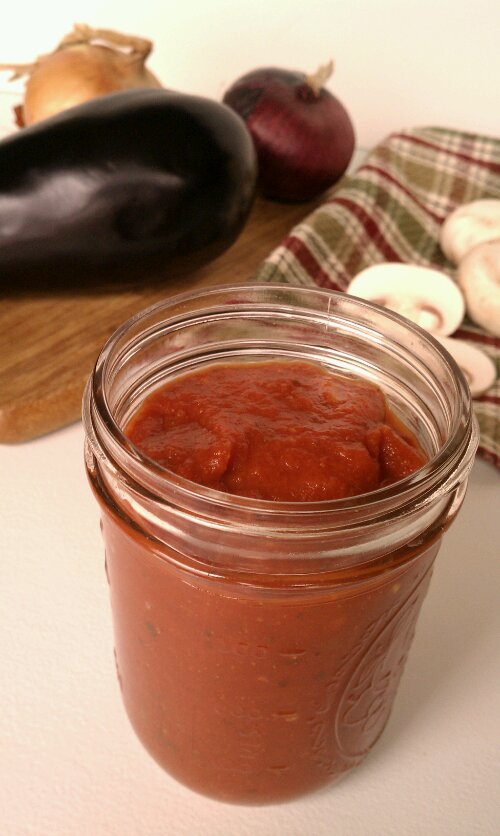
You’re wondering on the lazy part here? Well it all started out with me not feeling like doing much but having to eat like everybody else. So from what I had on hand, I concocted a soup, and here is the real lazy part about it: using up half a jar of tomato sauce that was leftover from a ‘quick-take-to-a-friends-house-Lasagna’. Even I, who make most everything from scratch, (often including tomato sauce) do have some jars of good store bought sauce on hand. A word of caution here: Read the labels, I never buy any jarred sauces with sugar or cornstarch or vegetable protein or really anything other than what you would put in it at home. Lets face it, when is the last time you reached for that soy isolate or sprinkled some monosodium glutamate on your food? Alright then, you might not want to eat that I am guessing. I am even weary of ‘spices’ as they can legally stick all kinds of stuff in there under that label, but I am getting off the subject here.

image

Where were we? Lazy, oh yes, so I made a soup for a cold winter day when the soul is longing for some sunshine but you really don’t want to put a lot of thought or energy into the food making process…

image
I added spices and peppers, eggplant and cumin, and I had a name picked out and everything! Life was great. Until I bit myself eating the soup three (yes, 3) times!!?  Montezuma apparently misunderstood the title, I mean it was in English and all…          ‘Lazy Mexican-soup‘ there, happy?

Well I do have to say, I ate all the rest of the soup and no more biting myself…

image

Ingredients

  • 1 medium red onion, diced
  • 4 ribs celery
  • 1/2 medium eggplant, cut into cubes
  • 1 lb campari tomatoes (they are about ping-pong ball sized), quartered
  • 1 red bell pepper, diced (optional: roasted)
  • 1/2  a jar Marinara (Spaghetti) Sauce (about 12oz)
  • 1 tbsp cumin seeds, whole
  • 1 tsp marjoram, dried
  • 1 tsp oregano, dried
  • 1 tsp chili powder, medium or hot, depending on taste
  • 2 tsp chipotle powder
  • 1/2 tsp ground white pepper
  • 2 tsp salt
  • 2 qts plain beef stock (for vegetarian option, use vegetable broth)

Directions

  1. If you are roasting the red pepper: Spread the peppers on a line baking sheet and roast in a 400°F oven until blackened in spots. (You can do this alongside other vegetables, like while making the cumin roasted carrots) or alternately, place under the broiler with the door ajar until some brown spots appear.
  2. Add some oil to a large stockpot, add the diced onion, stir and then cook until softened and browned in parts.
  3. Add the celery, eggplant and cumin to the pot. Cook for about 2 minutes, then add the tomatoes, pepper and all the spices. Stir and wait about 1 minute until adding the broth so the spices have toast a bit and time to release their flavor.
  4. Add the Marinara Sauce and bring to a boil.
  5. Cook until the vegetables are tender, about 8 to 10 minutes. Enjoy!
See? It doesn’t get much easier, lazier or cheaper than that!

image

Copyright © 2012 Simple Healthy Homemade. All rights reserved

Chocolate Balls

image

Schockolade Kugeln – Chocolate Balls – Swiss Christmas Cookies

You’re not surprised that a lot of Swiss cookies involve chocolate, are you?

This is another no butter recipe. It has an intense chocolate flavor and no added fat (only fat in here is from the almonds, eggs and cocoa powder). And as an added bonus, it just so happens that it is gluten-free, tadaa!

At first I was going to translate the name of these into bullets, as in ‘death by chocolate (bullet)’ but was musing on the whole Christmas and Peace on Earth concept and thought that would seem kinda wrong, but nevertheless they are intensely chocolatey!

image

Ingredients

    • 3 eggs
    • 1 1/2 cups sugar
    • 1 3/4 cups cocoa powder (I used a mix of extra dark and dutch processed)
    • 3 3/4 cups ground almonds (sometimes called almond flour)
    • 2-3 tbsp tapioca or potato starch

Directions

    1. In a big bowl, mix eggs sugar and cocoa until liquid and frothy looking
    2. Add the almonds and the starch and mix until, uniformly incorporated
    3. Chill dough for a few hours (if it’s cold enough where you are, put it on the balcony like we did in Switzerland, if not the fridge works well too)
    4. Form into walnut sized balls between your hands, (being careful to keep your hands cool), and place on a lined baking sheet.
    5. Let the formed balls dry overnight, or to speed up the process, you could also place the whole cookie sheet in the freezer for at least 1 hour.
    6. Bake in a preheated oven at 480°F for 3 to 5 minutes. The balls should only crack slightly
    7. Let cool on the baking sheet for 5 minutes before transferring to cooling rack.

image

Check out the post on more Swiss Christmas Cookies to try other varieties!

Copyright © 2011 Simple Healthy Homemade. All rights reserved

Lighter Asparagus Quiche

image

Asparagus Bacon and Cheddar, what better combination could there be? Oh I know, a crispy pie crust to encase it all. A Quiche in this country a lot of times feels like an ‘egg pie’ to me, which can make it pretty heavy and rich. So for this recipe I only used 1 egg, and by adding greek yogurt, we up the protein content without adding a ton of fat or weighing down the filling. Serve with a big salad for a light lunch or dinner or with a side salad as a first course for a leisurely, sit down dinner.

image

Okay so after all that pretty talk, here’s the truth: I made so many different traditional Swiss cookie dough recipes (you know, for Christmas I get homesick if I don’t have ‘my’ cookies), that I ran out of eggs, well, besides the one used here. So I had to make due with what I had on hand: 1 egg, flour/pie crust (there’s always pie crust), asparagus and some odds and ends.

Well, as so many times, when you find yourself in a tight situation, it leads to the discovery of something much better than expected…

image

Ingredients:

  • Single pie crust
  • 1 lb asparagus
  • 1 oz Speck *, diced
  • 2 oz Gruyere (or cheddar), grated
  • 1 cup milk
  • 1 egg
  • salt to taste
  • 2 heaped tbsp Greek yogurt

Directions

  1. Preheat oven to 380°F
  2. Roll out pie crust 1″ bigger than pie pan, fold to place into pan, and roll edges under to make a thicker edge.
  3. Mix milk through Greek yogurt
  4. Cut any hard ends off of asparagus, then place them into the crust in two layers, the second layer at a right angle to the first. Break any asparagus that are too big into smaller pieces
  5. Distribute the Speck over the asparagus, then pour the milk egg mixture over everything, and sprinkle with the grated cheese.
  6. Bake in the middle of the oven for 35-40 min
  7. Serve hot or warm

*often translated as bacon, it however has much more meat than fat on it, but plain old bacon would do as well, just have the butcher cut you a thick piece you can then dice into cubes)

Serves 4 as a lunch/light dinner, or 8 as an appetizer.

image
Copyright © 2011 Simple Healthy Homemade. All rights reserved

Pear Cranberry Almond Tart

image

Looking through my collection of recipes, I realize I bake a lot. Well, I do love my oven, so there’s that. It’s nothing fancy or anything but its GAS. And it bakes the best bread, and pies, and tarts, and muffins and lasagna. 🙂 I love baking, did I mention?  And since cooking with gas, I will never, ever want to live in any place I cannot cook with gas (alright, if the choice is living in a house with an electric stove or living under a bridge…, but short of that)

And on to another fall/winter treat…

image
Can you tell I got a good deal on pears recently? After shopping the local farmers market at the end of the day on Saturday, I suddenly found myself with bags of produce that now needs to be eaten. As for pears, it’s a race against time, as they are only at that ‘perfect ripe but not mushy’ state for so long, or should I say, so short. Sometimes it really seems like that window is measured in minutes not hours. So what’s a girl in possession of 12 pears to do? Well I made this, twice. And this deep dish pie uses another 6, so doing pretty good overall.

image
I also have been on a quest for the perfect pie crust recipe and am trying out different ones to see what to add or subtract from my two standard go to recipes in order to make a perfect and foolproof everyday crust. But more on that after the study has been completed.  😉 Here I used an amazing flaky, slightly sweet, all  butter crust.

image

So for this seasonal recipe besides using the abundance of pears in my kitchen, I used some cranberries. I think that the tartness of the cranberries very nicely offsets the sweetness of the ripe pears, but you could just as well leave the cranberries out. Almond and pear are a natural match and a lot of fancy French pastry draws on that flavor combo, you can do the same here, just easier.

imageFresh in the oven

You will need a Deep dish pie plate

Ingredients

  • Single pie crust (home made or store bought, your choice)
  • 6 medium pears * see note
  • 1 cup cranberries
  • 3/4 ground almond
  • 2 eggs
  • 1 cup almond milk (or dairy, if you prefer)
  • 1/3 cup sugar (i used coconut/palm sugar)
  • 1 tbsp coconut flour (you could use cornstarch instead)
  • 1 tsp almond extract (you could also use vanilla)

* note: I used pear the size of your fist, like the ones that come in 3lb bags at the grocery store; if you use bigger ones, you might need less

Directions

  1. Roll out pie crust about 1-2″ bigger than the pie dish. Fold crust in half and in half again to easily transfer it to the baking dish. Refrigerate
  2. Preheat oven to 400°F
  3. In a bowl or 4 cup measuring cup, mix the eggs, sugar, ground almond and almond milk. Then  add the coconut flour and the almond extract. Beat with a fork until well mixed.
  4. Wash pears and cut in half, core and cut each half into 4 slices (you should have 8 slices per pear)
  5. Remove crust from refrigerator, arrange pears in circles into the crust, layering the cranberries in between (or if you almost forget like me, just put them over top the pear before it goes in the oven). You should end up with two layers of sliced pear.
  6. Pour the filling over the pears into the pie pan, doing circles as you pour to distribute evenly
  7. Bake for about 35-40 minutes or until the filling is set and not liquid any longer.
  8. Serve warm or at room temperature!

imageand that’s light Asparagus Quiche in the background

Copyright © 2011 Simple Healthy Homemade. All rights reserved

Corn Free Baking Powder


If you are allergic or sensitive to corn, it can be quite a hassle eliminating all products containing corn or corn derivatives. It juts so seem since it is a heavily subsidized crop, it’s in everything or made into something that is in everything. Baby Carrots for example, are processed using citric acid, in this country made mostly from corn (ever notice how they are softer than regular carrots? Ever wonder why?) Somehow, besides adding substances that corn sensitive people react to, it seem to alter the GI (Glycemic Index, how fast carbohydrates in a particular food elevate your blood sugar), my guess is by breaking down some of the plant tissue by ‘cooking’ it with citric acid. I have heard from several diabetics that their blood sugar goes through the roof after snacking on baby carrots, but regular carrots are fine. Stay away from them.

But I’m going off on a tangent here. When I first started paying attention to the ‘corn in everything’ issue (my boss at work with is allergic to corn) I realized that baking powder is made with cornstarch, who would have thought?

So after some research, I have found this recipe that you can make yourself if you can’t find a corn free baking powder recipe (there are a couple out there I hear, but pretty hard to find)

Here’s what you need:

  • Baking Soda
  • Cream of Tartar
  • Rice, Tapioca or Potato starch (depending on quantity you’re planning on making)

From my research, I found many similar recipes and have compiled the info here for y’all. Basically you need an alkaline ingredient and an acid salt, and an inert ingredient to keep the two from reacting until you want them too.

More technical stuff, if you care, if not skip to the recipe, I won’t be offended 😉

Cream of tartar is the common name for potassium hydrogen tartrate. Grapes are the only significant natural source of tartaric acid, and cream of tartar is obtained from sediment produced in the process of making wine. Cream of tartar is obtained when tartaric acid is half neutralized with potassium hydroxide, transforming it into a salt. Sodium bicarbonate reacts with the potassium hydrogen tartrate,  causing the release of carbon dioxide (the bubbles that make the cake rise)

I even found the chemical reaction, but let’s skip that and get on with the program.

And as per my research, if you don’t add the inert starch, it will become rock solid (haven’t tried that, if you do let me know if it really does, I am infinitely curious)

For just a small quantity:

If your recipe calls for:

  • 1 tsp baking powder:         use 1/4 tsp baking soda, 1/2 tsp cream of tartar
  • 1 1/2 tsp baking powder:  use 3/8 tsp baking soda, 3/4 tsp cream of tartar

Or to keep on hand:

  • 1/4 cup cram of tartar
  • 2 tbsp baking soda
  • 2 tbsp potato, rice or tapioca starch

Store just like you would for store bought baking powder.

Copyright © 2011 Simple Healthy Homemade. All rights reserved

Super Muffins

image

I wanted to make muffins that taste good and you don’t have to feel super guilty about eating six, four, one.  Not like I did that or anything…

Here’s the result, mightily loaded with chia (protein, omega-3 & fiber, essential minerals like phosphorus, manganese, calcium, potassium and sodium) and flax seeds (omega-3), coconut (medium chain triglycerides are more likely to be used as energy than stored as fat), sunflower seeds (essential fatty acids, B1, B5, magnesium, manganese and various other minerals) and ground almond (monounsaturated fats, vitamin E, fiber, B complex vitamins and essential minerals)

While I am in no way suggesting you should live on these, they have nutritional value versus just empty calories, which makes me happy.

image

Super as in mighty good and good for you too, yummo!

Ingredients

  • 1 3/4 cups all purpose flour
  • 1/3 cup sugar (sucanat, coconut sugar or regular)
  • 1/2 cup ground whole almonds
  • 2 tsp baking powder
  • 1/2 tsp baking soda
  • 1/4 cup coconut, unsweetened
  • 2 tbsp chia seed
  • 3 tbsp raw sunflower seeds
  • 2 tbsp flax seeds (brown or golden)
  • 2 tbsp ground flax seed
  • 1 cup milk
  • 2 lg eggs

Directions

  1. Preheat oven to 400F
  2. In a bowl, combine all the dry ingredients (up to ground flax seed)
  3. Add the milk and eggs, mix just until all the dry ingredients are incorporated, (do not over mix or the dough becomes tough)
  4. Drop into paper lined muffin cups and bake at 400F for 15-20 minutes or until golden brown and a tooth pick inserted comes out clean.
  5. Let cool in the muffin pan for 5 minutes before removing individual muffins to a cooling rack.

image unbaked…

image…baked!

Okay, maybe I did have like 5… had to make sure they were really, really good before I posted it. You know, I am looking out for you guys 🙂

Copyright © 2011 Simple Healthy Homemade. All rights reserved

Pear Vanilla Butter

image

Lately I have just been feeling like changing things. From putting summer clothes away, ‘Tiffany-ing’ my bathroom windows,

image

and just generally fixing up and changing things around the house. Home Depot has been my friend (if not my wallet’s…) and I will soon be the proud owner of a real garage door opener! Hey, it only took four and a half years of living here, but now in the winter, in the snow or rain, I can actually use my garage for what it was meant for. Right now I have to leap out of the car, unlock the garage door, (had to get a separate key chain for that), open it, run back to the car and drive in = Completely useless when it pours as it literally takes less time to run to the front door. Yay! Can’t wait 🙂

I also have been thinking about adding a tile back-splash in my kitchen, currently debating on colors.

image
But here’s what I’ve come across looking for some paperwork filed away in a box in the basement… I though I ate it all, but there it was: Pear Vanilla Butter, 2008.

I have been waiting forever, ok maybe not, almost two weeks, to share this with you. It was inspired by a recipe in a cook book on preserving, but for the love of me I can’t find where it was. Luckily I had jotted down some notes and can therefore (hopefully * I was saying a prayer here*) recreate it. Trust me, it is totally worth the time spent. It is the smoothest, most delicately flavored preserve you will ever make! If the best and most beautiful parts of fall turned into a single food, it would be this elegant and sophisticated jam! Move over pumpkin and apple! ( At least for a little while)

image
I vaguely remember the original recipe saying something about ‘keeps for 3 months’, but this little gem I found smells and tastes just like I remember and while I won’t recommend you try this at home, it seems perfectly fine to me (if this is the last post on this blog, you’ll know why 😉 )

Ingredients

  • 4 lb pears, peeled, cored and diced
  • juice of 3 lemons
  • 1 1/4 cups water
  • about 5 1/2 cups sugar
  • 1 vanilla bean, slit open

Directions

  1. In a large pan, combine pears, water, lemon juice and vanilla bean. Bring to a boil, cover and simmer for 10 minutes, uncover pan and continue cooking for another 15-20 minutes, or until the pears are very soft.
  2. Remove vanilla bean and gently scrape out any seeds into the pan, using the rounded tip of a knife.
  3. Using a submersion blender*, and puree. You could also use your blender or food processor. Then press the resulting puree through a fine meshed strainer into a bowl.
  4. Measure puree into a large pan, adding  1 cup warmed sugar for every 2 cups of puree.
  5. Stir mixture over low heat until the sugar dissolves then increase the heat and boil for 15 minutes or more, stirring, until mixture becomes a thick puree and holds its shape when a little is spooned onto a cold plate.
  6. Spoon boiling pear butter into small, sterilized jars, being careful not to get burned, leaving 1/2″ head space. Immediately seal. After cooled off, check for seal, label and store in a cool, dark place for a minimum of 2 days before serving for flavors to blend.
  7. Keeps for 3 months, refrigerate once opened.

image

Close up.. Mmmmh see the Vanilla seeds?

image

Copyright © 2011 Simple Healthy Homemade. All rights reserved.

Grain Free Lasagna

image

Ahhh Lasagna! The whole house smells good after you make one of those…

image
Earlier this year, when I was plagued by seasonal allergies, I had been experimenting with a gluten free diet, at the time, I made some Lasagna using rice pasta, you could not even tell the difference!But I was ready for something new, so when I picked up some fantastic looking eggplant, zucchini and mushrooms, at the farmers market and walked past various types of squash, including spaghetti squash, (not ready for that one yet), inspiration hit me, a light came on and I heard a voice. Nonono no, not quite, but I said to myself, “what happens, if I just plain and simply leave out the pasta completely, replace it with thin slivers of veggie instead?” The result is not only gluten free, it is also almost Paleo 😉 (There is cheese, milk and potato starch in it, sorry folks) BUT it’s 100% grain free.

For a vegetarian version, replace the meat with diced zucchini, eggplant and shredded carrot. Adjusting the skillet time accordingly.

image

First I made a meat sauce, using homemade tomato sauce, ground bison and mushrooms…
image

Ingredients

  • 1 medium eggplant
  • 2 small zucchini
  • olive oil
  • 2 to 2 1/2 cups homemade tomato sauce (or good quality store bought)
  • 8 oz button mushrooms, cleaned and sliced
  • 1 lb ground meat (I used bison, but beef or turkey would work as well)
  • 1 med onion, diced finely
  • oregano  and basil(dry or fresh)
  • 2 tbsp butter
  • 2 tbsp potato starch/flour
  • 2 1/2 c milk
  • 1/2 tsp salt
  • 2 cups shredded mozzarella cheese

image

Directions

  1. Using a mandolin slicer, slice eggplant and zucchini into lengthwise thin ribbons (this is what you will be using instead of the pasta sheets). Set aside
  2. In a large skillet, heat a tbsp olive oil, add onion and cook over medium until softened, not browned, about 5 minutes.
  3. Add the sliced mushrooms, cover and cook on medium low until the mushrooms are starting to soften.
  4. Then add meat to skillet and cook, breaking up pieces with a fork until not pink anymore.
  5. Add tomato sauce and oregano and basil (depending on the sauce you choose, you might need less or more, suggestion for dried spices is 1 tsp oregano and about a tbsp basil), stir until mixed well and heated through. Set aside
  6. To make the Béchamel Sauce:  Heat 2 tbsp butter in a medium sauce pan over medium low until melted, add in 2 tbsp potato starch, stir until incorporated
  7. Whisk in milk and salt, and stirring continuously, bring sauce to a simmer (don’t turn up the heat, this should be done slowly), and simmer for 3-5 minutes until thickened. (Use when still warm/hot)
  8. Assembling the Lasagna: Using either one 9×13″ glass dish or several smaller ones ( I like to use dishes that are 2-4 servings and freeze several, for a quick week night dinner or lunch) start by spreading some meat sauce over the bottom of the dish, then a layer of eggplant or zucchini, followed by 3/4 cup of Béchamel sauce, a handful of mozzarella, another layer of vegetables (either zucchini or eggplant, I kept doing one layer zucchini, one layer eggplant, but you could mix and match), repeating the meat sauce and Béchamel/cheese layers, finishing with a layer of Béchamel and the rest of the mozzarella.
  9. Store in the fridge until ready to bake for dinner or bake right away: Preheat oven to 350F, bake in the middle of the oven for 30-40 minutes or until bubbly and the eggplant and zucchini are soft, when pierced with a knife. (Adjust baking time, if not storing in the fridge first)

image

image

Copyright © 2011 Simple Healthy Homemade. All rights reserved.

Roasted Salmon with Coriander-Paprika Glaze

Our Sunday night ‘still hanging on to summer’ dinner 😉


Salmon is one of those cold water fish, high in Omega-3’s, we all know by now we’re supposed to have more of ‘those ones’ in our diet, but how to go about it?

Last Weekend I created this quick and easy recipe that can be whipped up in a minute with minimal effort. And let’s face it, I haven’t met anyone that could not use another 10 minutes recipe! That’s how simple this roasted salmon is to make, although it tastes and looks like you labored in the kitchen for a lot longer 😉 And who doesn’t like to get some easy earned praise?

Ingredients

  • 2 pieces of salmon, about 3-4 oz each
  • 1 tbsp lemon juice
  • 1 tbsp olive oil
  • 1 tbsp whole coriander seeds, crushed in a mortar
  • 1 tsp honey
  • 1 tsp paprika (sweet)
  • 1/8 tsp salt

Directions

  1.  Crush the coriander seeds in a mortar or use a spice mill
  2. Combine lemon juice, olive oil and honey in a small bowl
  3. Add coriander, paprika, and salt, and stir well until incorporated
  4. brush the salmon fillets all over with the glaze and bake in the middle of the preheated oven at 400F for 10 minutes, or until opaque through, brushing tops one time at 7 minutes (10 minutes should be all it takes, unless you have an exceptionally fat pieces of fish)

You could use any extra glaze as seasoning for roasting red bell pepper slices alongside the salmon like we did here…

image

or just have the salmon with some grilled eggplant and hummus spread!

either way: make it.  It’s super yummy!

Healthy Carrot Cake

image
image

The last couple of days I have been thinking about home (the old home, where I was born and where I used to live) maybe it was brought on by roasting and eating those amazing chestnuts the other day, who can say? Anyway, we have a lot of regional specialties in Switzerland and this recipe pays homage to a Carrot Cake from the region of Aargau, and juuust in case any of you are into linguistics, the name of the dish I am going after is ‘Aargauer Rüebli Torte’. In my recipe, there is no butter or oil in the cake batter, there is limited amount of sugar compared to most regular muffin or cake recipes, hardly any flour and it can be made gluten free. It’s moist crumb is achieved without the addition of fat, in fact the only fat in it, comes from the egg yolks and the ground almonds used. Still it’s cake, it’s a desert and should be enjoyed as such, in moderation 😉 Not saying this would be a good idea, but it’s quite a way to sneak some veggies past certain people called kids 🙂

image

For simplicity reasons, you can also make muffins (simplicity, because you don’t have to try to come up with believable stories on where the missing piece of cake went 😉

image

Ingredients

  • 1/2 cup + 2 tbsp sugar
  • 5 organic eggs, seperated
  • 1 pinch salt
  • 2 tbsp warm water
  • 1/2 lemon peel
  • 1 lb carrots
  • 2 cups ground almonds, natural, not blanched (also known as almond flour)
  • 1/8 tsp allspice
  • 1/2 tsp cinnamon
  • 1/2 cup + 2 tbsp flour (use oat flour to make it gluten free)
  • 1/2 tsp baking powder

image
egg yolks , and sugar: looking dark yellow to start…


image
…and light in color after stirring

Directions

  1. Mix first four ingredients in a bowl and stir until light in color and airy
  2. add lemon peel
  3. Shred the carrots on the fine side of a grater into the egg mixture
  4. add the cinnamon and allspice, stir to combine
  5. in a separate bowl, beat the egg whites  until soft peaks form, add on top of the mix
  6. sprinkle the ground almonds on top
  7. sift flour and baking powder over top and gently incorporate the almonds, egg whites and flour.
  8. Fill into prepares 8″ spring form pan ( or grease muffin cups, you can use paper liners, only bake 25 minutes) and bake at 350 F for 50 minutes, or until tester comes out clean.
  9. After cooled completely, coat top of cake with sifted confectioners sugar, and marzipan carrots. Or make a white glaze by mixing  1tbsp lemon juice, 1-2 tbsp water and 1 1/2 cups of confectioners sugar until mixture coats back of spoon evenly. Spread over entire top and sides of cake.

image

By the way: My boyfriend, who was very adamant about not liking carrot cake, never having liked carrot cake, finally agreed to try a tiny piece, after my: ‘this is not your typical extremely sweet american carrot cake, just saying. But, alright, more for me!’ Well, he revised his opinion, in his own words: ‘OMG, this is delicious!’

image

Copyright © 2011 Simple Healthy Homemade. All rights reserved.