Lighter Asparagus Quiche

image

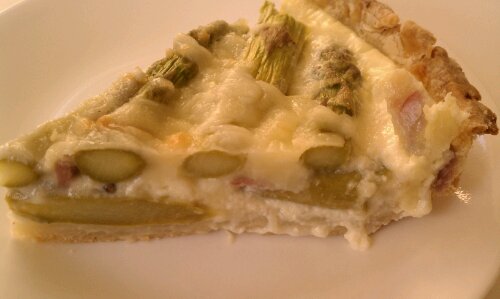
Asparagus Bacon and Cheddar, what better combination could there be? Oh I know, a crispy pie crust to encase it all. A Quiche in this country a lot of times feels like an ‘egg pie’ to me, which can make it pretty heavy and rich. So for this recipe I only used 1 egg, and by adding greek yogurt, we up the protein content without adding a ton of fat or weighing down the filling. Serve with a big salad for a light lunch or dinner or with a side salad as a first course for a leisurely, sit down dinner.

image

Okay so after all that pretty talk, here’s the truth: I made so many different traditional Swiss cookie dough recipes (you know, for Christmas I get homesick if I don’t have ‘my’ cookies), that I ran out of eggs, well, besides the one used here. So I had to make due with what I had on hand: 1 egg, flour/pie crust (there’s always pie crust), asparagus and some odds and ends.

Well, as so many times, when you find yourself in a tight situation, it leads to the discovery of something much better than expected…

image

Ingredients:

  • Single pie crust
  • 1 lb asparagus
  • 1 oz Speck *, diced
  • 2 oz Gruyere (or cheddar), grated
  • 1 cup milk
  • 1 egg
  • salt to taste
  • 2 heaped tbsp Greek yogurt

Directions

  1. Preheat oven to 380°F
  2. Roll out pie crust 1″ bigger than pie pan, fold to place into pan, and roll edges under to make a thicker edge.
  3. Mix milk through Greek yogurt
  4. Cut any hard ends off of asparagus, then place them into the crust in two layers, the second layer at a right angle to the first. Break any asparagus that are too big into smaller pieces
  5. Distribute the Speck over the asparagus, then pour the milk egg mixture over everything, and sprinkle with the grated cheese.
  6. Bake in the middle of the oven for 35-40 min
  7. Serve hot or warm

*often translated as bacon, it however has much more meat than fat on it, but plain old bacon would do as well, just have the butcher cut you a thick piece you can then dice into cubes)

Serves 4 as a lunch/light dinner, or 8 as an appetizer.

image
Copyright © 2011 Simple Healthy Homemade. All rights reserved

Pickles

image

Swiss or German pickles, yes, German-speaking, mine are smart, they can talk. Haha, no, but they are different from what is served here in Pennsylvania (can’t speak too much for other parts of the country since pickles are not usually high on my list of local fare when I travel 🙂 ) But since I am not a big fan of dill, personally thinking it goes well with fish and fish dishes, and should remain there… needless to say, the classic ‘Dill Pickle’ is not my thing.

I will move my sandwich to higher ground to avoid cross contamination with pickle juice, if I was served a pickle after all (If I remember, I usually ask for it to be left off)

Where I am from, pickles are sour. Period. Yes, there are spices used, but none is so dominant that it overpowers all others. We like balance (or close to). Go figure we’re neutral, ha!

So after not eating pickles (besides cornichon) for years, finally the revelation came to me: ‘Make them yourself, it can’t be that hard.’ And it isn’t, in fact it is less work than making jams or preserves.

And now, since I waited the required week to allow the flavors to blend, and I tried the result… Finally, Ladies and Gentlemen, the moment you’ve all been waiting for (drum roll): I am sharing what I did and how to go about it!

image
You can see the deviant pickle jar in the back left. I used carrots to completely fill the jar. Have not tried that one yet…

Ingredients

  • 4 cups apple cider vinegar
  • 4 cups water
  • 1/4 cup pickling salt
  • 20-25 pickling cucumbers, not waxed

Per Jar: (use quart size wide mouth jars)

  • 1/2 tsp yellow mustard seed
  • 1/8 tsp brown mustard seed (for pretty)
  • 1/8 tsp whole coriander seeds
  • 3-4 black peppercorns
  • 1 bay leaf
  • 1-2 small garlic cloves, peeled
  • 1-2 pieces of shallot (a piece here is about the size of a small to medium garlic clove)

Directions

  1. Bring water in a water bath canner to a boil, sterilizing the jars by cooking for 10 minutes.
  2. In a sauce pan in simmering water, sterilize the lids.
  3. In a large sauce pan, heat the water, cider vinegar and salt, stirring until salt dissolves. Bring to a simmer
  4. Scrub cucumbers and remove jars from water. Empty the water back into the canner,  fill jars with the cucumbers, then add the spices to each jar. Fill with vinegar mix, leaving a 1/2″ head space. Center a lid on top and secure with a band. Repeat with remaining cucumbers and jars, when all are sealed, place on canning rack and lower into the boiling water of your water bath canner. Process for 10 minutes, then turn of the heat and let sit in the water another 5 minutes, then gently remove the jars and place on a heat proof surface*, careful not to shake or tilt the jars
  5. Wait till next day to check for seal, place any jars that did not seal properly in the fridge and consume those first.
  6. Wait one week before eating.

*The best way for me is to place the jars on a big wooden cutting board, since they have to sit undisturbed for a week, I can move the whole lot of them without having to tilt and jiggle the jars

Makes 4-5 quart size jars

Copyright © 2011 Simple Healthy Homemade. All rights reserved.

Zucchini Griddle Cakes or Latkes

image

We all know someone who’s over productive zucchini plant fed the whole neighborhood.
One year, the seed company had messed up, and the Charantais Melon seeds turned into zucchini plants… And unfortunately for us ( and our relatives and neighbors) that was in addition to the 3 zucchini plants my parents purposefully planted. In their defense, this was when zucchini were still a fairly new thing to grow for the home gardener in my area.
We had zucchini steamed, filled, grilled, stewed, we gave a way zucchini, and after we could no longer get excitement out of people, we left them on their door step and tip toed away… We learned, after having 6 plants that summer… Have since never had more than 1 maybe 2 plants. I could not eat or smell zucchini for literally years. Thank goodness, I have since then recovered from my zucchini overdose and can happily eat it again. And here is one of my fun new ways of using up that bounty of summer, or since now it is early fall, maybe just conjure up that a last feeling of sun kissed earth!
image

Ingredients

  • 2 cups shredded zucchini
  • 1/2 cup Quinoa flakes
  • 2 Eggs, beaten (or for began option: flax seed ‘egg’ = 1tbsp ground flax seed, 3 tblsp water, let sit 3 minutes)
  • 2-3 tbsp chopped Onion
  • 1 tbsp chia seed (optional)
  • 1/2 tsp salt

image

Make them!

  1. Mix zucchini, onion and beaten eggs until combined.
  2. Add quinoa flakes, chia seed and salt, stir to incoropate.
  3. Drop by the heaped tablespoon into a heated skillet, flatten out each blob (yep, that’s a scientific term) to 1/4″ thickness.
  4. Cook until golden brown, flip over adding more olive or coconut oil to the pan, as needed.

They can also be baked instead.
Heat oven to 375 F and cook about 8 minutes per side.

Makes about 8. Serve them as a side or a savory breakfast.

Hmm, maybe I will try the rest with salsa…
image

They are light and I almost want to say fluffy, and the pictures DO NOT do them justice…

Copyright © 2011 Simple Healthy Homemade. All rights reserved.