Cranberry Orange Cream Scones

image

After happily taking the frozen cranberries out of the freezer, I came to the realization that there was no butter. None. Desperation set in as, how were those cranberries going to find their way into scones, if there wasn’t any butter to be had? 🙁 I even checked the corn-butterer, you know that little square contraption that fits a stick of butter for the purpose of easy application to a corn on the cob? But nope, I came up empty. And if you have ever looked up any recipes for scones, you know they all include a minimum of 6 tablespoons of butter, often more. I could have gotten out of my comfy-cosy pants and gone out into the dark December night to find me some butter…

image

However that really wasn’t my plan, especially once I discovered it was raining. So here is my solution, I used cream instead, plus a  bit of coconut oil. So instead of a traditional scone recipe with lots of butter and cream, just cream. I think it’s a fair trade-off. They are were very yummy too, but judge for yourself, don’t just take my word for it. You know you want to, you know you have some cranberries in the freezer. Come on, it’s okay, just do it. And takes no time at all! By the time you have the dough mixed, the oven is just getting hot enough!

image

Ingredients

  • 2 cups flour
  • 1/4 cup sugar + 1 tbsp raw sugar for sprinkling
  • 2 tsp baking powder
  • 2 tbsp coconut oil
  • 1 egg
  • 1 cup cream
  • 1 cup frozen or fresh cranberries
  • 1 tsp orange extract/orange essence

Directions

  1. Preheat oven to 400ºF  (200°C) and prepare a baking sheet
  2. Mix flour through baking powder
  3. Add oil, egg, cream and orange essence, stir to combine.
  4. Stir in cranberries.
  5. Drop dough by the 1/4 cup full onto the lined baking sheet, sprinkle the raw sugar over top and bake 22 to 25 minutes (cut time down if your cranberries are not frozen, try 16-18 minutes) or until slightly browned on the bottom and golden on top.
  6. Cool on a wire rack and enjoy!

Makes about 12

image

Copyright © 2012 Simple Healthy Homemade. All rights reserved

Cheesy Cornbread Muffins (gluten free)

image

We all know those people that won’t touch anything that says healthy in any of it’s conjugations, and since these days gluten free is in the news a lot, that get’s lumped into that same ‘healthy’ category and they won’t touch it. In their minds for some reason, healthy equals not tasty. But let’s face it, just because you have to adjust your diet, or want to change the way you eat, you do not have to go without and you certainly don’t have to deprive your self. You’re not going to last in your new healthy lifestyle, if you constantly feel that you are forced to live on dungeon food of moldy bread and water. But I digress, we were talking gluten free, which for some can be a healthy choice  for others it is a must (due to various digestion and auto-immune response issues).

image

When people first transition from a SAD (Standard American Diet, funny how that works out) to a gluten free life, it can be confusing and disheartening. And let’s take kids for example, they often refuse things that taste different from what they are used to or have a different texture. And frankly some of those gluten free products out there taste just a little better than saw dust, and probably just as good for you. Not that I would know what saw dust tastes like, but I imagine it to be pretty close to that. But trust me you can live a full and healthy life without gluten, without having to go buy the saw dust bread that the grocery store carries or for that matter even set foot into that section of the store.

image

Yes, you may have to eat different things, but you certainly have a whole host of choices out there, especially if you are a bit more open minded about what you put in your mouth. For one, there are numerous other cuisines out there that do not rely as heavily on wheat and wheat products as the western diet does. In many Asian countries you could eat all day without running into gluten, many Mexican dishes are gluten free. Many dinners you make at home are already gluten free. And, as I always repeat, make it yourself and you control what goes in it. Some unexpected items have wheat derived gluten ingredients, some salad dressings for example, so read the labels or make it yourself. And if you make corn bread or corn muffins, you get to decide what flour and how much butter you will put in. Gluten free baking can be a bit tricky at first since gluten is what makes the bread have the characteristic holes, well to be exact the gluten forms a sort of ‘web’ that traps the gas and creates the holes. So gluten free flours just don’t do that. And the texture often suffers accordingly, which brings me back to the picky eaters… Well you’re in luck, you can now have corn bread to have with your chili! The texture when they come out of the oven is so light and airy I almost called them corn souffle muffins. Trust me, no one will be able to tell they are gluten free!

image

Ingredients

  • 6 oz Neufchatel Cheese (1/3 less fat cream cheese) softened
  • 1 cup sour cream
  • 3/4 cups milk
  • 1 1/2 cups cornmeal
  • 1/4 cup potato flour ( or use your gluten free flour mix of choice)
  • 1/4 cup tapioca flour ( or gluten free flour mix)
  • 1 1/2 tsp xanthan gum
  • 2 tsp baking powder
  • 1/2 tsp baking soda
  • 1 cup grated Mexican cheese mix or cheddar
  • 1 or 2 tbsp sugar
  • 1 egg
  • 1/2 tsp salt

image

Directions

  1. Pre heat oven to 375ºF and prepare muffin tins (line with paper or grease well)
  2. Stir the softened cream cheese until smooth, then add the sour cream, milk, egg and sugar and stir to combine.
  3. Mix the dry ingredients, cornmeal through baking soda, add the salt then add everything to the bowl with the cream cheese mixture. Stir until blended, adding a little more milk if dough is too thick.
  4. Last mix in the cheese.
  5. Fill your muffin cups (makes about 12 standard size) and bake in the pre heated oven for 20 to 25 minutes or until golden brown and tester comes out clean.
  6. Have them with campfire chili , snowstorm venison chili or as snacks anytime

imageOh and  Remember this? I finished it! Finished and ready for gifting! On to new shores…

image

© 2012 SimpleHealthyHomemade

Thai Beef Salad to go

image

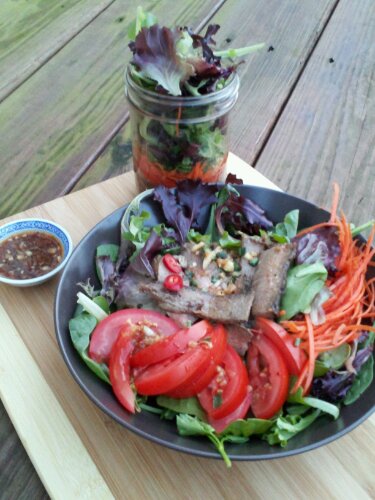
Last Tuesday it snowed and today it’s 65F! Crazy weather for a 4th of December. If I were back home, I’d be making ‘Grättimännli’ tomorrow, so they are ready for December 6th, and it was a firm plan, but how could I follow through when it is SUMMER outside? So instead I am going to mix things up and post a take along salad recipe. Most folks don’t eat badly because they want to, but because they fail to plan. With this series of recipes I am hoping to help you battle the lunchtime rush and have some healthy options on hand. I was going to start with a winter salad, something that can be warmed up, since I am not a huge salad eater in the winter, but seeing that it is summer today…

image

You need a two or four cup glass mason jar per serving. The jars seal well, are BPA free, re-usable forever and stack the salad items so the dressing stays away from the more delicate items until you’re ready to eat. For this one I suggest extra greens, beyond what fits the 2 cup jar. So either pack them in a little bag or go for the bigger jar (added weight). Take a fork along, shake it up and eat right out of the jar (bigger jar only), or bring a bowl and you have a fantastic lunch everyone will be eyeing.

image

Ingredients

Dressing (makes enough for 3 servings)

  • 1 tbsp garlic (about 1 clove), minced
  • 1 tbsp ginger, finely grated
  • 1 tsp dark sweet soy sauce
  • 1 tsp sesame oil (this is the oriental kind, it’s dark)
  • 1 tsp sambal oelek
  • 3 tbsp fresh lime juice (about 1 lime)
  • 2-3 tbsp Thai fish sauce ( I prefer tiparos brand)
  • This will make enough for 2-3 servings

Per Jar you will need:

  • 1/2 cup thinly sliced grilled steak
  • 1/2 medium tomato, cut into wedges
  • 2 tbsp julienned carrot
  • 2 packed cups of greens (spring mix, romaine or anything hardy works well)
  • some sliced chillies and crushed peanuts as topping (optional)

image

Directions

Make Dressing: Mix all ingredients in a small bowl and stir until well combined. Store any leftover dressing in the fridge and use within a week.

Then make the jars:

  1. Into each jar layer the ingredients in the following order: the steak, then pour 4-5 tsp of dressing over top, follow with tomato wedges, carrot, and greens.
  2. Top with some chilies if you like to spice up your life and crushed peanuts if desired. Close the lid and store in the fridge until ready to go!

Note: The dressing makes enough for 2-3 servings, so why not make dinner, and a jar for tomorrow? Or have a side salad with dinner and make 2 jars for y’all to take to work.

image


© 2012 SimpleHealthyHomemade

Chickpea and Rosemary Soup with Pasta

image

We woke up to the quiet of the first snow. It started snowing sometime during the night and by this morning white was blanketing the fields and trees and keeping the birdies busy coming to the feeders all day. Since there was much laundry and computer work to be done today, soup always is favorite. What am I saying, soup always is a favorite anyway and the past couple of weeks, Tuesday has turned into a soup day, and we get to benefit from the big spoils for the rest of the week. Doesn’t it make any meal more special if you start with a small bowl of soup?

Oh well, here I go again with my justifying soup eating. Frankly, soup is one of the easiest things to make. Period. You can make soup even if you think you have nothing in the house. Last week I made a creamy cauliflower soup, all it used was a half a head of cauliflower, some onion, broth and half a red pepper that needed to be used, for a little splash of color. Any vegetable hibernating in your fridge can be used, leftovers can be added. And if you have beans in the freezer and some stock, you’re set, really.

Today’s simple soup was not based on leftovers but pantry staples. And there are a few options and changes that are easy to implement. It uses one can of diced or stewed tomatoes, which you then blend smooth in your blender, but you could also use your own tomatoes, or leftover spaghetti sauce. In fact I have made this with half a jar of Vodka sauce before, and it was fantastic (cut down on the cream/ half&half) And even though you are adding about a cup of cream or half and half, at 8 servings, you are talking about 1 to 2 tablespoons of cream per serving. Less than most put in their coffee, so go spoil yourself and use real cream, like I did. And since you are adding Parmigiano to the soup, you could also use up the cream you skimmed off your raw milk and then didn’t do anything with, and now it has been a week and it is starting to separate. Yes, stick it in here, it will be just fine 🙂

image

Ingredients

  • 2 tablespoons olive oil
  • 1 onion, diced
  • 1 clove of garlic, minced
  • 2 carrots, cut into rounds
  • 2 stalks (risps?) celery, diced
  • 6 cups water or broth (make sure to reduce salt if using broth)
  • 1 sprig fresh rosemary
  • about 2 cups of jumbo pasta shells*
  • 1 pack  of chick peas (or 14 oz can, drained and rinsed)
  • 1 pack cannellini beans or 7 oz/ half can
  • 1 1/2 to 2 cups pureed tomatoes (1 can diced, pureed in your blender)
  • 1 scant cup cream (or half&half)
  • 2 tsp flour
  • 1 tsp salt
  • Parmigiano Reggiano and rosemary sprigs for serving

* Feel free to use any pasta you like, I prefer the big shells as they seem to ‘catch’ the chick peas just so…

image

Directions

  1. Heat olive oil in your favorite stock pot, add the garlic and cook for one minute before adding the onions and the vegetables. Turn heat to medium and cook until softened and some pieces on the bottom begin to brown. Add the rosemary and the salt, then add the water or broth, and bring to a boil.
  2. In the meantime, blend the tomatoes until smooth. Then add to the stock pot.
  3. Once the soup is boiling, add the frozen beans (or the drained and rinsed beans from the can), return to boiling the reduce heat and simmer for 30 to 40 minutes until the vegetables are soft and the flavors have blended nicely.
  4. In a glass or bowl, mix the flour into the cream. Set aside.
  5. Turn the temperature up and add the pasta. Cook  8 minutes until al dente or according to package instructions. Two minutes before pasta time is up, add the cream, stir and finish cooking.
  6. Season with freshly ground black pepper and serve with shavings of Parmigiano and some additional rosemary on top.

image

© 2012 SimpleHealthyHomemade