White Beans with Leeks and Thyme ‘Slow Cooker Friday’ Stew or Soup

image

That ended up being quite a long title, but the ingredient list is all the shorter to make up for it. And yes, I realize it’s not Friday 😉

Shorter days and all the holiday activity can leave you tired and sleepy. It’s darker earlier and after the hustle and bustle of the holidays most don’t feel like doing as much as on a sunny summer evening. Add to that the weeks of overindulgence that usually lead up to the end of the year, the lethargic feeling that comes with it and you know you really don’t want to cook at all. But luckily to your aid comes the slow cooker! After a long week of work or entertaining, you deserve to come home to a meal that’s good, good for you and won’t break the bank! Prepare in the morning and decide if you want soup or stew on your way home! (Sorry there are no picture of the soup, we were too hungry and it was dark out, but let me tell you, it was yummy)

image

I used a 2 qt size round cooker for this recipe. Makes 4 servings if you add some Chicken Sausage Patties on the side.

Ingredients

  • 1/2 lb dry white beans ( I have used both baby lima and regular dried lima beans) rinsed
  • 1 cup leeks, white and light green parts only, (from about 2 stalks) cut into rounds and cleaned well*
  • 1 tsp salt
  • 1/2 cube Rapunzel (no salt added) bouillon
  • 3 sprigs thyme
  • 4 cups water
  • (optional) pancetta or speck as a topping or chicken sausage patties as a side

* Leeks can trap a lot of dirt, so submerge the cut rounds in cold water and move pieces around with your hands, changing the water a couple of times if necessary until no more ‘sand’ collects on the bottom

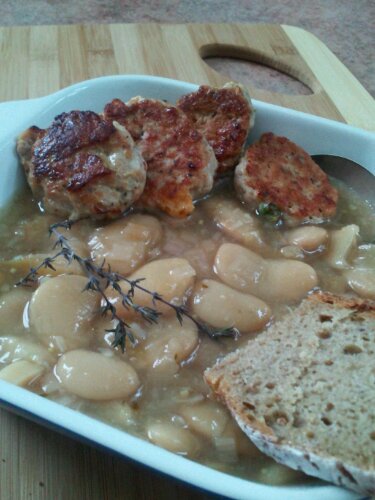
imageHere served with a nice slice of 10 grain sourdough for a vegetarian dinner (resuscitate your sourdough starter in the back of the fridge, you will need it for this yummy bread, recipe coming up soon)

Directions

  1. Rinse beans well, then layer into the slow cooker and add 3 cups of water.
  2. Add the cleaned leeks, salt and thyme sprigs.
  3. Turn your slow cooker to high and wait 5-6 hours until beans are fully cooked, adding water if necessary. (On low the recipe will take longer, about 8-9 hours)
  4. When you get home, either serve as is, or add another cup of water and using a hand held blender, puree the beans and leeks until smooth, adding more water if you like a thinner soup.
  5. Cook some chicken sausage patties until nicely browned and serve along the stew or cook a slice or two of Pancetta or Speck, crumble and top your soup with it

imageCopyright © 2012 Simple Healthy Homemade. All rights reserved

Beans and how I cook them

imageSoaking the beans in plenty of water overnight is essential

With making most things from scratch, the question sooner or later arises: What about beans? As I have mentioned before, I do cook my own beans and then package them rather than buying cans. It’s first of all cheaper, then it’s also better for the planet and most likely much healthier for you, not only due to the sodium content in most canned varieties but due to the materials used in the can lining that have come under more and more scrutiny lately. And if that does not have you convinced to cook dried beans, maybe the fact that they just taste so much better will! And it is really not all that time consuming if you are organized about it. Yes, it is easier if you have a pressure cooker, like the one I brought back with me from Switzerland. Mine is a Kuhn-Rikon Duromatic, kinda like this one, but any good quality pressure cooker would make your life easier, not just for beans (Do NOT get the cheapo ones with the wiggly-rocking-weight-thingy balanced on top, not worth it)
imagethe next morning: after soaking

I usually cook a couple of pounds of beans in one day, depending on the size of your cooker (refer to the manufacturers guidelines) about a pound at a time. So yes, I will cook several batches, one after another and then store them in the freezer for an easy addition to soups and other meals. I know some resources say that you can cook the beans without soaking, or ‘quick soak’ them by letting them sit in boiling water, here’s my experience: You know all the things beans are supposed to do to you, the bad things why folks don’t want to eat beans? In my experience, the gentler you prepare the beans the less they cause you to have to forego your upcoming social appointments. 😉 That includes soaking them overnight, draining and rinsing them before putting them in the cooking pot and cooking over gentle heat. Yes, it takes a bit longer but the results are way worth it.

Trust me.

Have I ever led you astray? No? See!

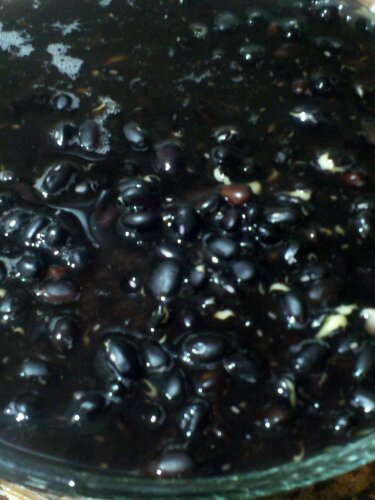
image Finished Product: Black eyed peas

Here’s the way I like to do it. You need:

  • 1 lb dry beans, soaked overnight
  • water
  • snack sized zip top baggies (about 6-8 per pound)
  • 1 or 2 gallon sized freezer bag
  • pen for labeling

For most beans: 1 pound dried beans = 2  cups dried = 4 – 5 cups cooked beans= 3-4 cans of beans!

  • Rinse the dried beans in cold water, then to soak overnight place in a good-sized bowl (the beans will swell and get bigger as they soak up the water) and cover with cold water. You want them covered by at least two inches of water.
  • In the morning drain and rinse the beans, then put them in the cooking pot of your choice
  • Option A: Regular pot is fine, just cover with plenty of water and bring to a boil then reduce and simmer until tender, can take 1-2 hours depending on the variety.  
  • Options B (my preferred method): Pressure Cooker, (following manufacturers guidelines) For mine that means cover with about a finger’s width of fresh water, close the lid and place on the stove over medium heat. Slowly heat until the pressure valve gets up to the first red ring, turn heat to low and set your timer (*see below). 
  • After releasing the pressure from the cooker by running cold water over it, open and drain the cooked beans in a colander in your sink until cool, then package in snack sized zip top bags, and store 6 to 8 baggies in a gallon sized bag labelled with the type of bean and the date before putting in the freezer.

*Some of my favorites are listed below; with the times that I have found produce perfectly cooked beans (I will update as I add more species and specifics)

All ready to freeze, packaged in portions ( I could probably have let them cool a little longer,a s you can see there is condensation in the bags)

And please understand that every pressure cooker is different, the beans could be fresher or older, so you do need to experiment a little. A lot of times I can tell by the smell of the steam escaping the pot if they still smell ‘green’ and need more cooking. I pre-soak all of these beans, unless otherwise stated. I also find that letting the pot stand off the heat for a while before releasing the pressure by running cold water over the outsides and the top keeps the beans nicer. NEVER EVER try to open a cooker that is still under pressure, this could be highly dangerous as the water still boils inside the cooker long after it’s been removed from the fire! Also too drastic of a pressure change and they tend to burst, same when you cook them at too high a pressure, so stick with the first red ring. This is not an activity to watch TV next to. 

Type of bean: time at first red ring: standing time before releasing pressure:

  • Small Red: 4-5 minutes: 5 minutes: then run cold water over sides and top
  • Adzuki Beans: no soaking 5 minutes: 6 minutes: then run cold water over sides and top
  • Baby Lima: 5-7 minutes: 3 minutes: then run cold water over sides and top
  • Black Eyed Peas: 6-8 minutes: 4 minutes: then run cold water over sides and top
  • Cannellini Beans: 8 minutes: 4 minutes: then run cold water over sides and top
  • Black Beans: 9 minutes: 6 minutes: then run cold water over sides and top
  • Red Kidney Beans: 10-12 minutes: 6 minutes: then run cold water over sides and top
  • Pinto Beans: 10-12 minutes: 6 minutes: then run cold water over sides and top
  • Chick Peas: 10 minutes: 4 minutes: then run cold water over sides and top

Some tips:

*Buy beans at a place where they have a quick turnover. WHile they are dry and will keep a long time, quality will diminish over time, just like with anything else you eat. Buy your beans at a latin or indian grocer, folks that eat a lot of beans tend to not have them on the shelf as long.

* Don’t salt beans until they are cooked, or you are adding to the cooking time! (I usually forget in the end and just salt when using the beans)

*Do not mix beans from two packages bought at different times. Cooking time varies with how old and dry the beans are as well as by variety and a new bag plus one that just showed up in the back of your pantry could cook at different times leaving some beans hard and some mushy.

image

© 2012 SimpleHealthyHomemade

Lighter Asparagus Quiche

image

Asparagus Bacon and Cheddar, what better combination could there be? Oh I know, a crispy pie crust to encase it all. A Quiche in this country a lot of times feels like an ‘egg pie’ to me, which can make it pretty heavy and rich. So for this recipe I only used 1 egg, and by adding greek yogurt, we up the protein content without adding a ton of fat or weighing down the filling. Serve with a big salad for a light lunch or dinner or with a side salad as a first course for a leisurely, sit down dinner.

image

Okay so after all that pretty talk, here’s the truth: I made so many different traditional Swiss cookie dough recipes (you know, for Christmas I get homesick if I don’t have ‘my’ cookies), that I ran out of eggs, well, besides the one used here. So I had to make due with what I had on hand: 1 egg, flour/pie crust (there’s always pie crust), asparagus and some odds and ends.

Well, as so many times, when you find yourself in a tight situation, it leads to the discovery of something much better than expected…

image

Ingredients:

  • Single pie crust
  • 1 lb asparagus
  • 1 oz Speck *, diced
  • 2 oz Gruyere (or cheddar), grated
  • 1 cup milk
  • 1 egg
  • salt to taste
  • 2 heaped tbsp Greek yogurt

Directions

  1. Preheat oven to 380°F
  2. Roll out pie crust 1″ bigger than pie pan, fold to place into pan, and roll edges under to make a thicker edge.
  3. Mix milk through Greek yogurt
  4. Cut any hard ends off of asparagus, then place them into the crust in two layers, the second layer at a right angle to the first. Break any asparagus that are too big into smaller pieces
  5. Distribute the Speck over the asparagus, then pour the milk egg mixture over everything, and sprinkle with the grated cheese.
  6. Bake in the middle of the oven for 35-40 min
  7. Serve hot or warm

*often translated as bacon, it however has much more meat than fat on it, but plain old bacon would do as well, just have the butcher cut you a thick piece you can then dice into cubes)

Serves 4 as a lunch/light dinner, or 8 as an appetizer.

image
Copyright © 2011 Simple Healthy Homemade. All rights reserved

Creamy Mushroom Soup

image

One thing that I really love about the colder months is soup! I could live on soup. If all I could eat for the rest of my days is soup, I’d be happy. Ok, maybe something crunchy to go on the side…

Soups are warming when it is cold, easy to make, easy to reheat and mostly pretty cheap to make as well. A lot of times when it is cold, I do not drink as much water as I should and as I do in the summer, I am just not as thirsty and I think soup has that added benefit of liquid 😉

To achieve the creamy consistency without added fat, I used some sweet potato, but since the mushrooms are braised and caramelized first to intensify their flavor, you can’t tell that there is anything except mushroomy goodness in the soup!

image…shown here with Garlic Thyme Sweet Potato Straws

Ingredients

  • 12 oz crimini or baby bella mushrooms, cleaned and sliced
  • 1 md shallot, minced finely
  • 1 md sweet potato, peeled and chopped
  • 2 tbsp Olive oil
  • Salt

Directions

  1. In a heavy pot, heat oil over medium. Add the diced shallot and cook until softened and browned.
  2. Add the sliced mushrooms, sprinkle with salt, stir, cover and turn heat to medium low. Cook for 15 -20 minutes, stirring every couple of minutes. The mushrooms will start to release their juices and cook.
  3. Uncover and cook, stirring occasionally until the liquid is reduced and the mushrooms start to caramelize and brown in bits, about 5 minutes.
  4. Add water and the sweet potato to the pot. Add enough water to cover the mushrooms and sweet potato by 1″ to 1 1/2″ (remember, you can always add more water, trying to boil it off, is much harder). Add 1/2 tsp salt (or to taste) and bring to a boil.
  5. Cook until the sweet potato is very soft.
  6. Remove from the heat, let cool slightly, then using a handheld blender/immersion blender (if you don’t have one, you NEED one, seriously), puree the soup. (alternately you could use your food processor/blender and blend the soup in batches, being careful not to overfill the container)

Serve with Garlic Thyme Sweet Potato Straws, croutons or a slice of hearty home made bread.

If you really want your soup to be super creamy, you could add 1/2 cup half-and-half (or coconut milk to keep it vegan).

Makes 4-6 servings

image

Copyright © 2011 Simple Healthy Homemade. All rights reserved

Sausage and White Beans ‘Slow Cooker Friday’ Stew

image

As the colder and shorter days arrive, and I know some of you are starting to get ready for the holidays, I tend to be drawn to soups and slow cooked dishes. I shop and eat with the seasons. Many of you already realize that in the summer months you are drawn to fresh crisp salads, raw vegetables and fruits and but now you naturally gravitate towards warming dishes as the temperatures start coming down. This is all part of the seasonal gear shift getting into the colder months. Nature hibernates and rests. So sit and sip some tea in front of the fireplace and read a good book, take your time, slow down and rest.

Eating fresh and local means to be in sync with nature more. Eating with the seasons takes into account that fruits and vegetables are at their peak of nutritional value when ripe, and the longer they have to travel until they get to you, the sooner (before ripeness) they have to be picked. Once the produce is picked and disconnected from the plant or root that it grew on, it is as nutritious as it is ever going to be, it can’t ‘make’ any more nutritional value. At the same time, the clock starts ticking and its nutritional value diminishes over time. For those of us on the East Coast, just think about how long it takes a truck to get here from California… Seasonal eating involves eating more locally grown and harvested produce. It has to travel less far to get to a store near you = it’s nutritional content is higher, therefore better for you. Yes, that means in the winter, strawberries and cantaloupe are not going to be as good or as good for you (high in nutritional content), as when they are in season. However apples, pears and oranges are at their peak.

image
Even though I love to cook, and admittedly spend a lot of time in the kitchen, on Fridays specially now that it gets dark so early, I like to take a break. I know many of you understand this feeling, after a long week, you just want to relax. That’s where this series of recipes comes in: Slow Cooker Friday! Simple and easy to prepare, pile it all in the slow cooker and forget about it until you come home to wonderfully flavorful dinner and a kitchen that smells like you just spent hours laboring over the stove!

To get the best dried beans, make sure they are not too old. In addition to loosing nutritional value, they will take longer and longer to cook. The best places for (fresh) dried beans I find are stores with a large Latino or Indian customer base. Remember, you will need to start this recipe the night before, as you are going to be soaking the beans overnight. I have also added barley to this recipe, since beans and grains together make up a complete protein, good to know if you are vegetarian!

image
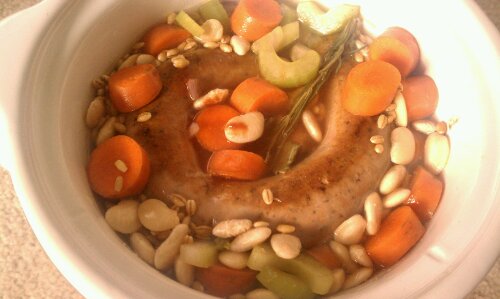
Easy and it is also an end of the month kinda recipe, using sausage, and dried beans to maximize your $$!

Note: I use a 2 qt round slow cooker, which usually makes enough for 2 hungry people, plus a round of leftover for as many.

Ingredients

  • 1/2 to 1 lb sausage of your choice (I used a spicy garlic turkey sausage this time, but sweet or hot italian sausage works great too!)
  • 1 cup baby lima beans (about 1/2 lb)
  • 1/4 cup barley
  • 2 celery ribs, chopped
  • 2 carrots, chopped
  • 1 tsp salt
  • 1 sprig of rosemary or 1/2 tsp dried
  • 1 bay leaf

Directions

  1. Soak the beans the night before in a bowl with cold water.
  2. Chop the carrots and celery ribs and place in the slow cooker insert. Then drain the beans and layer over top the vegetables. Add the bay leaf and rosemary and sprinkle with salt.
  3. In a skillet brown the sausage by cooking it without turning for about 5 minutes per side. Place in the slow cooker on top of the veggies.
  4. Fill the slow cooker insert with water to just cover the ingredients by 1/2″, turn your cooker on low and cook for 5 hours.
  5. Come home to a wonderful dinner 🙂

Serves 4

Copyright © 2011 Simple Healthy Homemade. All rights reserved

If you can’t make it yourself…

garden bounty

Lately I have found myself sucked into the computer and browsing food and recipe blogs for hours on end (…in my defense, it was rainy all week end). Sorting my thoughts on how to go about writing this cookbook I have been thinking about for some time now was my excuse for the countless hour leaking into the internet. Until it dawned on me, that maybe starting a blog about cooking (I love food), making healthy food choices and meals (I am a personal trainer and sports nutritionist) might be a good place to start sorting and organizing all the recipes (or new ones, no need to look back, right?) that in the past have lived in a 0.99 cent compositions book . And I have lots of them, notebooks with recipes that is.

I remember creating this recipe for a layered chocolate heart when I was a little girl back in  Switzerland, and how exited I was when I showed my Mom (Looking back she seemed a bit more concerned with the sticky mess I may have left behind in the kitchen, than exited about my ‘creation’, lol)

I love to make everything from scratch, because, it just plain tastes better and is better for you. If you can’t make it yourself, don’t eat it. I am not saying that I always make everything myself, but I will stay away from things I could not make, even if I had the right tools and would put all the effort into it. I have tried to make everything from sushi rolls to goat cheese to gluten free baked goods, just to see if I can do it (…and I am a very curious person and how stuff is made intrigues me), but more on that another time.

I believe healthy food should be flavorful, super yummy and not leave your wallet empty!

Welcome to      Simple. Healthy. Homemade!

🙂 Simone


Copyright © 2011 Simple Healthy Homemade. All rights reserved.