Chickpea and Rosemary Soup with Pasta

image

We woke up to the quiet of the first snow. It started snowing sometime during the night and by this morning white was blanketing the fields and trees and keeping the birdies busy coming to the feeders all day. Since there was much laundry and computer work to be done today, soup always is favorite. What am I saying, soup always is a favorite anyway and the past couple of weeks, Tuesday has turned into a soup day, and we get to benefit from the big spoils for the rest of the week. Doesn’t it make any meal more special if you start with a small bowl of soup?

Oh well, here I go again with my justifying soup eating. Frankly, soup is one of the easiest things to make. Period. You can make soup even if you think you have nothing in the house. Last week I made a creamy cauliflower soup, all it used was a half a head of cauliflower, some onion, broth and half a red pepper that needed to be used, for a little splash of color. Any vegetable hibernating in your fridge can be used, leftovers can be added. And if you have beans in the freezer and some stock, you’re set, really.

Today’s simple soup was not based on leftovers but pantry staples. And there are a few options and changes that are easy to implement. It uses one can of diced or stewed tomatoes, which you then blend smooth in your blender, but you could also use your own tomatoes, or leftover spaghetti sauce. In fact I have made this with half a jar of Vodka sauce before, and it was fantastic (cut down on the cream/ half&half) And even though you are adding about a cup of cream or half and half, at 8 servings, you are talking about 1 to 2 tablespoons of cream per serving. Less than most put in their coffee, so go spoil yourself and use real cream, like I did. And since you are adding Parmigiano to the soup, you could also use up the cream you skimmed off your raw milk and then didn’t do anything with, and now it has been a week and it is starting to separate. Yes, stick it in here, it will be just fine 🙂

image

Ingredients

  • 2 tablespoons olive oil
  • 1 onion, diced
  • 1 clove of garlic, minced
  • 2 carrots, cut into rounds
  • 2 stalks (risps?) celery, diced
  • 6 cups water or broth (make sure to reduce salt if using broth)
  • 1 sprig fresh rosemary
  • about 2 cups of jumbo pasta shells*
  • 1 pack  of chick peas (or 14 oz can, drained and rinsed)
  • 1 pack cannellini beans or 7 oz/ half can
  • 1 1/2 to 2 cups pureed tomatoes (1 can diced, pureed in your blender)
  • 1 scant cup cream (or half&half)
  • 2 tsp flour
  • 1 tsp salt
  • Parmigiano Reggiano and rosemary sprigs for serving

* Feel free to use any pasta you like, I prefer the big shells as they seem to ‘catch’ the chick peas just so…

image

Directions

  1. Heat olive oil in your favorite stock pot, add the garlic and cook for one minute before adding the onions and the vegetables. Turn heat to medium and cook until softened and some pieces on the bottom begin to brown. Add the rosemary and the salt, then add the water or broth, and bring to a boil.
  2. In the meantime, blend the tomatoes until smooth. Then add to the stock pot.
  3. Once the soup is boiling, add the frozen beans (or the drained and rinsed beans from the can), return to boiling the reduce heat and simmer for 30 to 40 minutes until the vegetables are soft and the flavors have blended nicely.
  4. In a glass or bowl, mix the flour into the cream. Set aside.
  5. Turn the temperature up and add the pasta. Cook  8 minutes until al dente or according to package instructions. Two minutes before pasta time is up, add the cream, stir and finish cooking.
  6. Season with freshly ground black pepper and serve with shavings of Parmigiano and some additional rosemary on top.

image

© 2012 SimpleHealthyHomemade

Rosemary Black Pepper Socca

image

Socca, a delicious street food from the south of France, more exactly Nice (in Switzerland, Nizza as the city is known in italian) is something I just recently discovered. I know, right? not while travelling in France, mind you, but living on the good old East Coast of the US. Which just goes to show that good food knows no boundaries.

image

“La socca de Nice, ou socca caouda, est un des plats les plus populaires de Nice semblable à une grande crêpe mais à base de farine de pois chiches et cuite au feu de bois.
A l’origine, c’était le plat du pauvre, bon marché et consistante.”

Basically saying: Nice’s ‘Socca’ is one of the most popular dishes from that region, resembling a big crêpe but made from chickpea flour and cooked over wood fire. Originating as poor folk’s dish, cheap and filling

Today, it is as much casual as it can be sophisticated, and a crowd pleaser at any dinner invite or potluck. Plus since it is naturally gluten free and vegan, can be served to most anyone. Best of all it is super easy to make but tastes incredible! Use a cast iron skillet for best results but I have also come across folks making it in a  pie dish, during my internet research. Traditionally it is made on a large copper disk, over very high heat and in a very hot oven. As with most street food (I was going to say any, but the Malaysian Roti Canai might be the exception to the rule) it is easy to prepare and therefore I figured must be a good candidate for outdoor cooking.

I have even had success making this directly on the  camp fire (since traditionally it is cuite au feu de bois, I had to) while camping but there are no pictures to prove it, so in this day and age, it never happened, lol. The one I did manage to get pictures of was made on my camp stove. And maybe here would be a good spot to apologize for the quality of some of the pics in this post, it was quite dark when I took them. Though I have to say, my headlamp functioned quite well as a backup flash for my cell phone, no?

image

You can make this easily in the oven at home, but since I had a little weekend away at a campfire planned, I decided to hone my socca making skills on a real fire. Maybe not entirely traditional, since much thicker than usual, but entirely too yummy not to share 🙂  I might post a more traditional version at some later time, we’ll see, but for camp fire cooking, this is taking it out of the hot dogs and smores category that often comes to mind when hearing ‘camping’. To make things extra easy, combine the flour, salt and pepper in a zip top bag before leaving and all you have to do is add the oil, water and rosemary at cooking time!

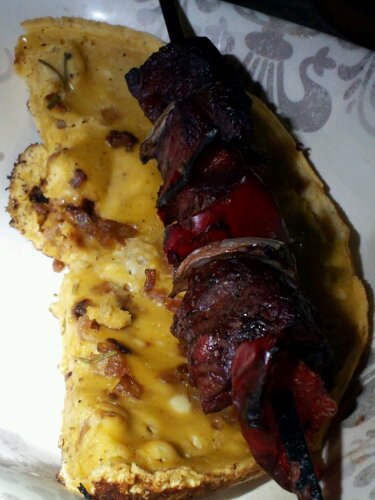
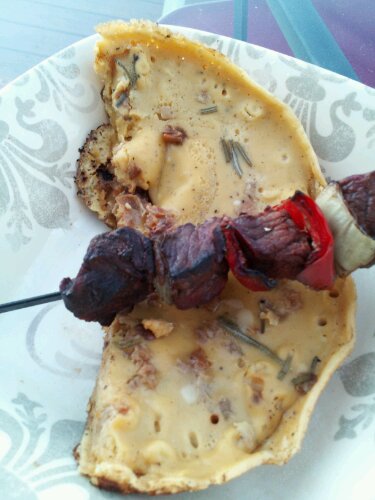
imageHere shown with beef and red pepper kebabs, a match made in heaven!

Ingredients

  • 1 cup chick pea flour*
  • 1 cup water
  • 1/2 onion diced
  • 1 1/2 tsp salt
  • 3-4 tablespoons olive oil
  • 1/2 tsp black pepper
  • 2 tablespoons fresh rosemary

*chickpea flour can be found at many health food stores or the gluten free section of your grocery store. But the cheapest way is to find an Indian grocer and get it there, it’s called ‘Besan’image

Directions

  1. Heat 3 tbsp olive oil in a 8″ cast iron skillet*, cook the onions until soft, turn down the heat and cook for another 10 to 15 minutes until starting to brown and caramelize. Set aside return the skillet to the heat, and keep heating on medium high.
  2. Mix chick pea flour, water and 1 tsp salt, stirring with a whisk or fork until all lumps are gone. Set aside (you can make this and use it right away or set it aside for several hours, it’s all good)
  3. Over high heat, in the same skillet, heat the remaining oil, then pour in the batter. After cooking for one minute, sprinkle the top evenly with the cooked onions and rosemary, and remaining 1/2 tsp salt, then cover with a lid until cooked through and the top is set about 5-7 minutes. Serve hot as a side to roasted meat or eat on its own.

* If you have a 10″ or larger skillet, the result will be thinner and take less time cooking.

The setting during the day…

image© 2012 SimpleHealthyHomemade

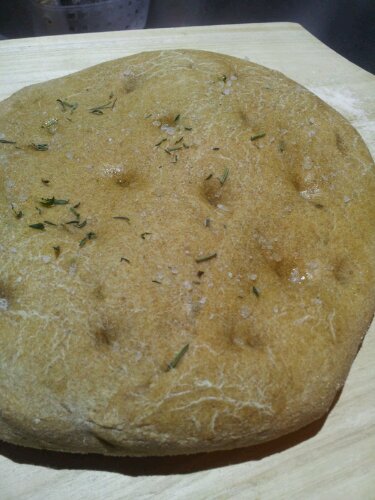
Grilled Rosemary Focaccia

image

Craving bread is what I remember when I first moved to the United States, the kind of bread I had taken for granted back home. I seems that when you’ve only lived in a very limited part of the world, you automatically assume, everyone in the western world does things the same way, including breakfast. I had been to Asia and knew that in some eastern cultures anything goes for breakfast (Remind me to write about this awesome rice soup I had in Thailand sometime), but I guess I somehow figured that the western cultures, namely central Europe and the US, where very similar and it came as a surprise to find that in my new home, no, there was no bread to be found. 🙁

In Switzerland, a normal breakfast is bread. Slices of crusty bread, with butter, meat, cheese or homemade jams, or delicate buns or croissants. Depending on the day of week, the region, your mood or the time of year there are countless variations on the theme of bread (oh yeah, there are some awesome pastries too). And when I first moved here, I could not handle eggs for breakfast, just couldn’t stomach it in the morning and I was looking for bread. By now, luckily there are bakeries that offer ‘artisan’ breads and it’s possible to get similar items in many grocery stores across the country, but for the first few years (and I did not live in a large metropolis), it was me trying to recreate breads to glimpse a taste of home. Can you tell, I was homesick sometime? 🙂 Well that’s a long time ago and I have successfully recreated and made many breads, using available ingredients to make up for what I was told was not available quite the same way. But I digress, all I really wanted to say here was this, I love bread! Fresh baked, crusty bread; and the smell of it, it just makes me happy.

image

So summer can be a bit of a trying time, when it stays hot for months here and heating up the house by using the oven to make bread just seems silly. So what is a bread loving girl supposed to do? Take it outside, that’s right! Now, I have played with the thought of building a stone oven out back, but due to space constraints (I want to keep my little raised bed garden, after all) lack of knowledge and mainly proper mason skills, I have had to abandon that thought, along with the flock of backyard chickens… for now.

Next best thing? Use the grill! I have had this pizza stone sitting around. I had used it sometimes to bake bread on, but after some internet research felt I could give this a whirl. After all, if the darn thing breaks, I thought, I just end up with more space in my cabinets. But after three or four tries, it’s still whole. Preheating gently seems to do the trick 🙂

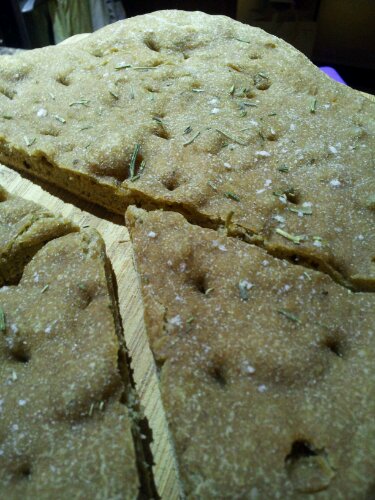
This makes one round, flat loaf of about 10″ diameter. Keeps me happy for three to four days, that’s saying you could make it as a bread to go with a dinner for four.

image

Ingredients

  • 1/4 up sourdough starter from the fridge
  • 3/4 cup warm water
  • 1 cup bread flour
  • 1 cup spelt flour
  • 1/2 tsp sea salt
  • 1 tbsp fresh rosemary, cut finely
  • coarse sea salt for sprinkling on top

imageDirections

  1. In  a large bowl, stir the sourdough with 1/2 cup warm water
  2. Add the flours, salt, rosemary and remainder of the water (If you are using all purpose flour, 1/2 cup total might be enough) mix together and knead until a smooth dough forms. Form into a ball and let rest in warm spot until doubled in size.*
  3. Shape into a flat round, about 1″ thick, place on a corn flour dusted pizza peel and let rest in a warm spot for another 20 minutes to half and hour before proceeding. (You want the dough to raise again after shaping)
  4. Place the pizza stone on the grill and preheat on low, indirect heat for 10 minutes.
  5. Right before baking, dimple the surface of the focaccia with your finger, brush or spray the surface with some olive oil and sprinkle with coarse sea salt and more rosemary if desired.image
  6. Slide bread off of the pizza peel onto the hot stone and cover the lid. Turn the burners under the stone on, but at low flame for 10 minutes.
  7. Then turn up the heat to medium, and bake for another 10 to 15 minutes or until the bread is done and sounds hollow when you tap the bottom of it.
  8. Remove the bread and set on a rack to cool completely before serving, (leaving the stone in place as you turn off the grill) and enjoy!

* The time for this depends on the warmth as well as the level of activity level of your sourdough. In the summer this takes about an hour, and I sometimes will place the covered bowl outside.
image© 2012 SimpleHealthyHomemade