Thai Beef Salad to go

image

Last Tuesday it snowed and today it’s 65F! Crazy weather for a 4th of December. If I were back home, I’d be making ‘Grättimännli’ tomorrow, so they are ready for December 6th, and it was a firm plan, but how could I follow through when it is SUMMER outside? So instead I am going to mix things up and post a take along salad recipe. Most folks don’t eat badly because they want to, but because they fail to plan. With this series of recipes I am hoping to help you battle the lunchtime rush and have some healthy options on hand. I was going to start with a winter salad, something that can be warmed up, since I am not a huge salad eater in the winter, but seeing that it is summer today…

image

You need a two or four cup glass mason jar per serving. The jars seal well, are BPA free, re-usable forever and stack the salad items so the dressing stays away from the more delicate items until you’re ready to eat. For this one I suggest extra greens, beyond what fits the 2 cup jar. So either pack them in a little bag or go for the bigger jar (added weight). Take a fork along, shake it up and eat right out of the jar (bigger jar only), or bring a bowl and you have a fantastic lunch everyone will be eyeing.

image

Ingredients

Dressing (makes enough for 3 servings)

  • 1 tbsp garlic (about 1 clove), minced
  • 1 tbsp ginger, finely grated
  • 1 tsp dark sweet soy sauce
  • 1 tsp sesame oil (this is the oriental kind, it’s dark)
  • 1 tsp sambal oelek
  • 3 tbsp fresh lime juice (about 1 lime)
  • 2-3 tbsp Thai fish sauce ( I prefer tiparos brand)
  • This will make enough for 2-3 servings

Per Jar you will need:

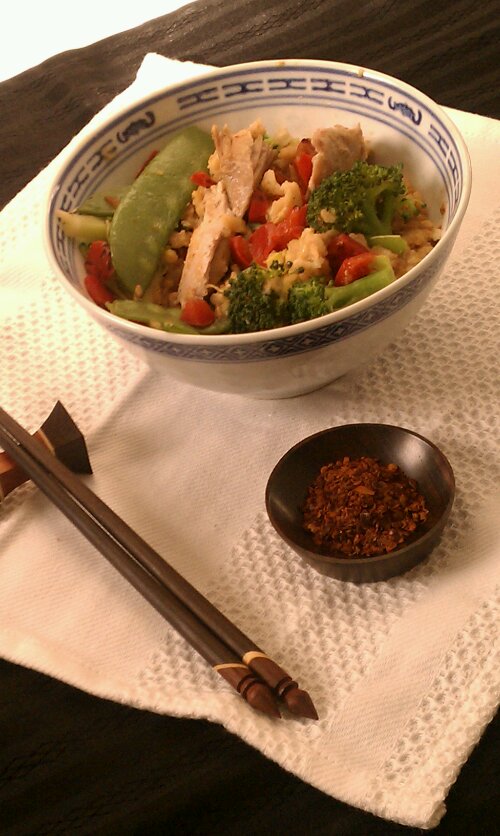
  • 1/2 cup thinly sliced grilled steak
  • 1/2 medium tomato, cut into wedges
  • 2 tbsp julienned carrot
  • 2 packed cups of greens (spring mix, romaine or anything hardy works well)
  • some sliced chillies and crushed peanuts as topping (optional)

image

Directions

Make Dressing: Mix all ingredients in a small bowl and stir until well combined. Store any leftover dressing in the fridge and use within a week.

Then make the jars:

  1. Into each jar layer the ingredients in the following order: the steak, then pour 4-5 tsp of dressing over top, follow with tomato wedges, carrot, and greens.
  2. Top with some chilies if you like to spice up your life and crushed peanuts if desired. Close the lid and store in the fridge until ready to go!

Note: The dressing makes enough for 2-3 servings, so why not make dinner, and a jar for tomorrow? Or have a side salad with dinner and make 2 jars for y’all to take to work.

image


© 2012 SimpleHealthyHomemade

Sticky Rice with Mango (Khao Neeow Mamuang)

image

Sticky rice, also called glutinous rice (even though there is absolutely no gluten in rice) is eaten sweet as a snack or desert a lot of places in Thailand, in the northeast of the country it is also served along your meal, unsweetened of course. That rice finds its way into meals from breakfast to desert isn’t surprising for a country where rice is a main staple in the diet, after all the verb ‘to eat’ in Thai is tantamount to ‘to eat rice’

image

For me, nothing says Thailand more than getting a serving of sticky rice with mango from a small place off a street corner somewhere. Vendor’s specialize in this dish and often you will find a line of people when mangoes are in season. That’s what I look for 😉 where the locals eat, it’s always the best. It’s served with sweetened coconut milk and is just delicious! Back home I would order it at Thai restaurants any chance I’d get, but alas it was often unavailable due to seasonal availability and because, unfortunately the restaurant often thought that ‘common’ food was not what should be served to guests in their establishment. 🙁 Imagine my joy when a few years back, I finally figured out that this exotic desert was actually pretty simple and easy enough to make at home. Cheaper and available whenever the lovely grocery store carries yummy mangoes. Win & win! Now I just have to figure out how to make the taro desert I can only get in Thailand…

image

You need to start this several hours before you want to indulge, since the rice is first soaked, then steamed.

Ingredients

  • 1 cup sticky rice*
  • 2-3 ripe mangoes, cut into bite sized pieces
  • 1 can coconut milk (not the light kind)
  • 2-3 tbsp palm sugar

Directions

  • Soak the rice in cool water overnight or at a minimum 4 hours
  • Line a bamboo steamer with cheesecloth and over the sink pour the rice into it to drain. Fold the cheesecloth over the edges so it doesn’t hang down and catch fire (tried that, and no, it doesn’t improve the flavor). Cover with the steamer lid.image
  • Set your bamboo steamer over a pot or wok of boiling water, and steam until the rice is cooked and yields softly to the bite. It will have a tacky consistency, will be slightly shiny and the rice grains will stick together. Takes about 15 minutes.

image

  • In the meantime, gently heat 3/4 of the can of coconut milk in a sauce pan, add the coconut sugar and stir to dissolve.
  • When the rice is done, transfer to a bowl and add the rest of the can of coconut milk, stir to mix. Let stand a couple of minutes until evenly moistened, then serve with mango and sweetened coconut milk.

If I get a good deal on mangoes, like I did this week, (hence the mango cheesecake, and this) I will make a good batch of this and keep the rest in the fridge, to reheat as needed for a quick exotic snack or desert anytime 🙂

*You can get this type of rice at most Asian stores, look for glutinous rice, sticky rice or sweet rice. Regular rice won’t work. It comes in white as well as purple!

If you find you end up making this a lot, you can get yourself an authentic sticky rice steaming contraption at Importfood.com as seen in the picture to the right here. I so far have used my regular (Chinese) bamboo steamer with results that make me happy 🙂

Nomnomnom nom nom…image

Copyright © 2012 Simple Healthy Homemade. All rights reserved

Thai Green Papaya Salad (Som Tum)

image

One of my favorite Thai Salads has to be Som Tum. Ever since my brother had me over for dinner one night and made this super delicious and fiery hot salad I have been hooked. (and he was nice enough to share the perfect recipe he brought back from Thailand the summer after the big Tsunami)

I like it equally with green papaya or green mango, the latter giving it a bit more of a tart flavor. You can find green (unripe) papaya at Asian food specialty stores, the regular grocery store will only carry ripe ones, yes they also look green outside, but have turned ‘fruit’ on the inside, and we need them to be ‘vegetable’ for this. ( They look white or slightly green after they are peeled, if the papaya is pinkish or the mango yellow, it’s too ripe and soft for this and the flavor is different)

image

I have adapted the original recipe a bit to adjust for our non Teflon coated tongues and intestinal tracts. The original recipe is so hot, it should have a name like Ten Thousand Chile salad or Eternal Purgatory salad. When my brother first made this we made steamed sticky rice to go along with it, to douse the fire. My version is still hot and you are most welcome to add more chillies if you like. But don’t say I didn’t warn you. I have also adjusted the preparation method (normally the salad is made in a big earthenware mortar ) and left out the dried shrimp, which are pretty hard to find and are a pretty foreign item for most folks here, although they are deliciously crispy and a bit salty, kinda like chips 😉

image

Ingredients

  • 1 green papaya (or mango, see note)
  • 2-3 cloves of garlic
  • 1 cups diced string beans or snake beans (if your papaya is big, you can use 1 1/2 cups)
  • 2 plum tomatoes, on the unripe side, diced
  • 3/4 cup raw, shelled peanuts
  • 2-3 Thai chilies ( the original asks for 9!!!)

Dressing

  • 2 tbsp Palm sugar
  • 8-10 tbsp fresh lime juice (from experience that’s about 5 small or 3 large limes)
  • 4 tbsp Fish Sauce
  • optional: Cilantro, sliced Kaffir Lime leaves and dried shrimp for garnish

Directions

  1. Dry roast peanuts in a skillet or alternately in the oven or toaster oven until slightly brown, set aside to cool
  2. Halve the papaya, seed and peel, then slice into a big bowl using a julienne cutter. (If you don’t have a julienne cutter, you can grate the papaya)
  3. Using mortar and pestle, crush half of the roasted peanuts, then add the chilies and garlic and mash together.
  4. Combine the lime juice, fish sauce and sugar, stir until the sugar dissolves.
  5. Add sauce to mashed spices, mash all of it a bit more to mix flavors, then add to the julienned papaya and mix well
  6. Serve garnished with cilantro leaves and crush the remaining peanut and server alongside to top the salad as desired.

Note: If using a green mango, you can reduce the lime juice by 3 tablespoons since the mango has a tartness of its own.

image

Copyright © 2012 Simple Healthy Homemade. All rights reserved

Thai Red Curry Chicken ‘Slow-Cooker Friday’

image

I love Thai food and I am a little bit of a Thai food snob, I have to admit. But I guess it might come as no big surprise, after travelling in South East Asia extensively, and my brother living on an island in Thailand (I know, don’t get me started, he gets to enjoy the sun while we have cold toes here ;P ) While travelling and meandering through Thailand and other South East Asian countries, I ate with local families, and therefore ate some ‘Thai Food’ you’d never see in a restaurant, in short I acquired some first hand knowledge of real Thai cooking. So this recipe really should be called Thai Inspired Red Curry Chicken, since the slow cooker is not traditional, but the flavors are still reminiscent of warmer places, so this is my Americanized Friday evening version 😉

image
Serves 4

Ingredients:

  • 2 chicken legs/thigh quarters, bone in (about 1 1/2lb)
  • 2-4 tbsp red curry paste (if you are very sensitive to spice, use less, for extra spice use more)
  • 1/2 of a 14 oz can of coconut milk
  • 1 cup brown Jasmine rice
  • 1 cup broth
  • 2 cup mixed vegetables, cut into bite size pieces (preferably fresh, I used snow peas, red bell pepper, and broccoli)
  • 1 lime, cut into wedges for garnish

Directions

  1. Heat a heavy frying pan over medium.
  2. Season the chicken with salt and pepper and cook the chicken skin side down until browned, about 4-6 minutes, turn and cook repeat on the other side (Chicken will cook more in the slow cooker, this is just to give it some extra flavor) Transfer to slow cooker
  3. To same skillet, add the coconut milk, half the broth and the curry paste. Stir and loosen any browned bits. Pour over the chicken in the slow cooker insert.
  4. Pour the rice around the chicken , add the remainder of the broth and cover.*
  5. Turn slow cooker on low and cook for 5-6 hours, or until chicken is sift and starts to fall off the bone.
  6. Half hour before you’re ready to eat, place the vegetables on top and turn up to high. Alternately you could also steam the vegetables separate and serve over the chicken and rice from the crock-pot.
  7. Garnish with lime wedges and serve.

* The rice will be soft and flavorful from cooking in the sauce, if you prefer your rice to be less ‘risotto’ , add it about half way through the cooking time.

image

Copyright © 2011 Simple Healthy Homemade. All rights reserved