Finally, I think I did it!! It only took about 5 or 6 tries, and me eating countless slices of extremely dense or otherwise unsatisfying 100% rye bread. Which, if I were a cat, would most likely be good for keeping my teeth tiptop clean. But anyhow, I think, finally, I can reveal the outcome of this process, and how fitting this would be my 100th blog post!

Can you believe it? I am celebrating the 100th post on Simple Healthy Homemade! I am super exited and would like to thank all my readers and fellow bloggers for their support and interest in what I cook and scribble! Thanks to all of you who have commented and engaged in the conversation! I truly appreciate your feedback 🙂

But let’s start at the beginning of the story. For before I could get started making ‘Walliser Brot’ I had to tackle a couple of hurdles I did not expect. First, the flour here is different. After consulting with one of my friends from Switzerland who, as a baker, had done an exchange year in the USA, I realized that making Walliser Brot (a traditional rye bread from the canton of Valais/Wallis is Switzerland) would be a tad more involved than expected, but that has never stopped me before, and was surely not going to hold me back now that I was craving that particular bread. So the flour situation I knew was going to be some trial and error, to determine what would work as a substitute. But the second part of the puzzle, (or actually the first, since without it, I could not even start the trial process) involved the bread not being made with yeast, but a traditional rye sourdough as a starter. To read more on that and learn how to make your very own rye sourdough starter, read my previous post.

A little bit of background on the bread we are talking about here. Walliser Rye Bread is a 100% rye grain bread, it is fairly dark and has a dense crumb. And it tastes nothing like what most of you associate with ‘rye bread’ here in the US. The taste many here think is ‘rye’ actually comes from the caraway seeds added to many rye breads (which I am not a fan of, at all) and to a lesser extend from the molasses. Also this bread has no yeast or added wheat flour to help with the lower gluten content of rye. So I knew it was going to be a sticky situation since gluten in wheat is what makes the dough hold together and be elastic and, uuhm, dough-like. Rye bread dough is often very tacky. But I was feeling a little homesick and nothing can hold you back when you crave something that will make you feel like home. And we all know, there’s no place like home 😉
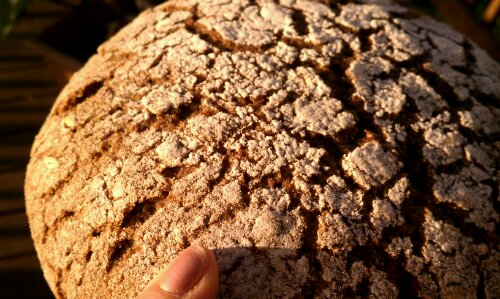
 Here is a picture once I finally got it to turn out just right.
Traditionally the oven in the village would only be fired up 2-3 times a year (!!!) and each family got their turn in using it. Follows that the bread would have been hard as a rock after a while, but it also must have kept quite well. There are stories of people using an axe to get a piece of bread cut! It would then be soaked in hot milk until soft and could still be eaten. Here a link for the curious (in German) about Walliser Roggenbrot (Rye Bread) and its history.

Rye was the primary or only grain available since it was the only grain suitable to the high altitude and short growing season. In fact, rye was sometimes referred to as “the poverty grain” since it will grow on soils too poor for other grains. Rye grows more rapidly than wheat, can withstand submersion during floods, and continues to thrive during drought. Rye therefore became especially popular in colder temperate countries – Russia, Poland, Scandinavia, Canada, Argentina, China, Turkey and elsewhere where it was too cold or wet for wheat to grow dependably, like in the high valleys in Switzerland. Besides being able to grow and mature in adverse conditions, it is also higher in protein, phosphorus, iron and potassium than wheat. It’s high in lysine, low in gluten and a good source of zinc, copper and selenium, and a very good source of Dietary Fiber and Manganese. In the high mountain valleys, rye was harvested with the use of only simple tools, by hand and after dreshing, would be stored in a place like this:
 Here with view of the Matterhorn
A ‘Stadel’ in this region of Switzerland would be built on stilts, which allowed the people to build on very uneven terrain, and would have a large stone plate (I have often seen them built: stilt, stone, stilt) to prevent mice and other rodents from getting into the grain stored for food. Smart move, given that back in the day, you could not just go and buy more if it went bad and you had to make it through a year before being able to harvest more.

But let’s get to the recipe!
Ingredients
- 1 cup rye sourdough starter, active and fed
- 4 cups whole rye flour* separated, plus additional for dusting
- (1/4 cups rye flakes, soaked in water for 2 hours) optional
- 1 tsp salt
- 3/4 to 1 cup warm water
*Either freshly ground rye (you need about 1 3/4 cup whole rye berries/grains) or store bought, make sure it is whole grain, not white or dark rye flour
Directions
- In a large bowl mix the sourdough starter with 3/4 cups warm water, add 3 cups of rye flour, salt and mix until incorporated. Depending on the wetness of your sourdough (the one I maintain is 100% hydration and therefore, quite wet) At this point the dough will be fairly moist and sticky so stirring with a spoon is a good option. If it seems dry, add another 1/4 cup water.
- Cover and let rest and rise in a warm spot until doubled in size. This will take anywhere from 3-6 hours, depending on how active your sourdough is and the ambient temperature. If you run out of time, place in the fridge overnight, let come to room temperature before the next step.
- To your dough, add 1 cup of rye flour, the soaked rye flakes, if using. Knead until incorporated. If your dough is still very tacky, add some additional flour, if it feels stiff and is dry add a little more water. (This step varies depending on the moisture content of the flour you are using. If your flour has been stored for a while, it tends to be drier than freshly ground flour, and you might have to add some extra water.)
 Now it’s time to get down and dusty. Knead the additional flour into the dough before shaping it into a ball and placing on a floured baking sheet to rise…
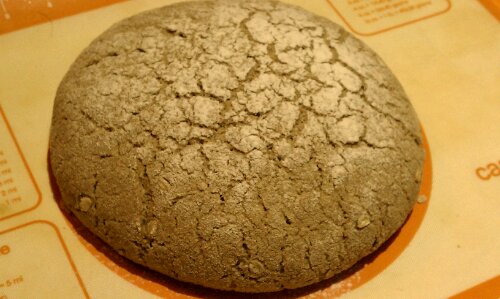
 - When everything is incorporated, form into a ball, flatten slightly, dust surface with flour place on a flour dusted baking sheet and let rest in a warm place until cracks show on the surface. (To create a warm place for my bread in the colder months, I turn the oven to warm (160º-170ºF) for 2-3 minutes, then turn the oven off. Cover the ‘bread to be’ with the inverted bowl so it doesn’t dry out and place in the warm oven to rise.)
 After its final rest and rise, ready for the oven… (notice the characteristic cracks)
 - There are two ways of baking this bread: Preheat oven to 380ºF for 10 minutes, placing a large cast iron dutch oven in the middle of the oven. When the oven is hot, remove the dutch oven, dust the inside with some flour and gently slide the bread into the pan, cover with the lid, then set back in the oven. (You can also use a cloche, if you happen to have one) Bake 45 minutes, then turn heat down to 365ºF remove the lid and bake an additional 15 to 20 minutes or until the bread is baked through. (Do not lift the lid or peak before the 45 minutes are up, you are trying to create a moist and steamy environment for baking the bread! )
- If you do not have a cloche or a dutch oven, you need a metal roasting pan or jelly roll pan. Put that on the bottom shelf of your oven as you preheat. When the oven is preheated, place the bread in the oven (on the baking sheet) and add 2 cups of hot water to the roasting pan on the bottom shelf to create steam and quickly close the door, trapping the steam inside. After 20 minutes, add more water if necessary, be careful not to splatter it on the glass parts of the door or at the light bulb, they could burst or crack. Bake for 45 minutes minutes, turn the heat down to 365ºF, check on your bread an bake an additional 15 minutes, or until done. The bread will sound hollow when tapped on the bottom (careful: HOT!)
- Turn off the heat and leave bread in the oven for an additional 20 minutes, then remove from oven, and place on a cooling rack.
- Let cool completely and rest for a minimum of 24 hours before cutting into it. It will gunk up your knife and stick together or crumble if you don’t wait (Trust me, I know how hard this is to wait when the house smells like fresh bread)

Copyright © 2012 Simple Healthy Homemade. All rights reserved

