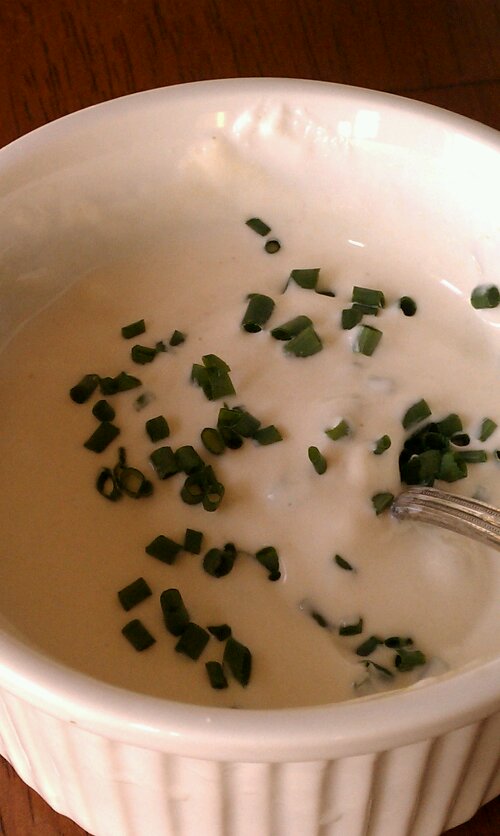
Guilt Free Yogurt Chive Sauce

image

I don’t like to waste things and have been practicing opportunistic eating the last few weeks. What I mean is I am really trying to only eat what is in my fridge, cabinets and seemingly bottomless freezer. Because, let’s face it, the more space one has the more ‘special buys’ find their way into said space. Hard to resist the buy-one-get-one deal on blueberries or roasts, whether you need them that week or not… I do claim complete innocence here and blame my ‘hunter-gatherer’ genes. More the gatherer part here, but hey, it’s not like I can change that, right 😉 And along with emptying out everything to make space for this years garden bounty, I am also trying to be more conscious of using the stuff as it grows instead of storing it for later. Not that I can eat all the chives, but heck am I going to try! And since we all got so many chives, here’s another recipe that will help accomplish that.

This one for  a burger sauce. Wait, it would probably be pretty awesome on baked potato as well… or fish! Hmmm I will have to come back to this one… Also a great one for Potlucks and Barbeques, much safer than any Mayo based stuff for sitting outside in the warmth. And totally guilt free, in fact it ups the protein since most of the sauce is Greek Yogurt, and believe it or not, the couple fo spoons of sour cream completely make it super creamy, you wouldn’t even know that you went for the much lower fat Greek Yogurt.

image

lighter accompaniment for burgers and more…

Ingredients:

  • 1/4 cup chives, chopped
  • 1/2 cup Greek yogurt, try not to use anything below 4%*
  • 2 tbsp sour cream
  • 2 tsp pickle juice (from your cucumber pickles)
  • 2-3 tsp mustard
  • 1/4 tsp salt

* for those of you not familiar with Greek Yogurt, it’s thicker and higher in protein because it is left to drain in cheesecloth. Yes, you could most likely drain your own yogurt and get a pretty good result.

image

Directions

  1. Mix everything except chives until smooth and homogenized.
  2. Stir in chives and serve! How’s that for easy?

imageCopyright © 2012 Simple Healthy Homemade. All rights reserved

Burgers (or what to do with all those chives)

image

The last two nights I had to cover up my garden and my two berry bushes with sheets and table cloths for lack of anything more fitting. They looked kinda like awkward ghosts in the morning sun. But they called for freezing and frost and what not, and since the warm weather made the currants burst into flower, I needed to protect them or they will be done and no berries for me this year. Red currants(and black or Cassis currants for that matter) are pretty hard to come by in these parts of the world and so I am wiling to go through all kinds of trouble to save them, including digging them up at my old house and transporting them in a pot, (poor things they lived in that pot for almost a year) or turning them into ghosts. This morning it was soooo cold inside I had to turn my fireplace on to stay warm (I did turn the heat off, it’s almost May after all, and I am keeping it that way, period.) Yes I will wear a fleece in my house, if need be. And need was definitely there this morning. Then this afternoon it heated up to the point where I removed half my clothes before my run for which I left the house seriously bundled up. AND I had dinner outside, on my deck.

imageWhat do you want? I had to make sure they were good, I watch out for you guys 😉

I had been looking to make use of the chives chive bush that erupted in my garden this spring. So when I just had to put something on the grill, I knew what to try. The try was successful and filled my tummy with super deliciousness!

image

I snip the chives with scissors, I find that the easiest way to go about it

Makes 6 burgers

You will need:

  • 1 1/4 lb ground meat (1 lb venison and 1/4 lb beef mixed, or all beef)
  • 1/2 cup chives, chopped
  • 2 small shallots, finely diced
  • 1 tbsp mustard
  • 2 tbsp tamari or soy sauce
  • 1 egg
  • Fresh ground pepper to taste
  • 3-6 burger buns (preferably sprouted grain such as these)

Serve with

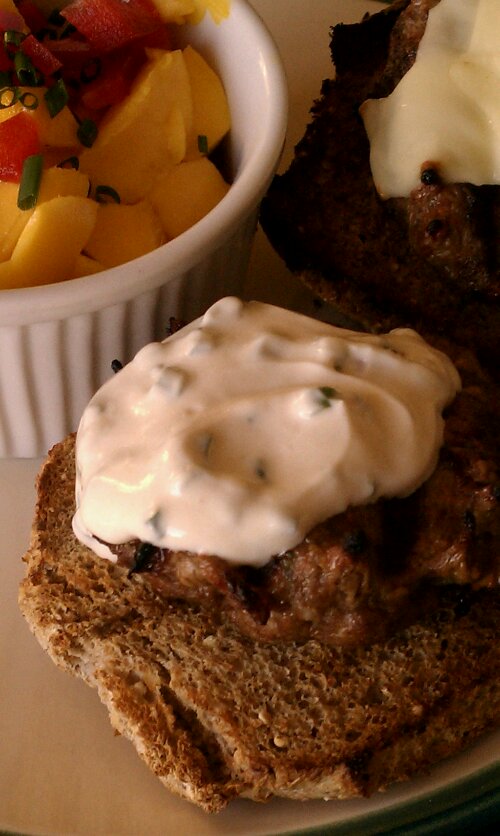
Guilt Free Yogurt Chive Sauce and Mango Sweet Pepper Salsa

image

Directions

  1. In a bowl break up the ground meat using a fork.
  2. Add mustard, tamari, shallots, egg, ground pepper and chives and stir gently until all mixed up (I did not include any salt here, since the tamari or soy sauce is pretty salty)
  3. With your hands, form into 6 balls then flatten out to make a burger patty, set aside.image
  4. Preheat your grill
  5. Grill the burgers to desired done-ness, flipping only once.
  6. Serve on a toasted bun, or half of one, if you like

image

Copyright © 2012 Simple Healthy Homemade. All rights reserved

Finnish Rhubarb Bake

image

This is adapted from an old recipe handed to me by a friend in school who was from Finland. I have made changes to it over the years and adapted the dairy products to something more readily available here in the States.

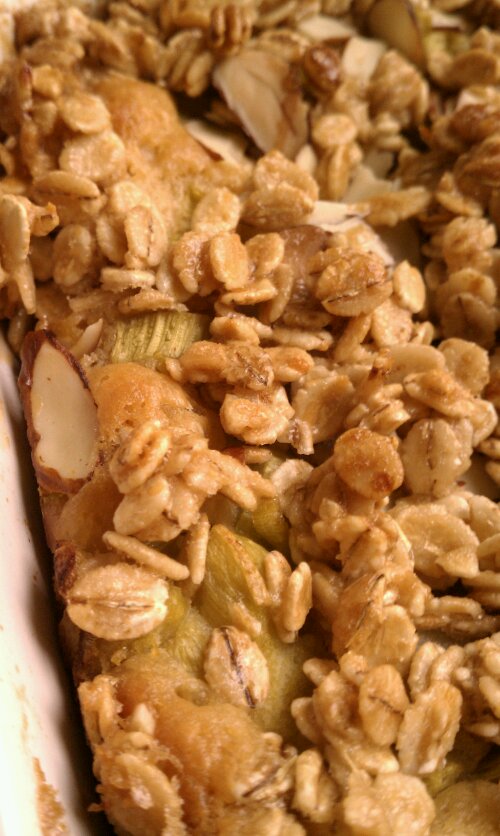
You bake it in a Lasagne type glass dish (9×13″) or using several smaller ones works as well. The resulting cake is moist, tart and sweet at the same time, and the topping makes for an awesome textural contrast. Soft rhubarb and crunchy almonds. Yum.

image‘Budget Version’ made with Oats

This year my garden has not yet produced a ton of rhubarb, it might still be too young, the stalks are nowhere near the size of what my parents have in their garden, but I had enough to make pie, for the first time this year! So I am extra exited, I love tart things and when I was a kid, when we’d cut up and clean the extra amount to prep it for the freezer, I would sneak a piece or two here and there. Yep, raw, no sugar just like that. I am weird, I know 😉 Depending on the amount of rhubarb your garden (or your neighbor’s garden or farmers market ) gives you, you can add more or less (adjust the sugar down if you use less rhubarb, or up of you like it sweet and you use extra stalks). Just make sure you don’t too drastically reduce the sugar, rhubarb is quuuuuuite tart. I have tried it, and it was not so fun. :S

I also tried greek yogurt instead of sour cream, don’t bother. Unfortunately the savings on the side of fat calories do not justify the flavor you lose by doing so. It’s a treat, so treat it as such. There just aren’t any shortcuts for some things, *sigh*

image

Ingredients

  • 4 eggs
  • 2/3 cup sugar
  • 2 sticks butter, melted, separated
  • 1 1/4 cups sour cream
  • 2 1/2 cups flour
  • 2 tsp baking powder
  • 5 stalks of rhubarb, washed peeled and chopped
  • 2 cups sliced almonds or rolled oats
  • 1/4 cup + 2 tbls light brown sugar

Directions

  1. Preheat oven to 400ºF
  2. Butter a 9″x13″ glass dish (adjust baking temp and time if using metal or ceramic)
  3. Mix eggs and sugar, then add the sour cream and stir until well blended
  4. Stir in 1 stick of melted butter, then add the flour and baking powder
  5. Pour dough into prepared form, top with the chopped rhubarb
  6. Mix remaining molten butter and brown sugar, then stir in the almonds or oats, whatever you are using (Oats will be cheaper)
  7. Spread over the rhubarb in the baking dish
  8. Bake for 30 to 35 minutes or until tester inserted in the center of pan comes out clean.

imageCopyright © 2012 Simple Healthy Homemade. All rights reserved

Zucchini Omelette with Prosciutto and Fontina

image

Quick and easy breakfast or lunch recipe you say? Coming right up!

image

As you all know I am not one to let things go to waste, if I can help it and from my Crab Asparagus Frittata the other day, I still have Fontina laying around my fridge deli drawer. Looking through the rest of said appliance, I also have eggplants, celery root, butternut squash and zucchini that I have to cook. I think sometime at the store my love for veggies gets the better of me, or my good intention to eat more produce, who knows that so exactly? Add some Prosciutto for flavor, and using zucchini seemed the easiest for a quick breakfast. Oh, a word on the zucchini. When I was little and my family first grew zucchini in our harden, it wasn’t called zucchini, no zucchetti is what they were called. And as I learned after some basic Italian, things that end with -etto/-etti should be small or little, (just like -ini as in= smaller, younger; fratello= brother, fratellino=little or younger brother) Uhhmm, so, we did not get that memo and let the darn things grow until they resembled some sort of prehistoric weapon, yep, exactly an edible club to go hunt some sabre-tooth with. Do yourself a favor, pick them small, if you grow them. They taste better and you won’t have them coming out your ears… But I digress, the 1/2 zucchini referenced to here is going to make about a cup grated.  Use a really fine mandolin slicer to julienne or shred the zucchini, otherwise you might have to turn the cooking temp down and cool a bit longer.
Ah I love my pastured hen eggs that I get every week at the farmers market 🙂 Now that the grass is getting lush with spring, you can see the color of the egg yolks intensify to almost an orange hue!

imageMakes 2 servings, unless you worked out really hard and are extra hungry 🙂

 Ingredients

  • 4 large eggs
  • 1/2 zucchini, grated finely using a mandolin sliver
  • (optional gulp of milk)
  • 1 slice Prosciutto (di Parma or San Daniele)
  • 1 0.5 oz piece Fontina, cut into small chunks (piece about 3″x 1″ x 0.5″ )

Directions

  1. Scramble the eggs in a bowl, adding a gulp of milk if you like or they are particularly thick
  2. Grate the zucchini into a separate bowl (I have done this both ways, right into the eggs=the omelette becomes a bit more fluffy and moist)
  3. Heat a little oil in a skillet, then add the scrambled egg, sprinkle/spread the grated zucchini on top, then quickly add the chopped cheese and tear the Prosciutto into pieces and drop on top
  4. Cover the skillet with a lid, and cook until the eggs are set on top and the cheese is melted.
  5. Add some freshly ground pepper, if you like. You don’t even need salt, the Prosciutto and Cheese give it enough flavor!

image

Copyright © 2012 Simple Healthy Homemade. All rights reserved

Totenbeinli (Hazelnut Fingers)

image

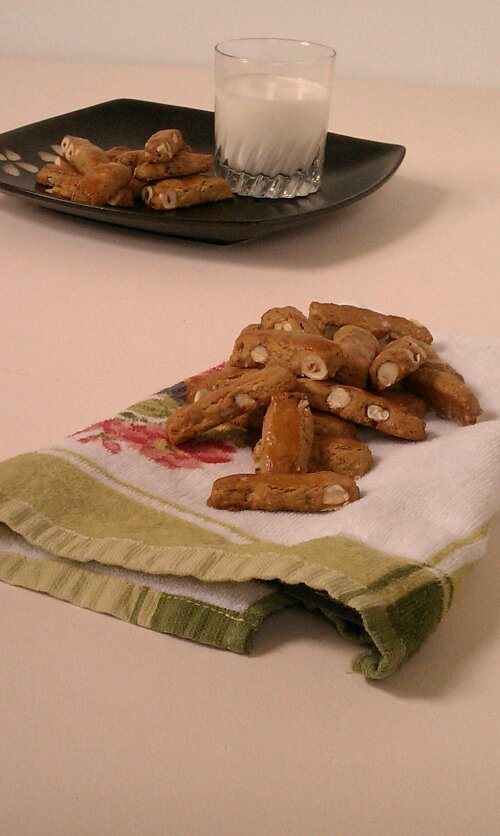
I kept wanting cookies, but at the store I’d either forget or promise myself to make some at home, so at least I would have control over the ingredients. And finally I just had to make the time! I love hazelnuts, in an y form I can get them, and these cookies rely heavily on just that. It’s not juts the flavor, I guess it has as much to do with the memories. Of outdoor adventures and hikes with my family.

Memories of my Dad making flutes out of fresh sprouted hazel twigs in early spring, when the sap just started rushing back up from the roots to make the buds sprout and give life to the plant, then in the summer the nuts would still be green, not quite ripe yet, and we’d sometimes cut small branches  (they are perfectly straight) for grilling sausage over an open camp fire for lunch out on a hike, then in early fall, the nuts would start to turn brown inside their green frilly frock and you knew they would be ready soon!

The great thing about these cookies, just like biscotti, they keep for quite some time. That is, i you can keep from eating them. Since they are crunchy all the way through they don’t go hard and stale like chewy cookies often do, (then again maybe I just don’t eat those other ones quick enough?)

image

These can range from crunchy to totally hard, but they keep, like forever (or until someone with less self control finds out where they are kept). Sort of similar to a biscotti. As per my research (thank you fragtdenkoch.ch) apparently the strange name (Toten= Dead,  Bein=Bones) comes from a custom that was mentioned first around 1500, where these would be served after a funeral. People did not have much and would save luxury items such as sugar, hazelnuts and such things for special occasions, later lemon zest, cinnamon and cloves were added and the cookie is now often made during Christmas time.  Although I remember our local grocery store carrying these in big (maybe not for American standards 😉 ) 500 gr bags all year long. I have pretty drastically reduced the sugar from my original recipe, but I think next time I will try and use even less, they are still plenty sweet!

Oh and just today, I got the local bulk store to turn some hazelnuts into hazelnut butter for me, so watch out world, I can see more Hazelnut recipes in my near future 😉

image

Ingredients

  • 1/3 cup butter, unsalted, softened
  • 1 1/2 c sugar
  • 3 eggs, separated
  • 1/2 lemon, grated peel only
  • 1 tsp cinnamon
  • 1 dash ground cloves
  • 1 pinch salt
  • 3/4 cups unblanched hazelnut flour/meal/ground hazelnuts
  • 1 1/2 cups whole hazelnuts
  • 2 cups flour

image

Directions

  1. Toast hazelnuts for a few minutes, then place on a kitchen towel and rub until some of the skins come off, set aside
  2. Stir sugar into softened butter until well mixed
  3. Add 2 eggs and lemon zest, spices, salt and ground hazelnuts, then add flour.
  4. Once everything is well blended, add the whole hazelnuts and stir.
  5. Let rest in the fridge for 30 minutes
  6. Preheat oven to 380ºF
  7. On a flour dusted surface, roll out to a little under 1/2″ thickness and cut into 1/2″ by about 3″ pieces using a bread knife to get easily through the whole hazelnuts.
  8. Place cookies on a lined baking sheet and brush with the lightly beaten remaining egg, bake for 15-18 minutes or until golden brown and crisp all the way through.

imageMakes lots of cookies, but they’re eaten so quickly

image

Copyright © 2012 Simple Healthy Homemade. All rights reserved

Walliser Brot – 100% Swiss Rye Bread

image

Finally, I think I did it!! It only took about 5 or 6 tries, and me eating countless slices of extremely dense or otherwise unsatisfying 100% rye bread. Which, if I were a cat, would most likely be good for keeping my teeth tiptop clean. But anyhow, I think, finally, I can reveal the outcome of this process, and how fitting this would be my 100th blog post!

Can you believe it? I am celebrating the 100th post on Simple Healthy Homemade! I am super exited and would like to thank all my readers and fellow bloggers for their support and interest in what I cook and scribble! Thanks to all of you who have commented and engaged in the conversation! I truly appreciate your feedback 🙂

image

But let’s start at the beginning of the story. For before I could get started making ‘Walliser Brot’ I had to tackle a couple of hurdles I did not expect. First, the flour here is different. After consulting with one of my friends from Switzerland who, as a baker, had done an exchange year in the USA, I realized that making Walliser Brot (a traditional rye bread from the canton of Valais/Wallis is Switzerland) would be a tad more involved than expected, but that has never stopped me before, and was surely not going to hold me back now that I was craving that particular bread. So the flour situation I knew was going to be some trial and error, to determine what would work as a substitute. But the second part of the puzzle, (or actually the first, since without it, I could not even start the trial process) involved the bread not being made with yeast, but a traditional rye sourdough as a starter. To read more on that and learn how to make your very own rye sourdough starter, read my previous post.

image

A little bit of background on the bread we are talking about here. Walliser Rye Bread is a 100% rye grain bread, it is fairly dark and has a dense crumb. And it tastes nothing like what most of you associate with ‘rye bread’ here in the US. The taste many here think is ‘rye’ actually comes from the caraway seeds added to many rye breads (which I am not a fan of, at all) and to a lesser extend from the molasses. Also this bread has no yeast or added wheat flour to help with the lower gluten content of rye. So I knew it was going to be a sticky situation since gluten in wheat is what makes the dough hold together and be elastic and, uuhm, dough-like. Rye bread dough is often very tacky. But I was feeling a little homesick and nothing can hold you back when you crave something that will make you feel  like home. And we all know, there’s no place like home 😉

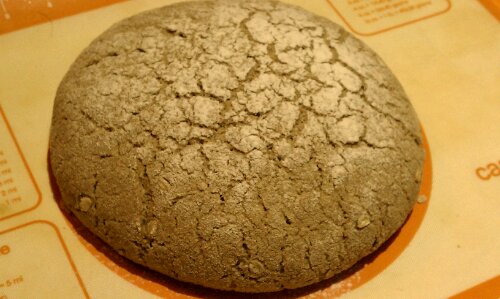
Here is a picture once I finally got it to turn out just right.

Traditionally the oven in the village would only be fired up 2-3 times a year (!!!) and each family got their turn in using it. Follows that the bread would have been hard as a rock after a while, but it also must have kept quite well. There are stories of people using an axe to get a piece of bread cut! It would then be soaked in hot milk until soft and could still be eaten. Here a link for the curious (in German) about Walliser Roggenbrot (Rye Bread) and its history.

image

Rye was the primary or only grain available since it was the only grain suitable to the high altitude and short growing season. In fact, rye was sometimes referred to as “the poverty grain” since it will grow on soils too poor for other grains. Rye grows more rapidly than wheat, can withstand submersion during floods, and continues to thrive during drought.  Rye therefore became especially popular in colder temperate countries – Russia, Poland, Scandinavia, Canada, Argentina, China, Turkey and elsewhere where it was too cold or wet for wheat to grow dependably, like in the high valleys in Switzerland. Besides being able to grow and mature in adverse conditions, it is also higher in protein, phosphorus, iron and potassium than wheat. It’s high in lysine, low in gluten and a good source of zinc, copper and selenium, and a very good source of Dietary Fiber and Manganese. In the high mountain valleys, rye was harvested with the use of only simple tools, by hand and after dreshing, would be stored in a place like this:

Stadel (Storage Barn for Rye)

Here with view of the Matterhorn

A ‘Stadel’ in this region of Switzerland would be built on stilts, which allowed the people to build on very uneven terrain, and would have a large stone plate (I have often seen them built: stilt, stone, stilt) to prevent mice and other rodents from getting into the grain stored for food. Smart move, given that back in the day, you could not just go and buy more if it went bad and you had to make it through a year before being able to harvest more.

image

But let’s get to the recipe!

Ingredients

  • 1 cup rye sourdough starter, active and fed
  • 4 cups whole rye flour* separated, plus additional for dusting
  • (1/4 cups rye flakes, soaked in water for 2 hours) optional
  • 1 tsp salt
  • 3/4 to 1 cup warm water

*Either freshly ground rye (you need about 1 3/4 cup whole rye berries/grains) or store bought, make sure it is whole grain, not white or dark rye flour

Directions

  1. In a large bowl mix the sourdough starter with 3/4 cups warm water, add 3 cups of rye flour, salt and mix until incorporated. Depending on the wetness of your sourdough (the one I maintain is 100% hydration and therefore, quite wet) At this point the dough will be fairly moist and sticky so stirring with a spoon is a good option. If it seems dry, add another 1/4 cup water.
  2. Cover and let rest and rise in a warm spot until doubled in size. This will take anywhere from 3-6 hours, depending on how active your sourdough is and the ambient temperature. If you run out of time, place in the fridge overnight, let come to room temperature before the next step.
  3. To your dough, add 1 cup of rye flour, the soaked rye flakes, if using. Knead until incorporated. If your dough is still very tacky, add some additional flour, if it feels stiff and is dry add a little more water. (This step varies depending on the moisture content of the flour you are using. If your flour has been stored for a while, it tends to be drier than freshly ground flour, and you might have to add some extra water.)imageNow it’s time to get down and dusty. Knead the additional flour into the dough before shaping it into a ball and placing on a floured baking sheet to rise…
  4. When everything is incorporated, form into a ball, flatten slightly, dust surface with flour place on a flour dusted baking sheet and let rest in a warm place until cracks show on the surface. (To create a warm place for my bread in the colder months, I turn the oven to warm (160º-170ºF) for 2-3 minutes, then turn the oven off. Cover the ‘bread to be’ with the inverted bowl so it doesn’t dry out and place in the warm oven to rise.)imageAfter its final rest and rise, ready for the oven… (notice the characteristic cracks)
  5. There are two ways of baking this bread: Preheat oven to 380ºF for 10 minutes, placing a large cast iron dutch oven in the middle of the oven. When the oven is hot, remove the dutch oven, dust the inside with some flour and gently slide the bread into the pan, cover with the lid, then set back in the oven. (You can also use a cloche, if you happen to have one) Bake 45 minutes, then turn heat down to 365ºF remove the lid and bake an additional 15 to 20 minutes or until the bread is baked through. (Do not lift the lid or peak before the 45 minutes are up, you are trying to create a moist and steamy environment for baking the bread! )
  6. If you do not have a cloche or a dutch oven, you need a metal roasting pan or jelly roll pan. Put that on the bottom shelf of your oven as you preheat. When the oven is preheated, place the bread in the oven (on the baking sheet) and add 2 cups of hot water to the roasting pan on the bottom shelf to create steam and quickly close the door, trapping the steam inside. After 20 minutes, add more water if necessary, be careful not to splatter it on the glass parts of the door or at the light bulb, they could burst or crack. Bake for 45 minutes minutes, turn the heat down to 365ºF, check on your bread an bake an additional 15 minutes, or until done. The bread will sound hollow when tapped on the bottom (careful: HOT!)
  7. Turn off the heat and leave bread in the oven for an additional 20 minutes, then remove from oven, and place on a cooling rack.
  8. Let cool completely and rest for a minimum of 24 hours before cutting into it. It will gunk up your knife and stick together or crumble if you don’t wait (Trust me, I know how hard this is to wait when the house smells like fresh bread)
I like it with cream cheese or other fresh cheese just as much as sweet toppings, my favorite currently (besides butter and prosciutto) is cashew butter and strawberry jam 🙂

image

Copyright © 2012 Simple Healthy Homemade. All rights reserved

Best way to cut up a pineapple

Stop buying those crazy gadgets, people!  There is, in no kitchen in the world, the need for a pineapple corer. Not only do you waste money on the tool, but you waste a whole bunch of yummy pineapple every time you cut one up. No No, nononono!
Here is a much better the best way to go about it, and all you need is a big cutting board, a bread knife (trust me, works the best) and, of course a ripe pineapple.
First you cut the ends off, like such…

image

Then proceed to slicing off just the outer layer, or most of the outer prickly layer…

image

Make sure you leave the prickly  ‘dimples’ in place, they provide a visual clue for the next step…

image

Notice how there is a patter to those ‘eyes’? Yes, they run in a spiral around your fruit. So cut out a few at a time, by holding the knife and cutting diagonally from one, then the other side of the dimples, so as to cut out a wedge containing the prickly bits.

image

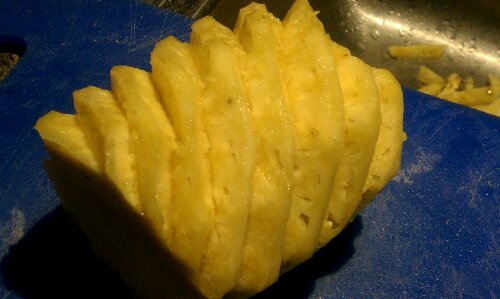
And there is your pineapple! Imagine the waste if you had to cut down to the inner level and chuck all the rest?

image

The only thing left to do now is half, then quarter the pineapple, and cut the hard part off of the center as shown in the picture. Feel free to gnaw and chew on it, its yummy! You just can’t eat all of it, too hard.

And there you go. No more unnecessary waste!

Another thing I like to do, after the outer hard shell is cut off and discarded(since I don’t know where this little fruit’s been hanging around) get a pitcher and put all the diagonal/wedge cut pieces plus the center in it, fill with water and let rest a room temperature for at least 4 hours, then refrigerate. Makes yummy pineapple flavored water. Keeps in the fridge for 4 to 5 days.

Would be really yummy on some fresh cheese or yogurt…but we’ll have to make do with plain Kefir, since that’s all my fridge will give me at the moment…

Copyright © 2012 Simple Healthy Homemade. All rights reserved

Spaghetti Squash Leftover Bake

image

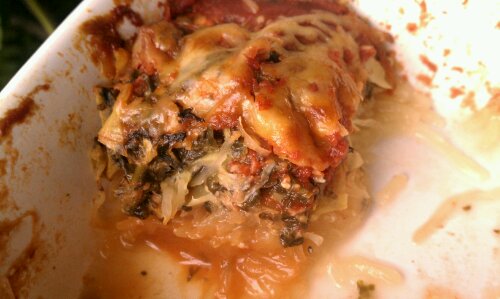
It’s a glorified leftover dish everyone will be exited about. It’s vegetarian, its cheap and it uses leftovers, option for no leftovers following as well. I mean, who has spinach artichoke dip leftovers? Pffffft!

For a long time I did not dare to eat this interesting item, it just seemed… wrong and I had no idea what to do with it once it would find its way into my kitchen. Stringy things are not usually a good thing when it comes to veggies, like stringy beans or the wire like strings in tough snowpeas that quite nearly strangle unsuspecting eaters. But finally curiosity won out and I have departed from the ‘just put spaghetti sauce over it’ approach that is generally the extend of creativity people come up with when confronted with the ‘what to do after it’s cooked’ question.

image

So while this particular squash can’t quite keep up nutrition wise with some of the other members of the winter squash family, its high water content kinda work against it there. Not to say it’s unhealthy, by no means, it’s just not as nutritionally dense as some of the other ones, but it’s a great low calorie, low carb choice!

One of the issues I have with this, like some of the other winter squashes as well, is what to do with it all? I am a one person household on most days and I really, really would like to not have to eat the same for lunch and dinner all week. Maybe I am weird that way, but hey, there’s worse 😉 Well, I have found that cooked spaghetti squash freezes quite happily for a couple of months, stored in zip top sandwich baggies. That way it’s ready to defrost in my fridge for whenever I need it.

So first, yes you do need to bake (or microwave) the thing to cook its interior.  Prick it with a fork all over so it doesn’t blow up on you, and either cut in half, scoop the seeds and discard and place cut side down on a baking sheet in the 350ºF oven until tender, or microwave without cutting in half until tender and easily cut in half (Careful, extremely freakin’ hot)

Once it’s cooled to an acceptable temperature, using a fork, scrape the stringy flesh into a bowl. Portion up as convenient and freeze until needed!

image

For two people as a side (or small meal) or 1 hungry eater

You need:

  • 1 cup cooked Spaghetti Squash (defrosted if frozen)
  • 1 cup Spinach Artichoke Dip (or 1/2 cup chopped artichoke hearts, 1 cup chopped fresh baby spinach, chopped & 1/2 cup italian cheese mix, microwave until cheese is melted and spinach wilted not quite as creamy, but works)
  • 1/2 of a 8 oz can tomato sauce
  •  1/4 cup of Italian cheese for the top (use a mix that has more than just mozzarella, so you get better flavor

Directions

  1. Preheat oven to 350ºF
  2. In an oven proof 2 cup square dish layer spaghetti squash, then top with Spinach Artichoke Dip, followed by tomato sauce by the spoonfuls. Top all of it with a handful of cheese.
  3. Bake until heated through and bubbly, cheese is melted and beginning to brown (about 15-20 minutes)

image

Copyright © 2012 Simple Healthy Homemade. All rights reserved

Fish Wellington

image

I have been eyeing these recipes for Beef Wellington for months now, but never had an occasion to try myself at it. But since this was going to be a Friday meal, fish seemed like the more appropriate (and quite honestly also quicker to prepare) route to take, and boy was it a good choice!

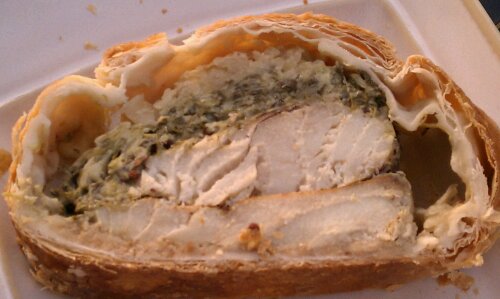
It looks so fancy and tastes super yummy! Shhht! don’t tell your guests just how easy it was to make! Just a heads up folks, this is not going to be an exact recipe, you might or might not use all the dough, depending on the size of the fish fillet. It took me a while to get this post done, because frankly, I don’t really know how much fish it was 🙁 I had three fillets, one long and narrow, but quite thick and the other two a bit more ‘regular restaurant piece of fish’ shaped. My best guess is that is was about two pounds? I am going backwards off of the half pound per person  It easily feeds four, if you want to make less, you only need one sheet of puff pastry. I froze the rest, since there were two people eating but there was about half leftover. Will update on whether or not baked puff pasty freezes well, once I try it out.

imageWhat it looked like coming out of the oven…

Fish Wellington, fancy was of saying: Fish in Puff Pastry, either way it is totally worth the time hunting the frozen food aisles for puff pastry. In Switzerland you can get this fresh in the dairy section, so it took me a few years of looking, hoping and experimenting with making my own until I found it, by chance sitting there in the frozen aisle. You can make your own and I do on occasion since it tastes soooo fantastic. And yes, there are versions that use the entire GDP of a small developing nation in butter, but there are also versions using various other dairy products that are not quite as ridiculously high in fat. Although I have to say to make croissants, the butter is a must. But back to our subject… Fish. For this recipe, you could most likely use salmon, (adjust cooking time according), haven’t had a chance to try that, so if you do, let me know how it works out!

image

Ingredients

  • 1 pack frozen puff pastry (you might not use all)
  • 2 lbs (about 3 pc) firm white flesh fish fillets such as pollock, cod or similar
  • 1 cup Spinach Artichoke Dip
  • 1 sweet onion
  • 3 tbsp bread crumbs
  • 1 egg, lightly beaten
  • 2-3 tbsp whole grain Dijon mustard (such as Maille à l’ancienne)

image

Directions

  1. Chop onions and cook over medium until translucent, then turn up to medium-high and cook until starting to brown. Set aside
  2. Pad fish dry with paper towel. Salt and pepper fillets all over, set aside
  3. Roll out pastry on a floured surface, sprinkle the center with bread crumbs then place the fillets on top. This depends on the shape and size of your fillets. If they have thinner and thicker ends, overlap the thin ends, and cut the third fillet in half, place on top. (What you are trying to do is make the fish layer uniformly thick, so it will all cook at the same time)
  4. Spread the mustard on top of the fish, then top with 1 cup Spinach Artichoke Dip, and layer all with the cooked onion.
  5. Brush edges of pastry with egg, the top with the second sheet of puff pastry, crimp edges using the tines of a fork to seal. (If your parcel is rather small after layering the fish, just fold up the edges of the pastry and crimp on top, or top with just part of a second sheet making sure you seal all the seams
  6. Preheat oven to 425ºF.
  7. Brush top of pastry with egg, cut several vents in the top to allow steam to escape while baking.
  8. Bake 30-40 minutes or until fish is cooked and contents are bubbly.

image

Copyright © 2012 Simple Healthy Homemade. All rights reserved
Asparagus Fontina Crab Frittata

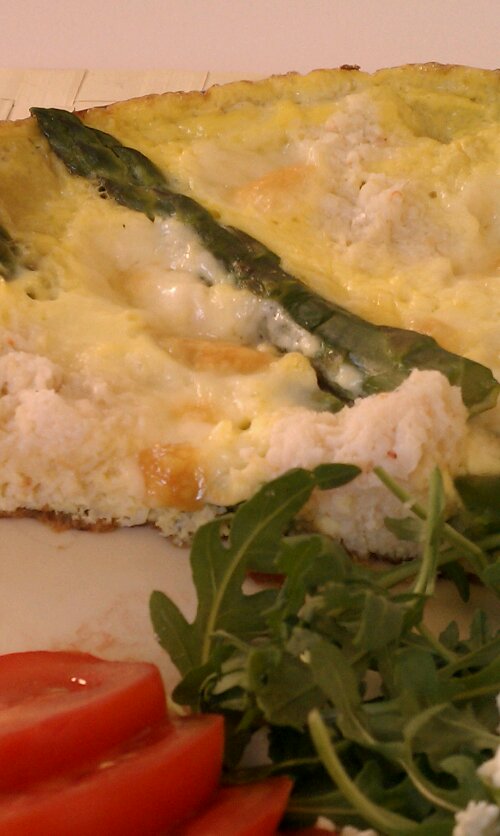
Elegant and special enough for a Sunday brunch, but easy enough for everyday. So indulge, treat yourself because you made it to Friday! With a side salad it also makes a great light lunch or dinner, in fact, why limit yourself? Have it any time you like!

image

Serves 2

Ingredients

  • 5 eggs, scrambled
  • 2 oz Fontina cheese, cubed
  • 1 can crab meat, 6oz, drained (I used a regular ‘fancy’ not jumbo lump, although that of fresh would certainly be tasty)
  • about 1/2 lb asparagus
  • freshly ground pepper

no really, that’s it 🙂

image

Directions

  1. Wash and cut the asparagus spears, then lightly steam them by adding to a saucepan, add 1 cup water, cover and heat until almost fork tender
  2. Heat a oven proof skillet with just enough oil to make it non stick, add eggs and cook for about 30 seconds before adding crab meat in heaped tablespoon portions, then spread the asparagus and the cheese over your eggs.
  3. Preheat broiler on low, when eggs are set, place skillet under broiler for 2-3 minutes, leaving door ajar, until top of Frittata is browned in spots and the eggs are cooked through.
  4. Serve with some greens on the side, or a full blown salad to make it into a bit more of a meal.

image

Yes, it’s THAT good!

imageCopyright © 2012 Simple Healthy Homemade. All rights reserved