Versatile Blogger Award

Imagine my surprise when I turned on the computer this morning and saw that someone had nominated me for a Versatile Blogger award. The someone was a gal who thinks very close along the same lines I do: If at all possible make it yourself. She might word it a tad different but in essence the Townhouse Homesteaders Blog is about making due with what is available to you, no, not just making due, since that can almost have that ‘not enough’ feeling but living excellently by making smart choices and having the right priorities! Thanks for the nomination, Kris 🙂

i tried my best to comply with all the below rules and reg. 😉

So, here are the rules & regs for those who receive the Versatile Blogger Award:

1.  Nominate 15 fellow bloggers for The Versatile Blogger Award.

2.  In the same post, add The Versatile Blogger Award.

3.  In the same post, thank the blogger that nominated you in a post with a link back to their blog.

4.  In the same post, share 7 completely random pieces of information about yourself.

5.  In the same post, include this set of rules.

6.  Inform each nominated blogger of their nomination by posting a comment on each of their blogs.

So below are my ‘regulars’, the ones I check out often and love to browse through for comfort, ideas and inspiration:

Healthful Pursuit with its healthy eats and nutrition tips will always have special spot in my heart, her blog was something I followed before I decided to give it a go, and I have to say she was a large part of the inspirational push that got me started here. Thanks 🙂

Love Veggies and Yoga, Averie’s Blog was and will always be an inspiration. A joy to read and someone who isn’t afraid to change the way she eats, cutting out certain foods for a while and is always up for re creating store items at home, just better (like granola bars or expensive crackers)

Teabagginit refreshing blog about food and life. I absolutely love her tagline: “A woman is like a Tea Bag. You never know how strong she is until she gets into hot water.” ~ Eleanor Roosevelt

Stone House Road from homesteading over cooking on to seed saving, a little of everything and so delightful to read, Daisy always makes me laugh!

Chez Cloe lots and lots of yummy stuff

35 a week ‘K’ manages to make all meals for two for $35 for an entire week, my hat off to that!

Empty Wallet Gourmet Meal another frugal foodie I enjoy!

Lightly Crunchy, one of my new favorites, she has the best sense of humor!

La Mia Cucina this one’s in German. Hailing from my hometown Basel and besides fabulous recipes, you can also see glorious pictures of Switzerland (miss it)

Wild Yeast Blog check it out for anything baked. Since I love bread, I love to make bread I am always interested in other’s baking adventures

Sumptuous Spoonfuls needs no words from me besides: yummy

Tasty Yummies Beth makes some awesome gluten free things over on her blog

Oh She Glows Vegan recipes, also good for omnivores like me 😉

Check them out, they all are marvelous and well worth reading!

Oh and now for the completely random facts:

  1. My brother lives on an island in Thailand (I am jealous when it is yucky and cold here)
  2. I like the smell of pine needles in the sun
  3. I have been knitting since I am about 5 years old
  4. I used to teach Middle Eastern dance (yes, that is bellydance)
  5. My pets are from the feline kingdom
  6. I like fog, over the meadows, over lakes, wherever. It’s beautiful 🙂
  7. I speak 4 languages

Hope you all enjoyed and thanks again to Kris at the Townhouse Homesteader for the nomination 🙂

Lighter Spinach Artichoke Dip

image

This proves that Spinach Artichoke Dip does not have to be a totally unhealthy indulgence. Well, it’s not quite diet food either, but besides being much lower in sodium than any restaurant version out there, this also has a lighter hand on piling on the fat calories and you get a good bit of veggies.

imagePlus you get waaaaaaaaaaayyy more Artichokes when you make it yourself 😉

imageMake extra, it makes a terrific layering ingredient to so many things     (like Fish Wellington, and Spaghetti Squash Bake)
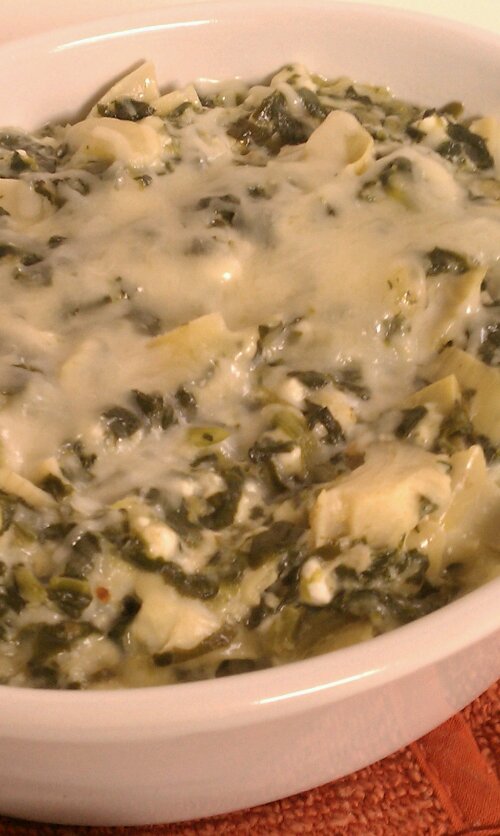
Ingredients

  • 1 pack frozen chopped spinach (10 oz), thawed
  • 1 pack frozen artichoke hearts (9 oz), thawed or canned (if using canned, drain and rinse)
  • 1 clove garlic
  • 1/2 cup cottage cheese
  • 1/2 cup thick fromage blanc (or sour cream)
  • 1 cup Italian cheese blend, shredded (mine had 5 cheeses in it) + some for topping …sometimes when I am really hungry, I use 2 cups 😉

image

Directions

  1. Squeeze the defrosted spinach until mostly drained. set aside.
  2. Chop the artichoke hearts into small pieces (chunks are fine, just remember you have to be able to ‘dip’ it up)
  3. In  a pan, heat a tablespoon oil, then add the minced garlic and stir, cooking carefully until golden, but not brown.
  4. Add the Spinach, Artichokes and the Fromage Blanc, stir then add the cottage cheese and heat until it gets stringy.
  5. Add the Italian cheese mix, and heat until melted, pour into a serving dish or oven proof form and sprinkle with some more cheese, cover and allow the cheese topping to melt. Serve with veggies or corn chips for dipping.
  6. Can be made in advance, cover and refrigerate, then reheat in the oven at 350 until hot and melted, or microwave until hot.

image

Copyright © 2012 Simple Healthy Homemade. All rights reserved

Fromage Blanc

image

It took me years to figure out what the elusive desert ‘cheese’ was we had back home, it was called ‘Blanc Battu’ short for fromage blanc battu and it is delicious with some fresh berries! Helpful but uninformed people over the years suggested farmers cheese and friendship cheese, but nehh, not the same AT ALL. Turns out you can make it at home here in the US quite easily with ingredients that are not too hard to come by. * Happy  dance* ( In am doing that a lot lately, hmm)

Fromage Blanc culture is available from New England Cheese Making and the process couldn’t be simpler.

You need:

Milk, culture (see above) stainless steel cauldron (just kidding, you only need a pot) Thermometer, a colander and butter muslin. For a fresh and soft desert cheese (ok you can also drain it more and mix it with herbs or drop spoons full into your Spinach Salad, but if you leave it a little more moist it makes the best desert, and healthy too!) Again, for a fresh and soft cheese like this, the fresher the milk the better the cheese is going to taste. If you have access to a farm, where you can get yourself some raw milk that would taste the best. If you’d like to make it fat free or at least with less than the whole fat content, let your raw cow milk sit for 12 hours in the fridge, then skim off the layer of cream that forms on top (and make butter with it for example)

    • 1 gallon milk
    • 1 pack fromage blanc culture

image

Directions

    • In a large pot heat the pasteurized milk to 86 degrees.The best and easiest way to do this is by placing the pot in your sink and filling the sink with warm (not hot) water. (86°F isn’t all that hot…)

image

    • Once at temperature, sprinkle the direct set fromage blanc culture over top, let sit 2 minutes then stir and mix in well.
    • Cover and let the milk sit undisturbed at 72°F for 16 hours (you can do as little as 12 hours, but I have found I like the taste best after about 16), in the colder month you want to add some warm water to the sink every so often.
    • After the required time, you will have something like this, kinda like a thick yogurt consistency

image

    • Ladle into butter muslin lined sterilized colander and drain for 3-4 hours (if you are going for more of a cream cheese texture, you can let the whey drain out for up to 12 hours), scraping the sides of the butter muslin every so often if the cloth becomes clogged. (One trick to draining this properly is to hang the knotted cheesecloth from your kitchen faucet)
    • For true Blanc Battu, place the drained curd in a bowl and using your handheld mixer/egg beaters, beat until smooth.

image

I know I have mainly berry pictures, but it is super yummy on a nice piece of crusty bread with some chives sprinkled over

image

    • Use fromage blanc instead of sour cream in your favorite recipe or dressing.
    • Whey makes a terrific fertilizer for your plants: Unless you are going to use it for something else, don’t juts dump it, give it to your (indoor or outdoor) plants. The year I started making cheese, my fig tree had the most figs ever!

Copyright © 2012 Simple Healthy Homemade. All rights reserved

Sticky Rice with Mango (Khao Neeow Mamuang)

image

Sticky rice, also called glutinous rice (even though there is absolutely no gluten in rice) is eaten sweet as a snack or desert a lot of places in Thailand, in the northeast of the country it is also served along your meal, unsweetened of course. That rice finds its way into meals from breakfast to desert isn’t surprising for a country where rice is a main staple in the diet, after all the verb ‘to eat’ in Thai is tantamount to ‘to eat rice’

image

For me, nothing says Thailand more than getting a serving of sticky rice with mango from a small place off a street corner somewhere. Vendor’s specialize in this dish and often you will find a line of people when mangoes are in season. That’s what I look for 😉 where the locals eat, it’s always the best. It’s served with sweetened coconut milk and is just delicious! Back home I would order it at Thai restaurants any chance I’d get, but alas it was often unavailable due to seasonal availability and because, unfortunately the restaurant often thought that ‘common’ food was not what should be served to guests in their establishment. 🙁 Imagine my joy when a few years back, I finally figured out that this exotic desert was actually pretty simple and easy enough to make at home. Cheaper and available whenever the lovely grocery store carries yummy mangoes. Win & win! Now I just have to figure out how to make the taro desert I can only get in Thailand…

image

You need to start this several hours before you want to indulge, since the rice is first soaked, then steamed.

Ingredients

  • 1 cup sticky rice*
  • 2-3 ripe mangoes, cut into bite sized pieces
  • 1 can coconut milk (not the light kind)
  • 2-3 tbsp palm sugar

Directions

  • Soak the rice in cool water overnight or at a minimum 4 hours
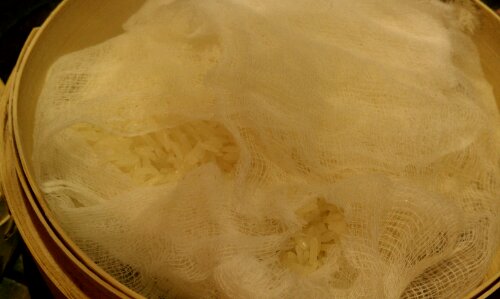
  • Line a bamboo steamer with cheesecloth and over the sink pour the rice into it to drain. Fold the cheesecloth over the edges so it doesn’t hang down and catch fire (tried that, and no, it doesn’t improve the flavor). Cover with the steamer lid.image
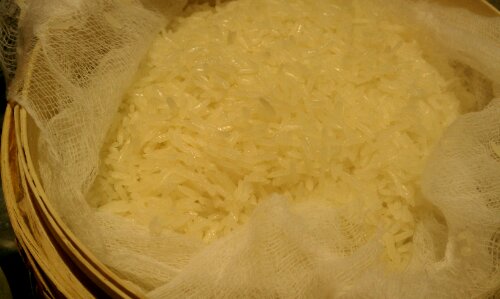
  • Set your bamboo steamer over a pot or wok of boiling water, and steam until the rice is cooked and yields softly to the bite. It will have a tacky consistency, will be slightly shiny and the rice grains will stick together. Takes about 15 minutes.

image

  • In the meantime, gently heat 3/4 of the can of coconut milk in a sauce pan, add the coconut sugar and stir to dissolve.
  • When the rice is done, transfer to a bowl and add the rest of the can of coconut milk, stir to mix. Let stand a couple of minutes until evenly moistened, then serve with mango and sweetened coconut milk.

If I get a good deal on mangoes, like I did this week, (hence the mango cheesecake, and this) I will make a good batch of this and keep the rest in the fridge, to reheat as needed for a quick exotic snack or desert anytime 🙂

*You can get this type of rice at most Asian stores, look for glutinous rice, sticky rice or sweet rice. Regular rice won’t work. It comes in white as well as purple!

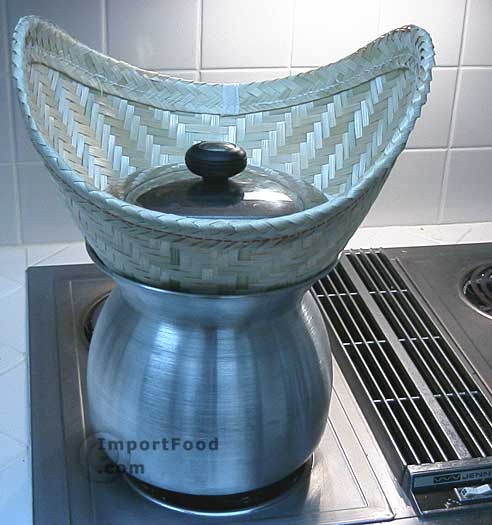
If you find you end up making this a lot, you can get yourself an authentic sticky rice steaming contraption at Importfood.com as seen in the picture to the right here. I so far have used my regular (Chinese) bamboo steamer with results that make me happy 🙂

Nomnomnom nom nom…image

Copyright © 2012 Simple Healthy Homemade. All rights reserved

Risotto milanese

Not quite conventional saffron risotto.

The creaminess of a good risotto is pure comfort food, at least to Europeans. However you look at it though, usually the recipe involves days of stirring over low flame (ok, I’m exaggerating slightly here) to reach that creamy state any self respecting risotto cook strives for. Since time isn’t always that easy to come by in my life, I needed something less traditional (sadly), but no less delicious or authentic tasting and most of all time saving, or at least work saving. I can see you frown, my purist friends, but since I made Osso Buco in the slow cooker, and therefore am already in the purgatory of purist cooks, I figured a little more deviation from the conventional path couldn’t hurt too much more.

image

So instead of adding water by the spoonful and being shackled to your pot for the purpose of slow and steady stirring, my quick version let’s you complete other tasks since it takes much less work. To make up for the blasphemy of bastardizing the preparation technique, I tried appeasing the food gods by adding extra saffron. You know: give some, take some. 😉
It’s utterly creamy and delicious, even without the long stirring and I think it can hold its own next to any traditional risotto, especially considering it’s weeknight fare!

image

Saffron is the most expensive spice by weight (worth thousands of dollars per pound!!) which isn’t surprising given that only about 5-7 pounds can be produces a year from an acre of land and the harvesting process is delicate and labor intensive. Saffron threads are the dried stigma of a fall flowering crocus variety and they have to be harvested by hand. By use however it isn’t all that expensive, since a little goes a long way and you only need about a pinch for a nicely flavored and colored risotto. And if you have a little land, (a flowerbed works perfect) you could order yourself some saffron crocus bulbs like me and harvest some of your own each year. I dry them on paper towels on top of my fridge, where they are out of the way.

image (this makes enough for 2 people/servings or to go with the slow cooker Osso Buco)

Ingredients

  • 1/2 cup Arborio, Vialone or Carnaroli rice
  • 1 small shallot, finely diced
  • 1 tbsp olive oil
  • 1/2 tsp salt
  • water (or broth)
  • 1 pinch of saffron threads
  • Parmiggiano Reggiano (Parmesan), to shave on top

Directions

  1. In a medium sauce pan heat the oil, the  add the shallot and cook until translucent. Add the rice and stir until all grains are coated.
  2. Add 2 cups of water and bring to a slow boil, stirring every couple of minutes, season with the salt, turn down if it starts to boil to rapidly.
  3. Cook for about 10 minutes, stirring every couple of minutes, then remove about 3-4 tbsp liquid, let cool slightly, add the saffron threads to hydrate and let sit for a couple of minutes before adding back to the rice.
  4. Add water, 1/2 cup at a time, while you are cooking the risotto, as the water gets absorbed. Your goal is to cook the rice to a nice and soft consistency and not have it swimming in water, keep stirring every so often.
  5. Cook until the rice is tender and creamy, adding water if necessary and stirring as above, total time is about 20 to 25 minutes, depending on the amount you make and I think also, the age of the  rice.
  6. If there is just a little liquid left when the rice is done, cover and let sit off the heat, the high starch content will absorb the excess moisture while it sits.
  7. Serve topped with shaved Parmiggiano Reggiano

image

Copyright © 2012 Simple Healthy Homemade. All rights reserved

Osso Buco ‘Slow Cooker Friday’

imageOsso Buco – Braised Beef Shank

This is part of the ‘Slow Cooker Friday’ Series, more recipes are Thai Red curry chicken, Turkey Provençal and Sausage and White Beans.

OMG, this is so super awesome, and easier than pie. And I swear there is no way anyone can tell that you did not labour over a hot stove for four hours or more. Go ahead, bask in the glory, no need to tell them. But it totally cooks itself while you’re at work, the only thing to do when you get home is to make the risotto (or I guess polenta or pasta in a pinch) and I have a maybe not totally authentic but very totally labor saving version for that as well 😉

The flavor factor is off the charts but for one person, well I guess it would have fed two, really, but I like leftovers and if you’re nice you’d probably want to serve one beef shank per person, so get this, the meat for one only cost me $3.55-$1 (coupon)=$2.55. And that really is for two meals. There are also a carrot, a piece of celery, onion and some tomatoes in there, but you all agree the big ticket item is generally the meat. Striving to be more frugal, like ‘K’ over at the $35 a week project. I admire how she can make a dollar last!

image

Even though the recipe tastes like a million bucks, it definitely isn’t one you have to crack the piggy bank open for, so put the hammer down… and get the crock pot out!

The trick to making this taste like the original, comes from two essential steps: browning the meat before cooking and thickening the sauce after cooking. The rest is taken care of while you are gone. Added bonus? The delicious smell all over the kitchen when you get home at night!

image

Ingredients

  • 1 beef shank (about .7lb) (Osso Buco is traditionally veal, but beef works wonderfully)
  • 1/4 cup flour for dredging
  • 2 tbsp butter or oil
  • 1 carrot, cut into 1/4″ rounds
  • 1 small celery stalk
  • 1/2 onion, diced
  • 1 pint of cherry tomatoes, halved, or 1 can (14oz plum tomatoes)
  • 2 sprigs thyme
  • 1 small sprig rosemary
  • 1 cup dry white wine
  • about 1  1/2 to  2 cups beef broth (depending on the size of your beef shank)
  • salt& pepper to tast
  • 1 tbsp lemon peel, finely diced
  • 1 tbsp fresh parsley, finely diced
  • 1 tsp minced garlic (from on small clove)

image

Directions

  1. Season beef shank all over with salt and pepper. Put flour in a wide, shallow dish, dregdge the beef shank in the flour, then shake off excess flour.
  2. Heat 2 tbsp butter (or oil) in a skillet, when hot, add the beef shank. Cook until golden brown, turning once (It is important you don’t go and turn it over multiple times, or it will not brown properly) about 8 minutes. Beef will cook more later, this is just to give it more flavor. Transfer beef to slow cooker.
  3. Add white wine and the broth to same skillet, scrape up any browned bits, then add the onion, carrot, tomato and celery. Bring to a boil, then transfer all to slow cooker insert.
  4. Cook for 6-8 hours
  5. To thicken the sauce, pour it out of the slow cooker (careful, insert is HOT, use gloves) into a sauce pan and boil on the stove top for 15 minutes or until thickened. No need to make sure it’s just the liquid, if the vegetables come along, that’s fine. (If you used too much broth,  and it is still very liquid after 15 minutes, you could always thicken it with some flour or corn meal)
  6. To make Gremolata: Finely chop the lemon zest, garlic and parsley, serve the Osso Buco topped with Gremolata and a side of Risotto Milanese

imageThis is when I remembered the sauce and the gremolata to put on top, with extra lemon peel, because it’s so good 😉

imageAnd yes, I did lick the plate… Shhht!, no one saw me…

Copyright © 2012 Simple Healthy Homemade. All rights reserved

Banana Chocolate Raw Pudding

image

There are days when chocolate is the only thing that will do. And today I had one of those days. To make up for it, there is nothing like treating yourself with something yummy, delicious even decadent! Yay, treat time! Decision made, but good things don’t have to be bad for you. And yes, you can have this even if you don’t eat sugar. The only sweetness comes from the bananas! Let them get nice and ripe  over-ripe brown, and you’re in business! Easy to make and guilt free too 🙂

image

Ingredients

  • 2 over ripe bananas, mashed with a fork
  • about 1/2 cup milk (dairy or almond)
  • 2 tbsp cocoa powder
  • 2 tbsp ground flax seeds
  • 2 tbsp chia seeds

Directions

  1. Mash the banana with a fork
  2. Add the milk, stir until well blended
  3. Add the cocoa powder, flax seed and chia seed and stir it all together until mixed
  4. Refrigerate overnight

image
Copyright © 2012 Simple Healthy Homemade. All rights reserved

Creamy Fennel Parsnip Soup

imageSuper easy and velvety smooth, even though there is absolutely no cream in it!
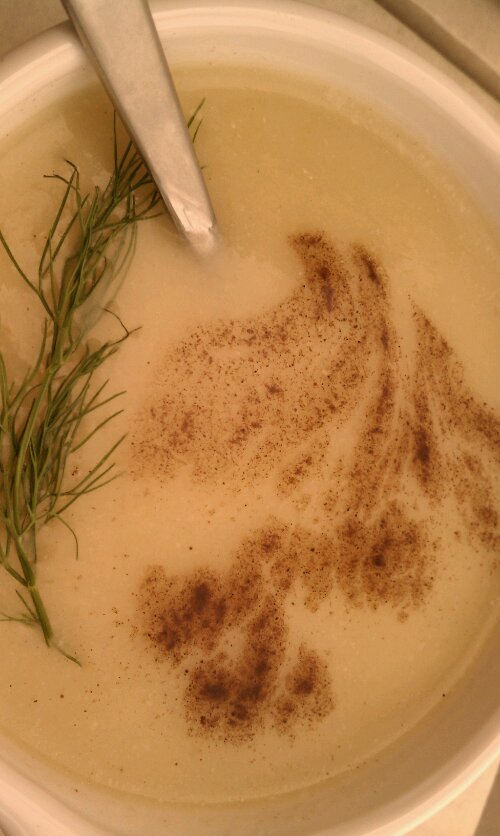
This is made after a recipe I found on a fellow blogger’s site ‘La Mia Cucina‘ from Basel, my hometown. Since I discovered the recipe, I have made it three times, in slightly different variations. I have never tried it with the liquors the original recipe calls for, mainly because I did not have them on hand, Noilly Prat and Pernot are not part of my regular arsenal of beverages and to hunt them down just for a soup seemed a bit outrageous to me. I was just gonna take my chances, and happily have since found, that it seems perfect even without. If this soup was any better with, that would almost be alarming. It’s oh so smooth and creamy, and that without any cream or potatoes. Depending on who you ask (as per the original blogger) thanks to the parsnip or thanks to the fennel. But I think the pureeing and passing it through a fine meshed sieve might have something to do with that as well. I mean, just maybe? 😉 Surprisingly to me, there wasn’t much fiber leftover in the sieve, even though the soup contains fennel.

image

Ingredients

  • 1 medium fennel bulb, trimmed and sliced
  • 1-2 medium parsnips, peeled or scrubbed well and diced
  • 1 shallot, diced
  • 1 1/2 quart vegetable or chicken broth (or water and salt)
  • water
  • allspice

image


Directions

  1. Heat a little oil or butter in a heavy soup pan. Add the shallot and cook until softened and glassy looking, but not brown.
  2. Add the chopped fennel and the parsnip, stir to get the shallot off the bottom of the pot so as not to burn itimage
  3. Add the broth, bring to a boil, reduce the heat and simmer until fennel is tender.
  4. Let cool slightly then tip soup into a blender, and puree until smooth. Rinse the soup pot, place a fine meshes sieve on top and strain the blended soup back into your soup pot. You can stir with a spatula to help get the soup through. Discard whatever is leftover in the sieve.
  5. Reheat the soup, thin with additional water as needed and serve garnished with liberal sprinkles of allspice (if you like), some leftover fennel fronds and a hearty slice of bread.

imageCopyright © 2012 Simple Healthy Homemade. All rights reserved