OwlCat Designs


Welcome to OwlCat Designs!

New patterns and other important updates will show up here first, but if you would like to know a bit more, there are several ways to get your hands on some background info and possibly a coupon here and there…

Ways to stay in touch:

You can find my patterns (as they become available) under [OwlCat Designs][1] on Ravelry.
Join our Group OwlCat designs Studio on Ravelry for more info on patterns, help, errata, knit alongs or to share your thoughts and Pictures of finished OwlCat designs Projects!

The best visual way to stay in touch is Instagram. See what I am up to here: https://www.instagram.com/owlcatdesigns

Follow us on facebook: OwlCatKnits

or on Twitter: @owlcatdesigns


and you can even sign up to get an email (and email only coupons), every time a new pattern is published: http://eepurl.com/HIXBP

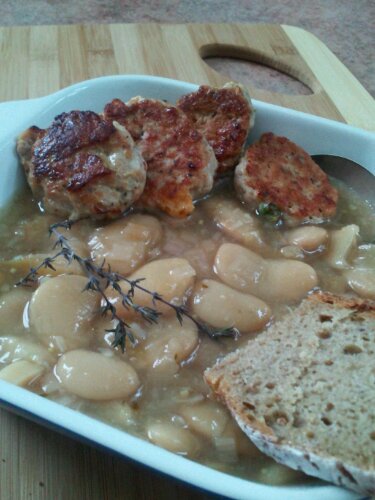
White Beans with Leeks and Thyme ‘Slow Cooker Friday’ Stew or Soup

image

That ended up being quite a long title, but the ingredient list is all the shorter to make up for it. And yes, I realize it’s not Friday 😉

Shorter days and all the holiday activity can leave you tired and sleepy. It’s darker earlier and after the hustle and bustle of the holidays most don’t feel like doing as much as on a sunny summer evening. Add to that the weeks of overindulgence that usually lead up to the end of the year, the lethargic feeling that comes with it and you know you really don’t want to cook at all. But luckily to your aid comes the slow cooker! After a long week of work or entertaining, you deserve to come home to a meal that’s good, good for you and won’t break the bank! Prepare in the morning and decide if you want soup or stew on your way home! (Sorry there are no picture of the soup, we were too hungry and it was dark out, but let me tell you, it was yummy)

image

I used a 2 qt size round cooker for this recipe. Makes 4 servings if you add some Chicken Sausage Patties on the side.

Ingredients

  • 1/2 lb dry white beans ( I have used both baby lima and regular dried lima beans) rinsed
  • 1 cup leeks, white and light green parts only, (from about 2 stalks) cut into rounds and cleaned well*
  • 1 tsp salt
  • 1/2 cube Rapunzel (no salt added) bouillon
  • 3 sprigs thyme
  • 4 cups water
  • (optional) pancetta or speck as a topping or chicken sausage patties as a side

* Leeks can trap a lot of dirt, so submerge the cut rounds in cold water and move pieces around with your hands, changing the water a couple of times if necessary until no more ‘sand’ collects on the bottom

imageHere served with a nice slice of 10 grain sourdough for a vegetarian dinner (resuscitate your sourdough starter in the back of the fridge, you will need it for this yummy bread, recipe coming up soon)

Directions

  1. Rinse beans well, then layer into the slow cooker and add 3 cups of water.
  2. Add the cleaned leeks, salt and thyme sprigs.
  3. Turn your slow cooker to high and wait 5-6 hours until beans are fully cooked, adding water if necessary. (On low the recipe will take longer, about 8-9 hours)
  4. When you get home, either serve as is, or add another cup of water and using a hand held blender, puree the beans and leeks until smooth, adding more water if you like a thinner soup.
  5. Cook some chicken sausage patties until nicely browned and serve along the stew or cook a slice or two of Pancetta or Speck, crumble and top your soup with it

imageCopyright © 2012 Simple Healthy Homemade. All rights reserved

Chicken Sausage Patties

Chicken Sausage PattiesSausage can be a mixed bag of tricks. Store bought it often contains a lot of fat with the flavor that we all want. But if you want to control fat and sodium content, blending up your own patties (unless you know of a great source that makes chicken sausage from just breasts) is often the only choice. It’s quick and cheap and oh so versatile! Trim all visible fat from the chicken breast prior to making these.

Ingredients

  • 1 boneless chicken breast half, coarsely chopped (1/2 to 3/4 pounds)
  • 1 egg white
  • 3 tablespoons scallions or onion to taste
  • 1/2 tsp salt
  • 1 tsp paprika, sweet
  • 1/4 cup fresh herbs such as parsley
  • 1/2 cup chopped bell pepper pieces, red and green (about 1/4 pepper each)
  • 1 tsp crushed red pepper, (optional, to add some spice)

Directions

  1. Pulse all the ingredients except the peppers in the blender until chopped, but not pasty
  2. Stir in the pepper pieces and using a table spoon, form into 2-3″ patties.
  3. Cook in a hot skillet until cooked through and nicely browned. (Or bake in a 375ºF oven)
  4. Can be made in advance and frozen. When needed just pop in the microwave or defrost and heat in the toaster oven.

Serve as a side with soup or White Bean Stew with Leeks and Thyme

Copyright © 2012 Simple Healthy Homemade. All rights reserved

Warm Winter Salad

image

Now that the holidays are coming to a close, and New Years is staring to wave at us with all its new beginnings and good resolutions. Why not indulge in something reminiscent of comfort food, but without the guilty pleasure price tag? This salad is just right for that. Sustaining enough to not leave you looking through the cookie jars in the break room, but nourishing and light at the same time. It’s a salad for those that don’t like salad. Like my one friend that doesn’t see why anyone would want to eat ‘crunchy water’. This would even work for her, a no greens salad!

image

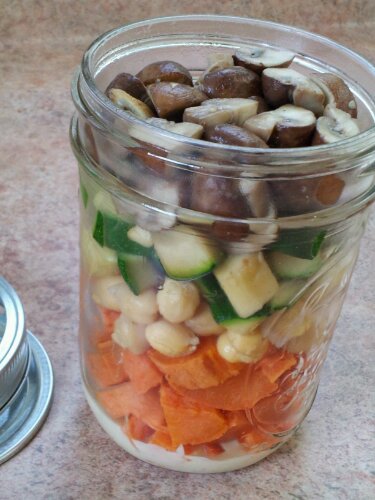
And of course, where would we be with our healthy living resolutions if it were not going to be convenient? So this one packs neatly into a jar, dressing and all. When ready, just shake, remove the lid and heat up ( I like mine warm), or enjoy cold!

imageper serving you will need:

Ingredients

  • 1 small sweet potato
  • 3 tbsp chick peas (cooked or canned)
  • 5 small mushrooms, quartered
  • 1/2 small zucchini, diced into cubes
  • 3-4 tsp roasted garlic dressing
  • 2 cup mason jar

image

Directions

  1. Prick sweet potato with a fork, wrap with 2 paper  towels, drizzle some water on the paper towel for moisture and microwave until soft and cooked through. (Alternately use  some leftover roasted sweet potato, peeled) Once cool enough to handle, peel and cube and set aside to cool completely.
  2. Heat a teaspoon olive oil in a small skillet, add mushrooms to pan and quick sauté for 1 minute. Set aside to cool. Add zucchini to pan, and sauté for another minute, set aside to cool completely.
  3. Layer ingredients into a  2 cup mason jar in the following order:
  • creamy roasted garlic dressing
  • sweet potato
  • chick peas
  • zucchini
  • mushrooms
  • lid

You can assemble this salad completely and store in your fridge for up to 4 days!

image

Copyright © 2012 Simple Healthy Homemade. All rights reserved

Roasted Garlic Dressing

Let’s face it, most of us like creamy dressings to go with our salads, at least every once in a  while. I have lately been hooked on lemongrass-mint white balsamic from Seasons and could eat salad with just that on it. Yep, nothing else, no oil, just that. It’s especially good on baby spinach with pomegranate seeds. But I digress, back to the subject: creamy dressings. The problem with salad dressing and especially the creamy kind is the caloric impact they tend to have. So you decided to have a ‘light’ lunch, a salad, but guess what, that commercial dressing you just poured on made it have more calories and in some cases more fat than a burger. So what to do? Your ticket is flavor, the more flavor your dressing has, the smaller the amount you need, plus making it at home allows you to control exactly what goes in it. For days like today, when it’s snowing and sleeting, when a cold meals just isn’t the answer you need something hearty that can stand up to a warm winter salad. Greek yogurt provides the creamy texture and garlic and Parmesan the flavor. Slow roasting the garlic makes it surprisingly mellow, totally taking any bite out of the taste. This one will keep in the fridge for about a week (it might keep longer, but it never lasts that long in my house), the only thing is the olive oil gets solid in the fridge, so let the dressing come to room temp before using, or heat like in the recipe above.

Makes about 1/2 cup

Ingredients

  • 4 cloves garlic, thinly sliced
  • 1/4 cup extra virgin olive oil
  • 3 tbsp cider vinegar
  • 1 tbsp grated Parmesan
  • 1/4 tsp salt
  • 1 pinch white pepper
  • 3-4 tbsp Greek yogurt
  • (optional) Pancetta crumbles

Directions

  1. Gently heat oil in a small skillet or shallow pan over low (yes, trust me) add the sliced garlic in one layer. Slow roast until starting to turn golden and beginning to caramelize, about 20 minutes, turning pieces over about half way through. Set aside to cool.
  2. In a mini food processor, combine roasted garlic and olive oil from the skillet, salt, pepper and cheese and pulse to blend, then add the Greek yogurt and vinegar and run the machine until well blended and thick.
  3. If desired, stir crumbled roasted Pancetta pieces into the finished dressing (you can cook them in the same skillet you just used for the garlic, no need to add any oil)

Copyright © 2012 Simple Healthy Homemade. All rights reserved

Sweet Potato and Tarragon Gnocchi

image
It’s been cold and rainy again and all I want to eat is soup, stew and gnocchi. So here another New World take on classic potato dumplings. They involve a little sticky work, but are so worth making. The tarragon really takes this former ‘poor people’s food’ from everyday to special occasion.They also freeze great, so make more than you need, freeze right on the sheet then store in zip top bags and cook from there when you’re ready. That way you could A) store them for a busy week night or B) make them ahead as a holiday side dish to serve with your Christmas dinner.

imageThe dough is a bit sticky, so make sure you flour the work surface well

imageready for the freezer!

Ingredients

  • 2 medium sweet potatoes
  • 1 egg
  • about 1 cup flour
  • 1/2 tsp salt
  • 3 sprigs French Tarragon, leaves only, chopped

imageThey will look like little pillows 🙂

Directions

  1. Heat oven to 375, poke sweet potato with a fork and roast on a cookie sheet until soft  hen pricked with a knife, about 25 to 35 minutes, depending on the size of the sweet potato.
  2. Line two baking sheets with parchment paper or silicone mats, set aside.
  3. Set sweet potato aside until cool enough to handle, then peel and squish through a potato ricer into a bowl, let cool 10 more minutes (you want it to be cool to the point where the egg does not cook when you add it).
  4. Stir in the salt, tarragon leaves and the egg, then gently incorporate the flour.
  5. Set dough aside for 15 minutes to allow the flour to absorb some of the moisture.
  6. Then flour your work surface well, and cut off a portion of dough the size of a baseball. Gently roll into a rope, about 1 1/2″ diameter, keeping your hands floured.
  7. Using a knife, cut 1″ sections of dough from the rope and place on a  prepared baking sheet. Repeat until all dough has been used up.
  8. For eating right away:  Bring a pot of salted water to a boil and cook about 8-10 gnocchi at a time until they swim to the surface, skim out using a wire mesh strainer, drain and serve.
  9. For use later: Freeze on baking sheets until gnocchi are firm, then transfer to zip top bags and store in the freezer until ready to use. Then bring a large pot of salted water to a boil and cook 5-6 gnocchi at a time, cooking less gnocchi at a time and making sure the water stays boiling, since the frozen dumplings will bring the water temperature down drastically and if the water isn’t hot enough, you risk having them fall apart.

Ideas for serving them:

  • with freshly grated Romano cheese and a drizzle of olive oil,
  • top with your favorite sauce,
  • bake in the oven topped with a little Parmesan cheese until slightly browned (highly recommend)
  • serve alongside roast chicken or game and don’t forget the side of cranberry or lingonberry jam!

imageCopyright © 2012 Simple Healthy Homemade. All rights reserved

Rosy & Grey Wristlets

[x_section style=”margin: 0px 0px 0px 0px; padding: 20px 0px 45px 0px; “][x_row inner_container=”true” marginless_columns=”false” bg_color=”” style=”margin: 0px auto 0px auto; padding: 0px 0px 0px 0px; “][x_column bg_color=”” type=”1/1″ style=”padding: 0px 0px 0px 0px; “][x_custom_headline level=”h2″ looks_like=”h3″ accent=”true” class=”center-text “]Rosy & Grey Wristlets[/x_custom_headline][x_gap size=”10px”][/x_column][/x_row][x_row inner_container=”true” marginless_columns=”false” bg_color=”” style=”margin: 0px auto 0px auto; padding: 0px 0px 0px 0px; “][x_column bg_color=”” type=”1/3″ style=”padding: 0px 0px 0px 0px; “][x_text]

Rosy & Grey was inspired by a cold November morning, where before the sun comes up fully, the world is rendered in shades of gray and rose. Melancholy and Beauty all wrapped up into one! And just like the fog sometimes can float up and swirl down, the pattern on the finished wristlet is ‘turn-on-its-head-able’, the design stays the same. Choose which way to wear them, having either the gray or the rose colored edge showing, depending on your outfit or your mood. Worked in the round with an easy 2 color pattern, you can knock a set of these out in an afternoon! At only 50 yards per color, you might as well use up some remnants and make several, stash them in your car, purse and office for when the chill hits you!

Great first stranded project!

[/x_text][/x_column][x_column bg_color=”” type=”2/3″ style=”padding: 0px 0px 0px 0px; “][x_text]

Yarn: KnitPicks Wool of the Andes Worsted Yarn (100% Peruvian Highland Wool, Worsted Weight, 110 yards/50 gram ball) 1 skein color A (Cobblestone or dark grey) and 1 skein color B (Pink Posy Heather or rose heather) or about 50 yards each of 2 contrasting colors of worsted wight yarn

Needles: US Size 8 (5mm) set of double point needles, or size to obtain gauge

Gauge: 18 st = 4” on US #8 (5mm) needles in color pattern

Finished Sizes: sized in xs/sm to fit 6” wrist circumference (actual body measurement) and md/lg to fit 7” wrist circumference; 7.5” long for both sizes

[/x_text][x_line][x_text]

All patterns have been professionally edited and tested.

Available for immediate download on Ravelry for $5:

[/x_text][/x_column][/x_row][/x_section]

Avocado, Sweet Potato & Corn Salad

image

What’s better than a healthy meal? A healthy meal that’s easy to make, tasty AND portable. Here’s another installment in our ‘lunch salads to go’ series. Assembled in a mason jar, layered so the dressing stays on the bottom until needed. Substantial enough to hold you over until dinner time, and when you mix the avocado with the citrus dressing first, the salad can be prepared ahead and will keep for 3 days in your fridge without turning brown.

Makes 1 two-cup jar

image

Ingredients

  • 1 tsp minced shallot
  • 1/2 avocado, cubed
  • 1/3 cup sweet potato, cooked, cooled, peeled and cubed
  • 1/4 cup sweet corn (from a ‘no salt added’ can)
  • 2-3 radishes, sliced thinly
  • 4 slices red, hot chili pepper (optional), diced
  • 3-4 tbsp Citrus dressing

Directions

  1. Toss shallots and avocado with the citrus dressing, then layer into the glass jar, followed by sweet potato, the corn, the hot pepper (if using) and finish with the sliced radish.
  2. Store in the fridge until ready to use, then shake the jar until the dressing mixes throughout, use a fork, eat right out of the jar, or invert onto a plate.
  3. Enjoy.

image

Copyright © 2012 Simple Healthy Homemade. All rights reserved
Citrus Salad Dressing

wpid-2012-12-09-15.57.50.jpg

Ingredients

  • 1/2 lime, juice only
  • 2 tbsp olive oil
  • 1 tsp Dijon mustard
  • 1 tsp honey
  • 1 pinch to 1/4 tsp salt

Directions

  1. Stir honey and salt into lime juice until dissolved
  2. Stir in mustard, then add he olive oil and stir until well blended

Use on salads, particularly anything with avocado, to keep them from turning brown

Copyright © 2012 Simple Healthy Homemade. All rights reserved

Spitzbuebe (little Rascals or Linzer Cookies)

image

Spitzbuebe – ‘Littel Rascals’ – Swiss Christmas Cookies

Spitzbuebe translates literally to mischievous boys, but I have seen similar cookies called Linzer cookies here in the US.

image

This is how I make the and the way my recipe adapted over time. You would do well to not work in a warm kitchen and maybe this is not the cut-out you want to make after a long and stressful day, or have your little ones help you with for that matter. My mom would almost always make them after we went off to bed. Now I know why. The dough can go from crumbly to sticky and crumbly (can you believe it) in a matter of minutes and depending on the way the dough came together that particular day, can make you walk the edge towards insanity unless you maybe make them right after a yoga class. With the changes I made to the recipe (like using a whole egg, for example) the chances of that happening have drastically decreased. Although this time a year Yoga classes might be a good idea no matter what. Nothing like the clear head after a good and sweaty class!

Oh and by the way, these are pure indulgence, not really a host of health claims attached. But they are worth every single calorie!

image

Ingredients

  • 2 sticks butter, softened
  • 1/2 cup plus 2 tbsp sugar
  • 1 egg
  • 2 and 3/4 cups flour (350g)
  • 2 tsp vanilla sugar (if you use essence, use the clear version, the dark one can give the delicate dough a strange color)
  • 2-3 tbsp currant jelly
  • confectioners sugar for dusting

Directions

  1. Stir butter until soft, then add sugar and stir until little bubbles show on the bottom of the bowl (see picture)
  2. Add the egg, mixing well.
  3. Add the vanilla sugar and the flour, stir until just combined, knead together quickly, form into a ball, cover the bowl and chill for a minimum if 4 hours
  4. When ready, take the dough out of the fridge and let warm up a bit (15-20 minutes, if you kitchen is cool) cut of half of the dough, keeping the rest chilled, and roll out to a thickness of about 1/16″ (do 1/8″ then roll just a bit more)
  5. Preheat your oven to 400ºF and line several cookie sheets with parchememnt paper or silicon mats (My cutter is a little over 2″ in diameter and I made a good 3 sheets full. Remember, you’ll end up with half as many cookies as what you bake)
  6. Cut out round shapes, making sure you have one for the bottom and one for the top. From all the top pieces, cut out a small shape such as a heart, star, flower or round. If you have special cookie cutters, the tops might be done in one step. Just make sure you have an equal number of tops and bottoms
  7. Bake for 8-10 minutes in the middle of the preheated oven, until just starting to turn a little golden. Cool on the sheet for a few minutes then transfer to wire racks.
  8. Once cooled, separate tops and bottoms. Place the wire rack with the tops over a sheet of parchment paper and using a small strainer sprinkle the tops with confectioner sugar until completely white.
  9. Heat the currant jelly in a small bowl until liquid. Fifteen seconds in the microwave works great. Using a pastry brush, brush the a bottom piece with some jelly, then gently place a finished top on it and set aside. Continue until no more cookie halves remain.
  10. Try to refrain from eating all of them before you showed them off to at least a few friends.

For more classic Swiss Christmas Cookies check here

image

Copyright © 2012 Simple Healthy Homemade. All rights reserved